The DATEVALUE function serves a simple purpose. It converts a date written as a text string into a serial number that Excel can recognize. While it looks (and indeed is) pretty straightforward, the DATEVALUE function provides powerful ammunition for converting dates, which consequently enables us to manipulate them with formulas and pivot tables.
This is especially helpful when you are importing data from external sources because it is quite likely that Excel will convert date entries into text strings upon importing. To remedy this, we will use the Excel DATEVALUE function and convert the text strings into Excel-recognized serial numbers representing dates.

Syntax
The syntax of the DATEVALUE function is as follows:
=DATEVALUE("date_text")Arguments:
date_text – This is the only argument required. The supplied value should be a text string containing a valid date.
Before we dive deeper, let’s address a fundamental concept that forms the basis of the DATEVALUE function.
How does Excel store dates internally?
Since dates can be written in several formats, there has to be some sort of standardization that is understandable across worksheets. If you try to manipulate two dates in a worksheet, one with a DD/MM/YYYY format and another with MM/DD/YYYY format – will it still work? Yes! Because Excel stores these dates as a serial number.
This is precisely where the DATEVALUE function enters the scene. If you have dates enlisted in a column as text strings (not dates as far as Excel can tell), you will need the DATEVALUE function to convert those into serial numbers, so Excel knows that these are dates and not just text strings.
Important characteristics of the DATEVALUE function
- The
date_textargument must always be enclosed in quotes unless supplied as a cell reference. - If the referenced cell does not contain a date that is formatted as a text string, the formula will return a #VALUE! error.
- If you do not use a 4 digit number for a year in a date, Excel will make the following assumption:
- Entered number lies between 0 and 29: Excel will assume the year as 2000 to 2029.
- Entered number lies between 30 and 99: Excel will assume the year as 1930 to 1999.
- If you do not enter a year altogether, Excel will default to the current year as reflected in your computer’s time and date setup.
Examples of the DATEVALUE function
Now let's have a look at some of the examples of the DATEVALUE function in Excel.
Example 1 – The plain-vanilla DATEVALUE formula
Let’s start by looking at the DATEVALUE formula in its simplest form. We have a list of dates written as a text string, and we need that converted into serial numbers that Excel can appropriately interpret as dates. To accomplish this, we will use the following formula:
=DATEVALUE(A2)
Note that we could have just as well used a text string like “05-20-2005” instead of referencing the cell and achieved the same result.
In our example, we first use the formula to fetch the serial number of the dates. Once we have the serial numbers, all we need to do is change the cell format to “Short Date” or “Long Date” depending on your preference. You can select the format from the drop-down menu in the “Number” group under the “Home” tab in Excel.
Example 2 – DATEVALUE function with Imported Data
Let’s say you pulled the data set off a website, and you now have that data in a PDF or CSV format.
You import the data set into Excel, and it gives you a separate column for each component of a date (month, day, and year).
What you want is a date that Excel recognizes so that you can plug that in or reference it anywhere on your worksheet.
To deal with this, we will use the following formula:
=DATEVALUE(CONCAT(A2, "/",B2, "/", C2))
In the above formula, we have used the CONCAT function to combine the different parts of the date and then passed the result to the DATEVALUE function. It’s that simple!
Example 3 – DATEVALUE function combined with TIMEVALUE function
Scroll back up to our first example and look at the image. Do you see how the last row includes time, but the formula ignores it and returns just the date?
Well, what if time was a critical component of my data? What if I also want to include time in my return?
To do this, we have to use the TIMEVALUE function along with the DATEVALUE function. DATEVALUE function only fetches the date part from the input string even though the input string has the date as well as time. On the other hand, the TIMEVALUE function takes only the time part from the supplied DateTime.
We can combine both these functions as:
=DATEVALUE(A2)+TIMEVALUE(A2)
In the first part of the formula, we are extracting the date from the text string, with the help of DATEVALUE function. Using the same logic, in the second part of the formula, we are fetching the time from the text string.
By adding both these parts we are left with a decimal number, where the part before decimal represents the DATE in numeric format and the part after decimal represents the TIME in numeric format.
Be sure to format the output cells appropriately, so they show the date as well as the time.
Recommended Reading: Remove Time From Date In Excel
Not sure how to format cells for the DATEVALUE function?
Take a deep breath, we have you covered.
We know that Excel stores a date as a serial number, and for the same reason, the DATEVALUE function will always return a serial number.
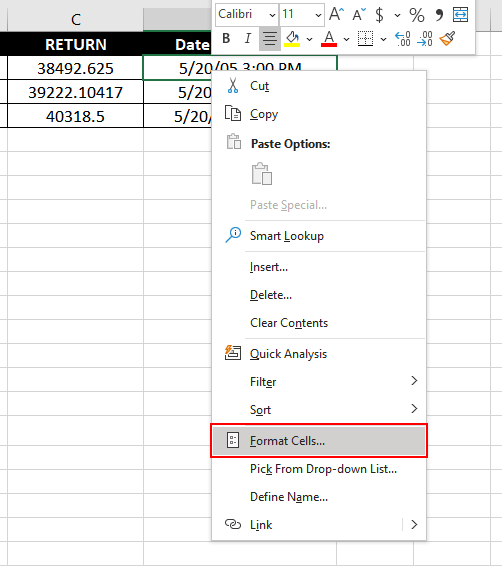
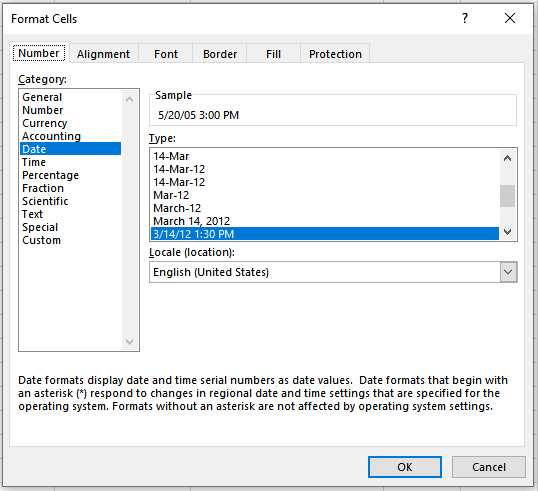
To display it as a date, we must format that cell to show our preferred date format. When you have a serial number in a cell, right-click on the cell and choose “Format Cells”.

That should open up the following dialog box:

That is pretty much it. All you have to do now is choose your preferred format. If you want to display the time, be sure to choose a format that includes the time component.
That wraps up our discussion on the DATEVALUE function. I hope the next time you see an overwhelmingly long list of dates imported as text, you will know how to use the DATEVALUE function to deal with it. When you finish practicing, come back here, and we will talk about a new Excel function.


