The LOWER function in Excel is a text function that converts all other cases to lowercase. The return value of the LOWER function is always a text value. As Excel does not contain an inbuilt 'Change Case' option like Microsoft Word, the LOWER function comes in handy to refine the data as per our needs.

Syntax
The syntax of the LOWER function is as follows.
=LOWER(text)Arguments:
'text' – This is a mandatory argument of the LOWER function. It is the input text that we wish to convert to lowercase. The value of the text argument can be direct text or string that needs to be converted or a cell reference containing the value.
Important Characteristics of the LOWER Function
Some noteworthy characteristics of the LOWER function are as follows:
- If there is an issue with the function name or the arguments, Excel returns a #NAME error.
- If the value of the text argument contains numbers, punctuations, spaces, or special characters, the LOWER function does not alter them and simply changes the case of the letters.
- If the value of the text argument is numerical, the LOWER function changes it to text format and removes all the number formatting.
Examples
Microsoft Word contains a 'Change Case' feature, while Excel does not have an in-built feature for changing cases. But by using the LOWER function, we can quickly convert our data to lowercase. Let's look at a few examples to better understand all the applications and usage of the LOWER function.
Example 1 – Simple Use of LOWER Function
Here we have taken different kinds of data to use with the LOWER function to understand the basic functionality comprehensively. We will see how the LOWER function behaves with text, string, a combination of numbers, alphabets, and accented letters.
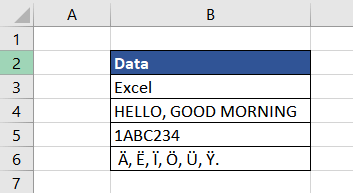
The formula used will be as follows.
=LOWER(B3)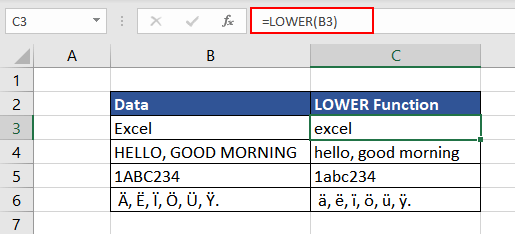
As observed, the LOWER function converts all the other cases to lowercase by making every uppercase letter a lowercase one. The function converts the proper case to lowercase in the first example, while in the second example, it transforms uppercase sentences to lowercase. The LOWER function also works with accented characters, as seen in the last example.
Now that we understand the straightforward application of the LOWER function, let's check more examples to understand other applications.
Example 2 – Converting Date in Lower Case
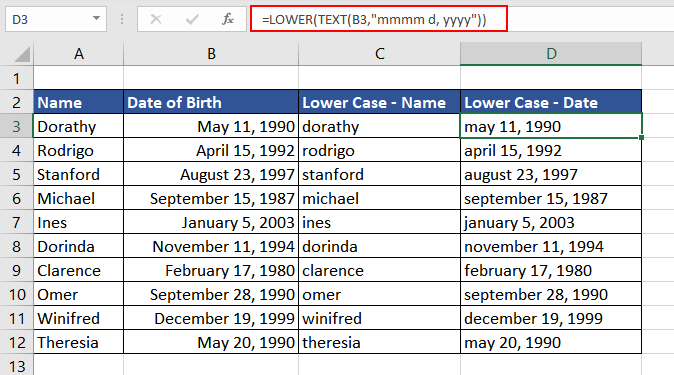
Here, we have a database of names along with the date of birth. For the sake of data entry, we have to convert the entire dataset into lowercase. The names in text format can be easily altered, while the date loses its format.
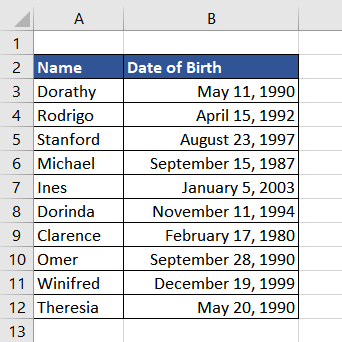
The formula used will be as follows for both columns A and B.
=LOWER(A3)
=LOWER(B3)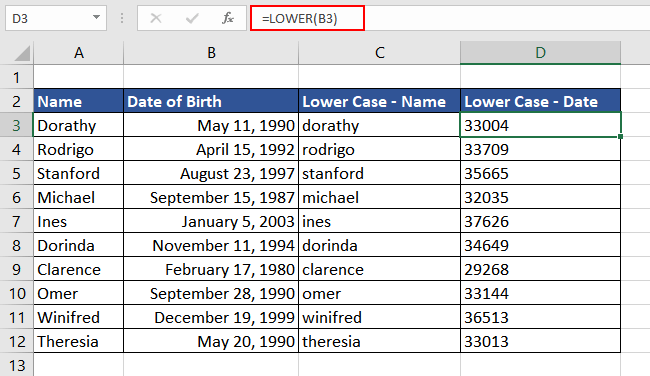
As observed, column C contains the correct data, which is the lowercase format of the names, while data in column D lost its format. We can convert the dates into lowercase using the LOWER and TEXT functions. The formulas used for names will remain the same, while the formula used for converting the dates will be as follows.
=LOWER(TEXT(B3,"mmmm d, yyyy"))The TEXT function first converts the date from column B in the mentioned text format (mmmm d, yyyy). Then the return value is passed in the LOWER function to convert to lowercase.
Now we can use the lowercase data for further data processing.
Example 3 – Creating Email IDs using the LOWER Function
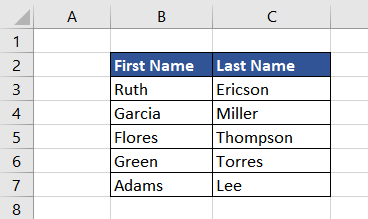
We have a few newcomers in our company, and we wish to create email addresses for all of them. Doing it manually is tiresome, so we will automate the process for all future newcomers as well. Here we have a database of their first and last names.
The company standard for email IDs is 'first name.last [email protected]', and everything must be in lowercase. To combine all the different parts of the email address, we will use the ampersand (&) symbol. We will then wrap it in the LOWER function so that the final result is in lowercase. The formula used will be as follows.
=LOWER(B3&"."&C3&"@companyname.com")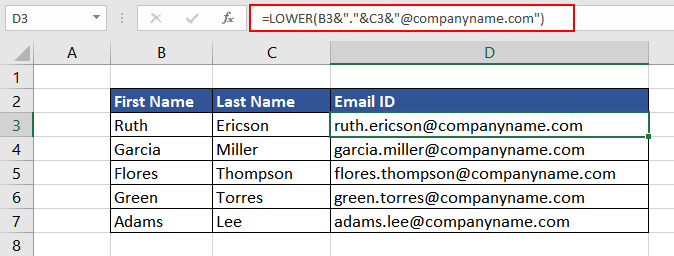
Example 4 – Checking if the Value is in Lowercase
In this instance, we received a dataset containing the employees' names and email IDs. We now wish to check if all the data is in lowercase.
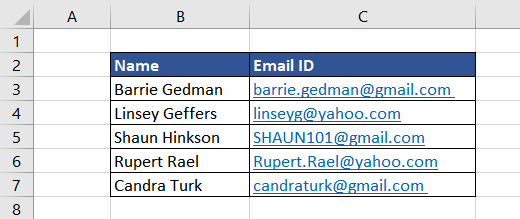
To check if the email IDs in column C are in lowercase or not, we will first convert them into lowercase using the LOWER function. The formula used will be as follows.
=LOWER(C3)We will then do a case-sensitive comparison of the return value of the LOWER function with the actual value in column C using the EXACT function. The formula used will be as follows.
=EXACT(C3,LOWER(C3))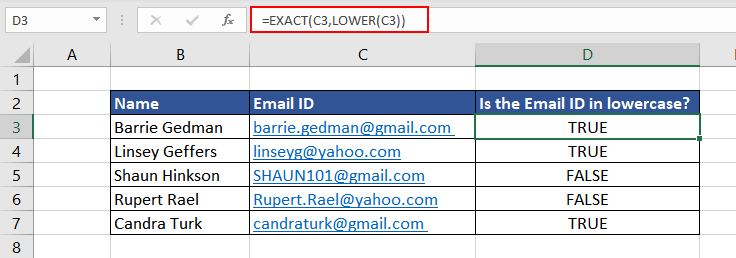
The EXACT function checks if the result of the LOWER function and the IDs in column C are exactly the same, returning TRUE for exact matches and FALSE otherwise.
Example 5 – Only Accepting Lowercase Text
There are instances when we wish to collect data from users in Excel. In these cases, the collected data is often in different cases and needs polishing later. But if we use the LOWER function with the Data Validation feature of Excel, we can force the users to enter the data only in lowercase.
In this example, we ask all guests to leave their email IDs for further communication. To use the LOWER function with the Data Validation option in Excel, simply select the cell where the data entry will be done.
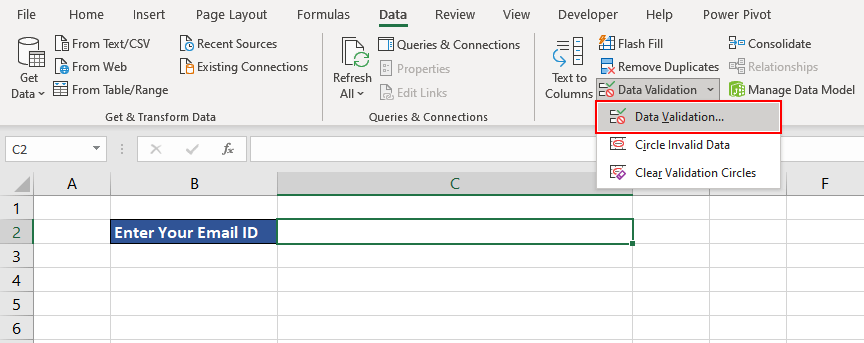
Then under the Data tab, Select the Data Validation option.
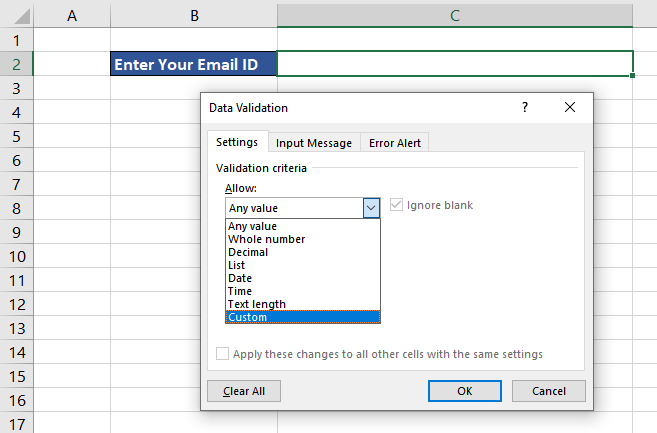
A dialog box opens with the following options. Under the Settings tab, choose Custom.
Then enter the custom LOWER function formula in the Formula field. The formula used will be as follows.
=AND(EXACT(C2,LOWER(C2)),ISTEXT(C2))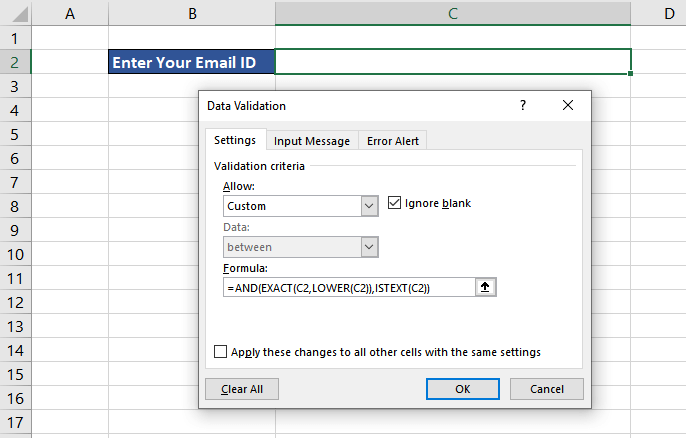
Press OK.
This is how we use the LOWER function and Data Validation. Now let's try check if it accepts anything except lowercase data. The following error displays when we enter a dummy email ID in uppercase letters.
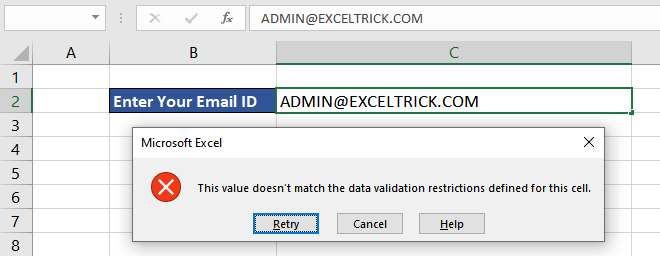
Moving forward, let's understand the formula used.
=AND(EXACT(C2,LOWER(C2)),ISTEXT(C2))The Data Validation rules get activated as soon as the user enters any details in the cell. First the LOWER function converts the value of the cell into lowercase. The EXACT function then compares the input value (the email ID) with the return value of the LOWER function. The formula so far will be as follows.
=EXACT(C2,LOWER(C2)Additionally, using the ISTEXT function, we can check whether the input value is a text or not. Combining both logical functions, we will wrap it in an AND function. The AND function returns TRUE only if both the conditions are true, else it returns FALSE which then triggers an error message signifying that the value fails the Data Validation.
Now, at the end of the event, you will have a data set containing all the email IDs in lowercase.
LOWER vs UPPER vs PROPER Functions
There are different text functions in Excel to change the formatting or case of the text, such as LOWER, UPPER, and PROPER functions. We have exhaustively understood the applications and usability of the LOWER function.
In contrast, the UPPER function in Excel transforms all the input values to uppercase, while the PROPER function changes the text to the proper case. The proper case text means the first letter of each word is in uppercase while the remaining text is in lowercase. Let's try these functions on the same text input.
We have taken the input value as "life is Beautiful !!!". Now using all three functions, the formulas used will be as follows:
=LOWER(C2)
=UPPER(C2)
=PROPER(C2)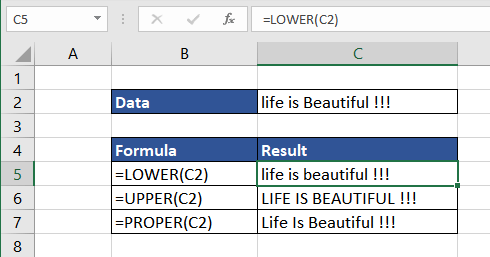
As we can see, each function transforms the input text as per the intended case.
Hopefully, you have come to understand all aspects of the LOWER function. Try using the function on your own to discover applications that are useful for you. Till then, we will curate another interesting Excel function for you.

