The PROPER function alters the text into proper case by converting the first letter of each word in a string to uppercase. The first letter is changed to uppercase, and every letter followed by a space, special character, or any character other than a letter is transformed into uppercase.
PROPER function in Excel is a text function; therefore, the return value of the function is always in text format.

Syntax
The syntax of the PROPER function is straightforward, containing only one argument. The syntax is as follows:
=PROPER(text)Arguments:
As the PROPER function accepts only one argument, it is mandatory.
'text' – This is the input value we wish to alter to proper case. The input value of the text argument can be a formula that returns text, a direct value in double quotes, or a cell reference containing the input value.
Important Characteristics of the PROPER Function
As the PROPER function is a text function, one of the primary characteristics is that it converts all the input values to text format. Other noteworthy features of the PROPER function are as follows:
- If the value of the text argument contains data with Number Formatting, the PROPER function removes the formatting in the return value.
- When the value of the text argument contains numbers, punctuations, spaces, or special characters, the PROPER function leaves them unaffected while changing the string to proper case.
- If the name of the function or the argument is incorrect, Excel returns a #NAME error.
- If the text argument is a null character or an empty string, the return value will also be a null character.
Examples of PROPER Function
Excel does not have an inbuilt functionality of Change Case like Microsoft Word, so we use the PROPER function to capitalize the first letter of each word in a string. Let's explore the several applications of the function using the examples given below.
Example 1 – Simple Functionality of PROPER Function
Here we have taken some sample data to better understand the elementary functionality of the PROPER function. The data includes a name, home address, office address, car type, and email address.
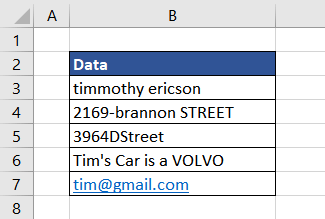
The formula used will be as follows:
=PROPER(B3)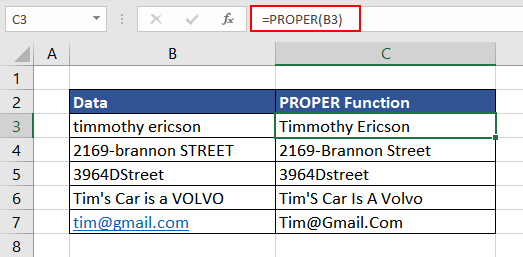
As we can see, in the first instance, the name is in lowercase, and the PROPER function alters the case type to proper case by converting the first letter of each word into uppercase. In the following example, the numbers remain unaffected, and the word followed by a dash (-) is also considered a separate word; therefore, the first letter is changed to uppercase.
In the third case, the word's first letter, followed by numbers, is capitalized. So, a common observation is that any word or letter followed by a space or special character is automatically assumed to be a new word. Therefore, when the PROPER function is applied, the first letter of that word is capitalized.
The same is the case in the last two examples where 'Tim's' is altered to 'Tim'S', and in the email ID, the first letter of each word followed by an at sign (@) and dot (.) is converted into uppercase.
Hopefully, now you have a better grasp of how the PROPER function works in Excel. We will now move on to different examples to explore various applications of the function.
Example 2 – Joining Text using PROPER Function
In this example, we have downloaded the addresses of our employees to mail them the holiday hampers. Upon downloading, we realize that the case type is inconsistent, which doesn't look very presentable.
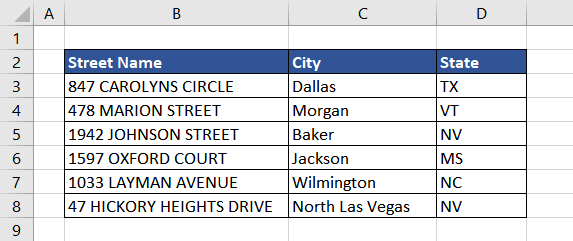
Usually, the address is written in proper case. As the state names are written as acronyms, they can be written in uppercase. So, when we compile the complete address, we can restyle the street name in proper case using the PROPER function while adding the city name and state as it is.
We can join the data in columns B, C, and D using the TEXTJOIN function. Alternatively, we can also use an ampersand symbol (&) or CONCAT function. In this case, we use a combination of TEXTJOIN and PROPER functions. The formula used will be as follows:
=TEXTJOIN(", ",TRUE,PROPER(B3),C3,D3)
We combined all the parts of the address using a comma and a space (", ") while ignoring the empty cells (represented by TRUE in the formula). The street names in column B are converted in proper case, and then the remaining data is joined in the original form.
Excel functions like the PROPER function are very useful when we wish to alter a section of data. We finally have the complete address in proper case type that we can forward to the mailing company.
Example 3 – Checking if Data is in Proper Case
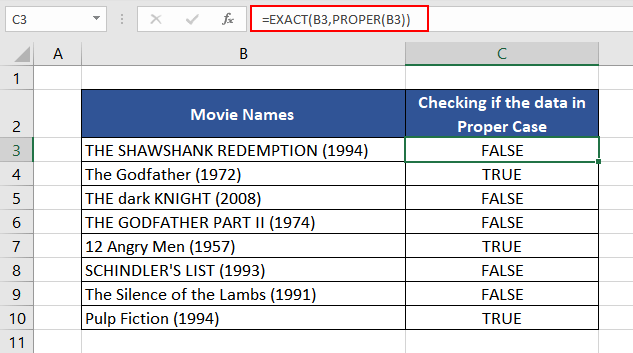
After conducting an online survey, we have a list of the top movies of all time. Before sharing the list with everyone, we would like to quickly check if all the movie names are in proper case and if not, we wish to convert them into proper case. That way, the final list will look more presentable and neater.
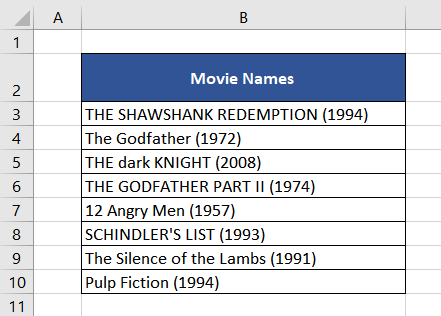
To do a quick check, we will use the EXACT function along with the PROPER function. The formula used will be as follows:
=EXACT(B3,PROPER(B3))In this formula, we will first convert the movie name in proper case using the PROPER function and then execute a case-sensitive comparison with the original value in column B using the EXACT function. If it matches the formula, it returns TRUE, else it returns FALSE.
As a few movie names are not in proper case type, we will use a basic IF function. The logic used will be as follows:
If the text in column B is in the proper case, then return the text as it otherwise, transform the text to proper case and return it.
The formula used will be as follows:
=IF(EXACT(B3,PROPER(B3)),B3,PROPER(B3))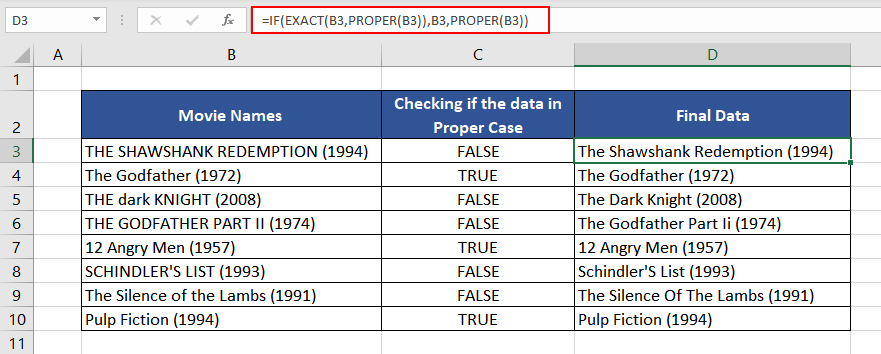
Now that we have the final movie names in column D in proper case, they can be used and shared further.
Note: We could have achieved the same results by simply using the PROPER function as:
=PROPER(B3)The use of IF and EXACT functions above was only for educational purposes.
Example 4 – Using Data Validation with Proper Case
There are instances when we curate our database using information entered directly by the users. In those cases, the data collected is often in different case types. For example, here we are collecting the names and professions of all the guests who attended the event.
Using the PROPER function with the Data Validation option in Excel, we can compel the users to enter the information in proper case. We can apply this functionality, by following the below-mentioned steps.
Begin with selecting the cells where the Data Validation will be applied. Then, under the Data tab, choose the Data Validation option from Data Tools.
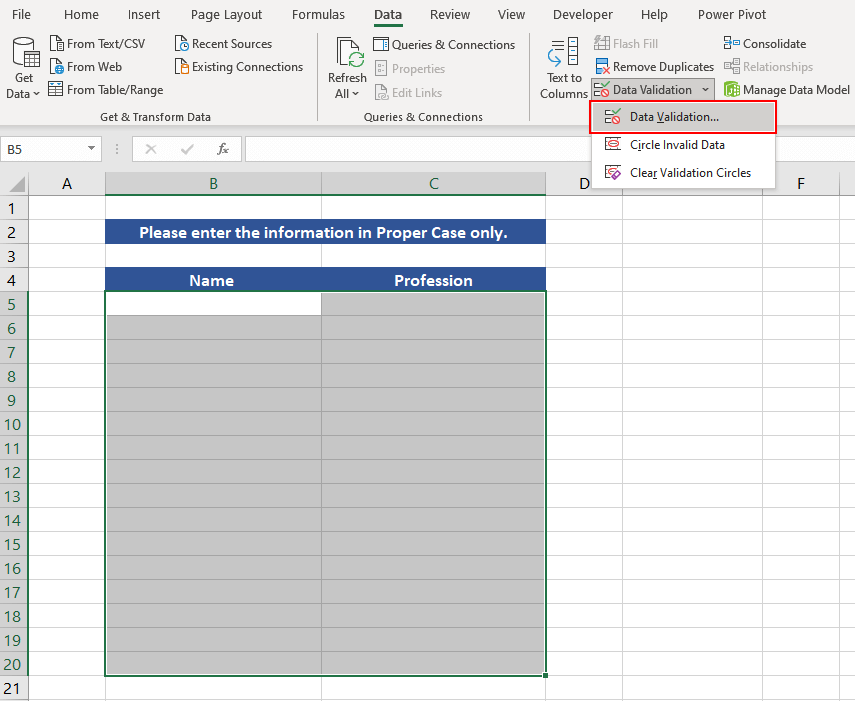
After selecting the Data validation option, under the Validation criteria, choose Custom from the dialogue box.
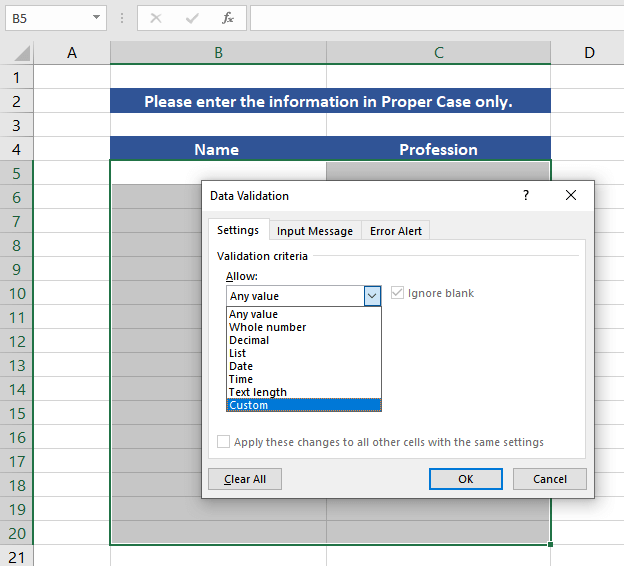
The next step is to enter the PROPER function formula in the Formula field and press OK. The formula used will be as follows:
=AND(EXACT(B5,PROPER(B5)),ISTEXT(B5))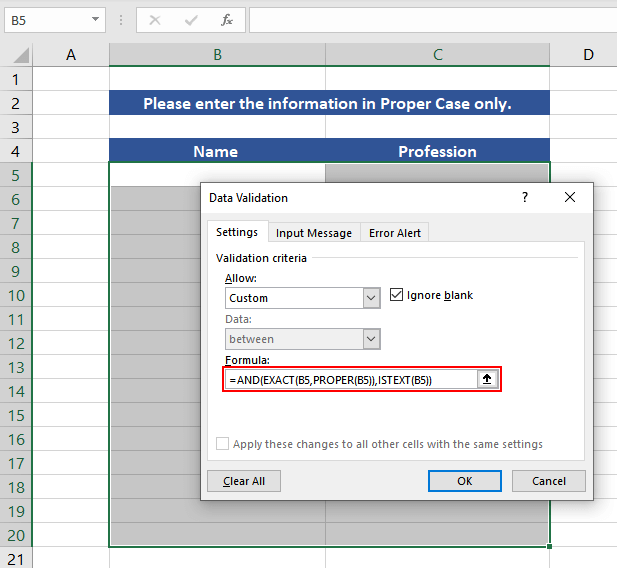
After we press OK, the Data Validation gets activated as soon as the user enters the data in the given cell. Let's understand the PROPER function formula entered for the Data Validation.
The PROPER function converts the input text into a proper case. The EXACT function then compares the original input value with the return value of the PROPER function. It is important to note that the EXACT function does a case-sensitive comparison.
The ISTEXT function is an additional check if the data entered is in text format. We then wrap both functions in the AND function. If both functions' return value is TRUE, the Data Validation accepts the input value. If even one function returns FALSE, it returns an error message in the form of a dialog box.
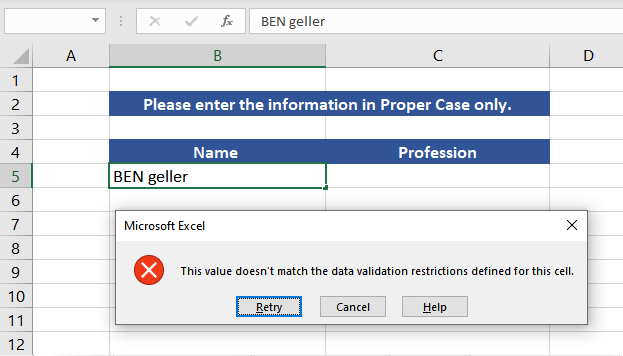
Finally, all the data that will be collected will be in proper case only.
LOWER vs UPPER vs PROPER Functions
Like the PROPER function refines the data by converting it into proper case, the LOWER and UPPER functions change the data into lowercase and uppercase, respectively. These text functions are extremely handy when dealing with data that requires consistent formatting.
To better understand the distinction between all the functions, here we have taken a sample text in cell C2. We will now use all three functions on the same input value, and the formula used is as follows:
=PROPER(C2)
=LOWER(C2)
=UPPER(C2)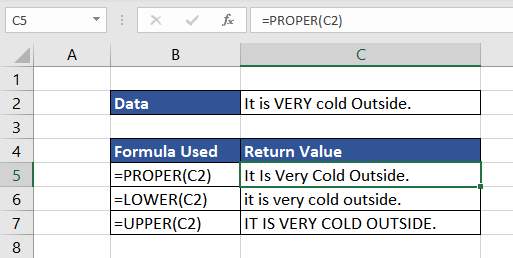
As we can see, all three functions return values as expected. The PROPER function changed the first letter of every word into capital letters, while the LOWER function altered the complete value into lowercase. The UPPER function modified the complete input value to uppercase.
We hope that all the aspects and functionality of the PROPER function are now understood. Practice on your own and discover new ways to use the PROPER function. Till then, we will knock together another interesting Excel function for you.


