Hi reader, here it is again; Excel shorty logging in. Do you know how to add years to a date in Excel? No? Keep reading. We are back with a quick lesson on 3 quick methods to add years to dates. The three methods we will use to add years are: easy, peasy, and lemon squeezy.
In Excel terms, We mean that the 3 methods are usage of the EDATE function, the YEAR and DATE functions, and a simple custom formula.
For calculations and data analysis, you may need to add years to a date to arrive at a later or future date or deduct years to arrive at an earlier date. We can show you how to do that with the help of our assistant.

Example
Our humble assistant today is the represented example case. We have a selection of longstanding successful brands in column B and, let's say, would like to analyze their revenue after 10 years of company founding. For that, first, we need to add 10 years to each of their founding dates in column C:
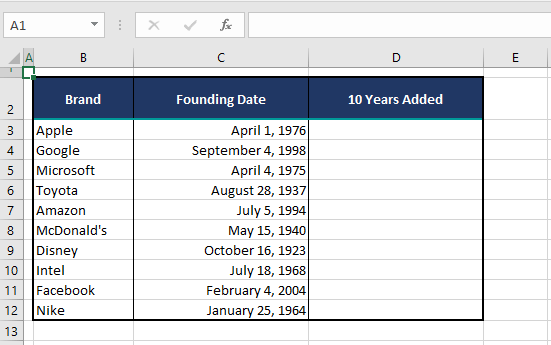
We see you're accusing us of incomplete homework but that's what we're here to remedy today. We will show you how to fill column D by adding 10 years to each of the founding dates using various formulas. Before we rush to the hows, jot down a few notes:
Notes:
If you start right away, using any formula to fill column D, for the first instance, you will get "31503". Just so you don't think your meticulously typed formula hasn't worked, we advise changing the format of the column beforehand because the default format of the cells is the General format and dates require a date format if you don't want the result as a serial number. What would be even better is if you select both columns C and D and set the same format for both so that the dates in both columns are far more easily comparable. To change the format, you can use the Number Format bar in the Home tab or select one of many date format options from the Format Cells dialog box, accessed by pressing the Ctrl + 1 keys.
Question: Why would we get "31503" in General format instead of a date?
Answer: Excel stores dates as serial numbers (1 being January 1, 1900), and dates would appear so, resultant of formulas, unless the format of the cells is changed to a date format.
Similar to adding, years can be subtracted from a date by a simple minus sign tweak in the formulas.
In our demonstrations below, we have added a flat value of 10 in each formula since we want to add 10 years to every date. If you have a column with different numbers of years to add to the dates, you'll need to replace the number 10 in the formulas with the reference of the cell with the number of years. We'll show you a small example below.
Let's get adding!
Method #1 – Using EDATE Function
Let's check out our first method which is using the EDATE function for adding years to a date in Excel. The EDATE function adds or deducts the supplied number of months from a date and returns it as a serial number.
Whatever you will do with a serial number when you want a date? Well, that serial number is the date, as we have just explained above. With some numerical confusion cleared, we can move onto the formula that involves the EDATE function to add years to a date. Here it is:
=EDATE(C3,(10*12))With the dates listed in column C, the EDATE function takes C3 as its working date. The next argument is the number of months that will be added to the date. Here we have entered 10*12 to add years instead of months. This adds 10 years to April 1, 1976 and returns April 1, 1986.
Make sure you have the format of the target column changed into a date format as per your preference. Now let's apply the formula to the rest of the dates:
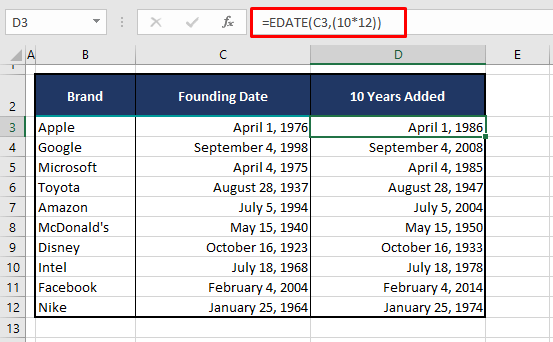
Note: Without multiplying the number with 12 in the formula, it will add months to the date.
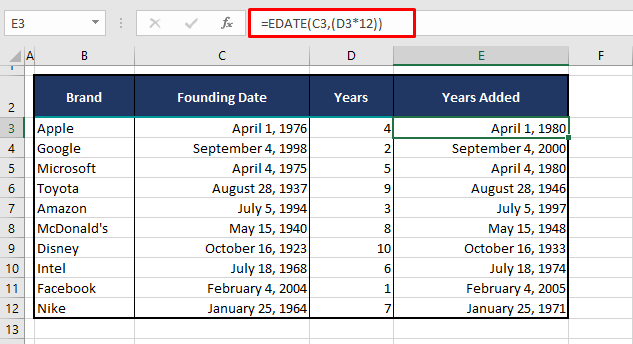
We promised you a small example of adding a different number of years to the dates. Here it is; see the example below and the formula just ahead:
=EDATE(C3,(D3*12))The only difference from the previous formula is that the number 10 has been swapped with the reference of the cell containing the number of years to be added i.e. D3. In this way, the number of years in column D will be added to the dates in column C:
Method #2 – Using YEAR & DATE Functions
The YEAR function can be nested in the DATE function to add years to a date. The YEAR function returns the year of a given date between 1900 and 9999. The DATE function takes an argument each for the year, month and day and returns the collated date as the relevant serial number.
The YEAR function is not the only function that will be used with the DATE function to coin this formula. The MONTH and DAY functions will be used like the YEAR function to return a complete date. We'll show you how it's done using the following formula that enlists the YEAR and DATE function to add years to a date:
=DATE(YEAR(C3)+10,MONTH(C3),DAY(C3))The YEAR, MONTH, and DAY functions take the year, month, and day respectively from the date in C3, as required by the DATE function to return a date. The only difference is that the number 10 has been added to the YEAR function to add 10 years to the date in C3. The addition successfully adds the mentioned years to all the dates in our example:
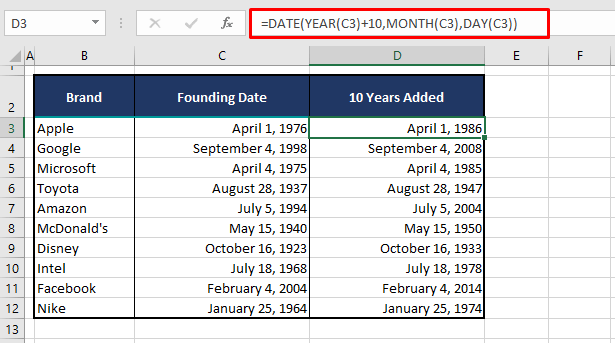
Note: Similarly, numbers can be added to the MONTH and DAY arguments of this formula to add the supplied number of months or days to the date.
Method #3 – Using Custom Formula
If you want to strip the formula down, excluding any functions, it is possible to add years to a date in Excel using simple arithmetic. See the formula below and then let's show you the small problem with it:
=C3+(10*365)A year of 365 days has been multiplied by 10 since we want to add 10 years, and added to the date in C3. Have you figured out the loophole here? See the results of this formula below for our example case:
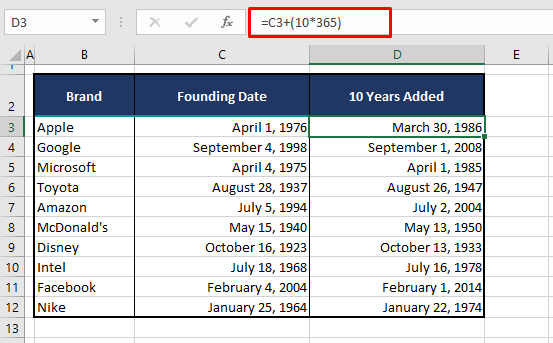
The days in the new dates differ from the original dates. Why? The years are added in the formula assuming each year is a 365-day year. That is obviously impractical as it does not account for leap years. This method is will, however, be better applicable for adding a fixed number of days to a date.
That was our little lesson on how to add years to a date in Excel using 3 easy formulas. You see how effortless and quick that was? We have more handpicked, ripe, and ready, simple techniques for your Excel life but we'll need a teensy bit of time to prep it for you. Excel shorty logging out!


