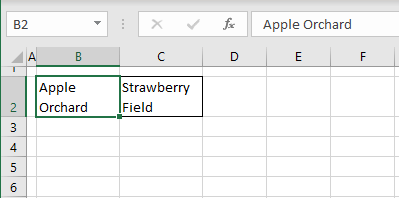
Auto and fit; it doesn’t leave much to the imagination. AutoFit in Excel is a very quickly applicable feature that fits the text of a cell according to the measurement of the row or column (depending on which one is chosen) the text is in. This is very useful since the worksheet has preset column width and row height and the text entered in the cells may not be displaying completely. Why is that?
There could be several reasons and here are a few of them to give you an idea. The height or width may have been preset which is why the added text won’t make the cell expand accordingly. The subsequent cells are non-blank cells and the contents of the cell are hiding behind them. The height or row has been manually adjusted according to other rows and columns, hiding the text. Owing to one of these menaces, you may need to resort to AutoFit which we promise you, isn’t daunting at all.
This tutorial will teach you how to AutoFit single and multiple rows and columns using the mouse, keyboard, and Excel ribbon. Read to the end for a nifty tip on copy-pasting column width and for finding out what to do when AutoFit doesn’t work. Let’s get fitting!

How to AutoFit In Excel Using Mouse Double Click
The double click method of AutoFitting really only takes….. two clicks but where the clicks are made, is the point. Let’s find out how to AutoFit single or multiple rows and columns.
AutoFit Single Row
To AutoFit a single row, hover the cursor on the border of the particular row header, making a black double-pointed arrow appear.
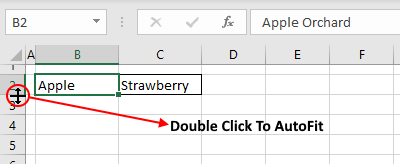 Double click now and the row will AutoFit; expanding in height to fit the text in the cells accordingly.
Note that the extent to which the row height expands depends on the cell in that row containing the largest text string.
AutoFit Single Column
To AutoFit a single column, hover the cursor to the right of the column header.
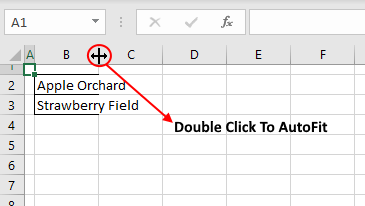
When the double-pointed black arrow appears, double-click the header’s border to AutoFit the column. The column width will expand, fitting according to the longest text string in a cell contained in the column.
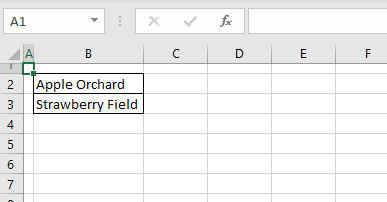
The column width adjusts for the text without it having to hide behind the text of the next cell or spill over onto an empty cell.
AutoFit Multiple Rows and Columns
Select all the rows or columns and double-click the double-pointed arrow over any of the header borders between the selection to AutoFit. The height of the rows or the width of the columns will expand according to the cell containing the most text.
AutoFit Multiple Rows
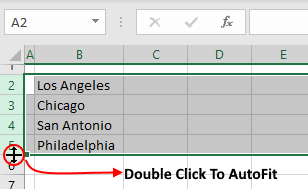
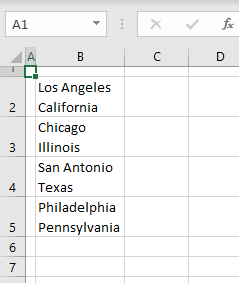
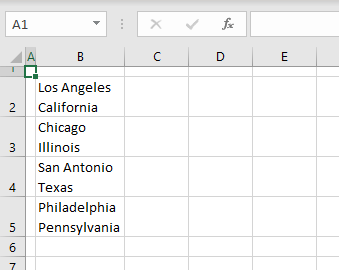
Below we have rows that need height adjustment to display the complete text which is in the format ‘City Alt + Enter State’. To Autofit we simply have to select all the relevant rows and double-click the double-pointed arrow over any of the header borders between the selection.
AutoFitting the row heights displays the full text.
Before:
After:
AutoFit Multiple Columns
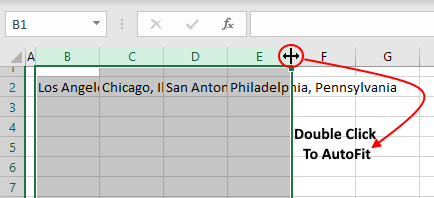
This time we need the column widths to be adjusted for showing our next string which is ‘City, State’. That is instantly achievable with AutoFitting the width of multiple columns. To Autofit we simply select all the relevant columns and double-click the double-pointed arrow over any of the header borders between the selection.
Before:
After:

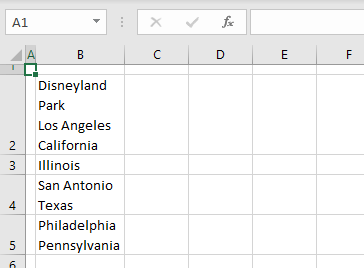
Do note that AutoFit is a feature to make the text ‘fit’ which means that all rows will not together expand to the same height; each row’s height will independently AutoFit according to its cells and their content, resulting in different heights. E.g.:
The same rule applies to AutoFit for multiple columns; the columns don’t all stretch to the same width but only to how much each column needs to extend according to the individual column’s cells’ text. If you want the columns (let’s say) to collectively expand the same amount, select the columns and click and drag the header border instead of AutoFitting.
AutoFit Whole Worksheet
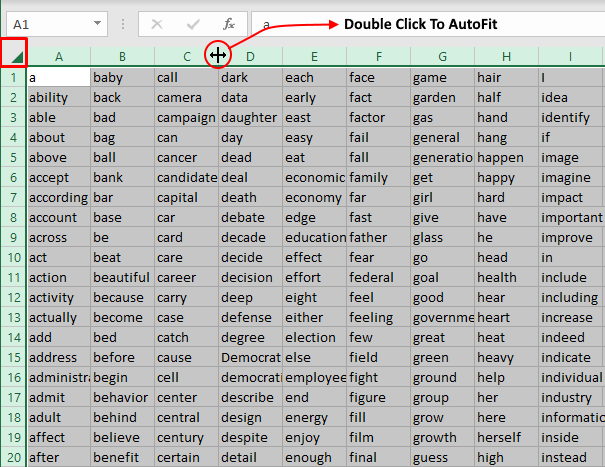
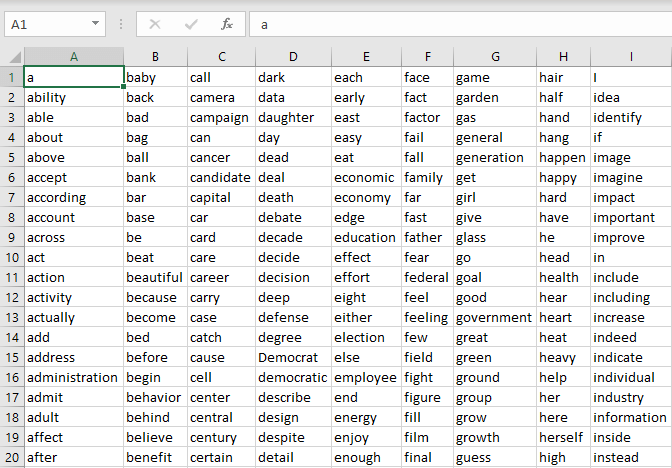
To AutoFit the entire worksheet, first select all the cells in the worksheet by pressing Ctrl + A or by clicking on the Select All button, a small green triangle on the top left corner of the worksheet window. Then double-click the double-pointed arrow over any of the row or column headers to autofit respectively all the rows or the columns.
Before columns AutoFit:
After columns AutoFit:
How to AutoFit in Excel Using Excel Ribbon
What feature can appear faster than a couple of clicks; that still doesn't stop the Excel ribbon from containing everything on its menu. The AutoFit options are no different and here’s how to use them from the ribbon:
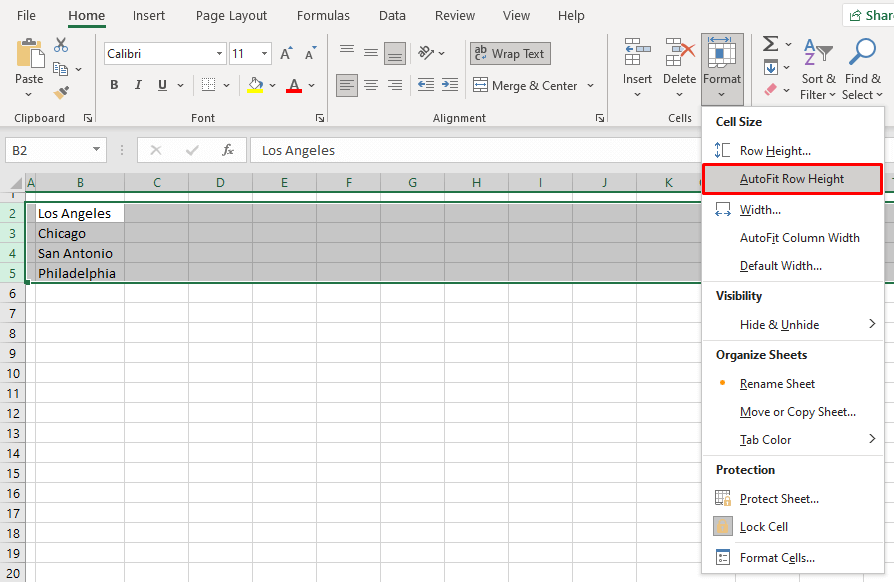
AutoFit Rows
Select all the rows requiring AutoFit.
- From the Home tab, in the Cells section, select the Format button and then the AutoFit Row Height
Behold AutoFit rows:
AutoFit Columns
Select all the columns you want to AutoFit.
- In the Home tab, go to the Format button in the Cells
Select AutoFit Column Width from the list.
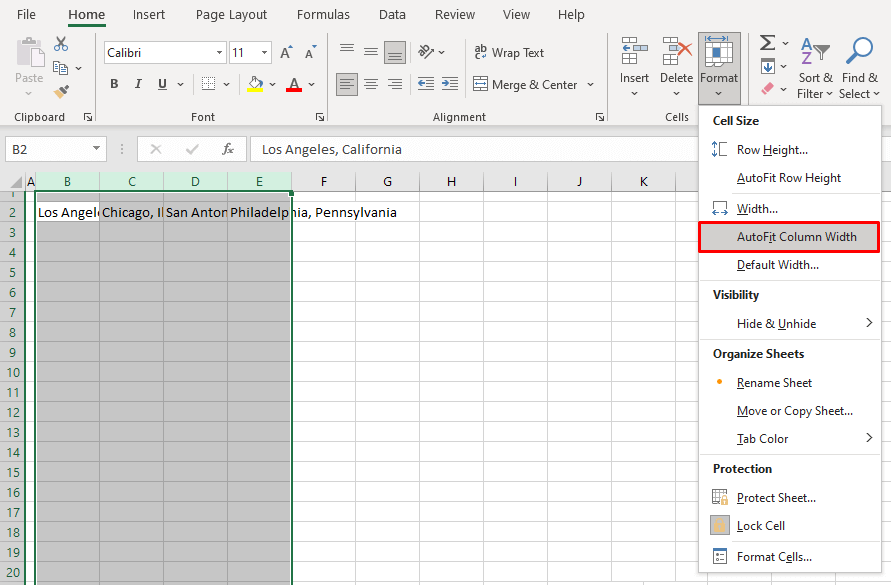
AutoFit columns are ready:

How to AutoFit in Excel Using Keyboard Shortcut
The keyboard shortcuts for AutoFit are as follows:
- AutoFit rows: Alt, H, O, A
- AutoFit columns: Alt, H, O, I
The keys are to be entered in sequence; one after the other, not all pressed together.
Alt – opens selection for the tabs.
H – selects the Home tab.
O – selects the Format button.
A – selects the AutoFit Row Height option OR
I – selects the AutoFit Column Width option.
First, select the rows or columns to AutoFit. Then apply the relevant keyboard shortcut and that’s deal done!
AutoFit Not Working
We’ve worked out the kinks for you so you don’t have to waste time trying different fixes. There can be a couple of instances when AutoFit may not work. We have the details right here with the troubleshooting guns out.
When There are Merged Cells
Problem: AutoFit will not work on merged cells. There is no big reason or explanation for this; Microsoft says it won’t work so it won’t work.
Fix: You can unmerge the cells.
If you’re keeping the merged cells, you will have to manually adjust the column width or row height (by click and drag) or set the width/height from the Format options. Go to the Home tab > Cells section > Format button and select Row Height… or Width… which will pop up a little dialog box to enter the height or width.
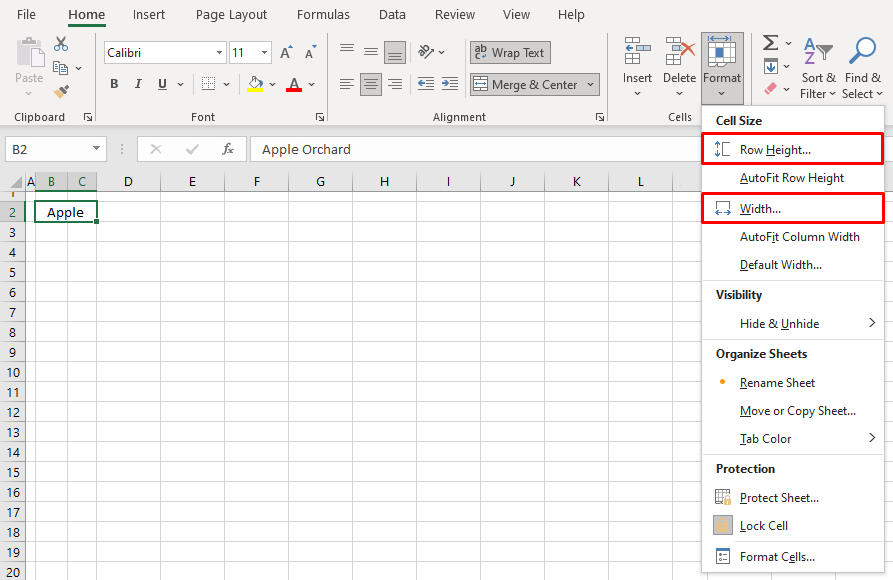
When 'Wrap Text' is Applied
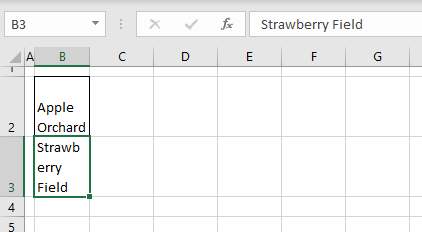
Problem: Sometimes when Wrap Text is applied, you may see some space at the top or bottom of the cell. A reason for this could be that Wrap Text was applied to more than one cell and therefore, the cell took on the row height of another cell like so:
In this case, AutoFitting the column will adjust for the space but display the text in a broken way anyway:
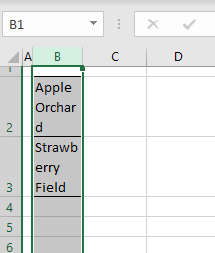
This is because Wrap Text has already wrapped the text within the cell and so AutoFit may either not do anything or make things equally off.
Fix: The first idea can be to remove Wrap Text and get down to AutoFit. If you’ve decided to work with the wrapped text, you need to take the following steps to rectify this display:
- Press Ctrl + A to select the whole worksheet area.
- Over-expand any column width.
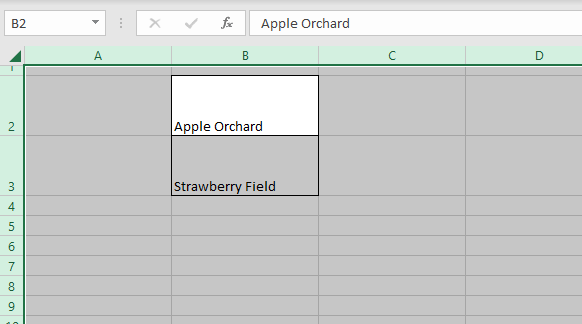
- AutoFit any column. This will snap back the column to AutoFit the text perfectly.
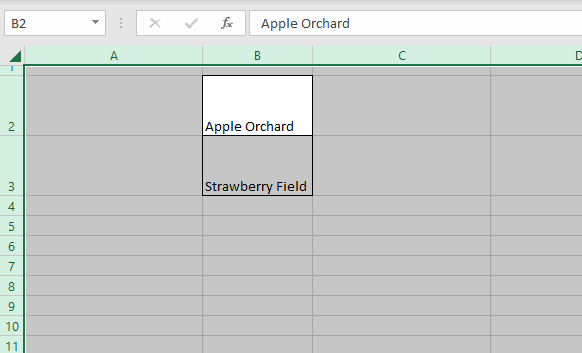
- Now AutoFit any row to get rid of the needlessly empty spaces.
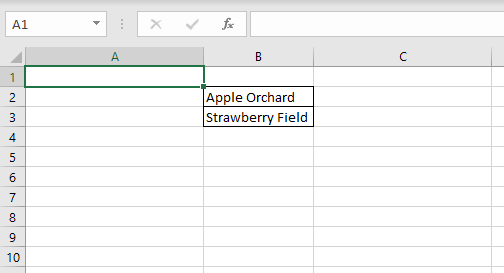
Consider the problem AutoFitted!
Pro Tip: How to Match the Width of Another Column
If you want to match the exact width of a column, all you have to do is copy and a special paste. Sounds too easy, right? It is! Here’s how:
- Select any cell from the column you want to copy the width from.
- Press Ctrl + C to copy.
- Select the target column and right-click it.
- Hover to Paste Special on the menu and select the Paste Special…
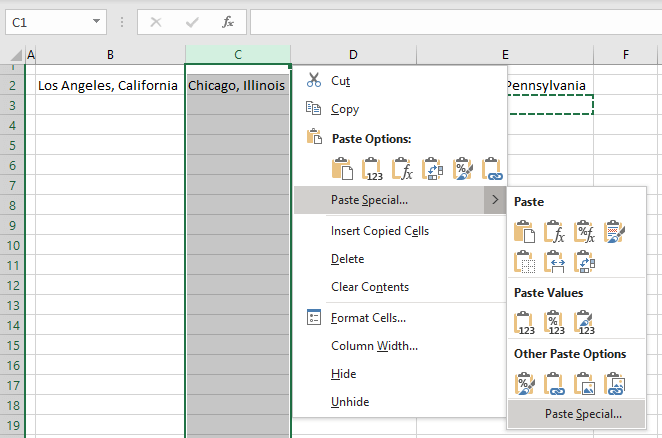
- In the Paste Special dialog box, select the Column widths radio button.
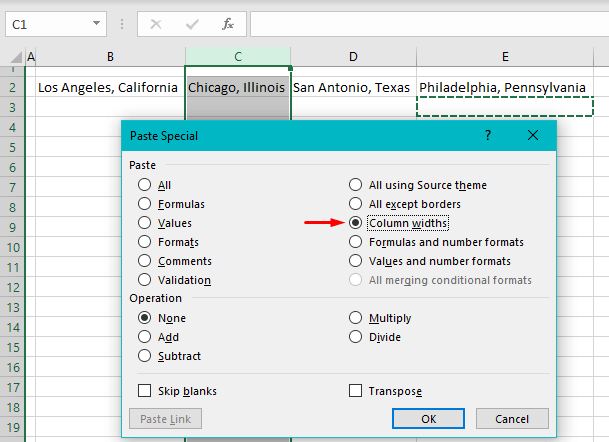
- Click OK.

With these steps, there’s the column width pasted to another column.
That’s all from us on how to AutoFit rows and columns in Excel. We hope you learned the tips and tricks on getting that textual look just right because the first impression is the last impression, isn’t it? We also hope to have helped you out with your pickles when the AutoFit boot doesn’t fit. Head on back here for solving the problem of misfits and more; we will see you with further Excel-ness!
