Excel is not a word processor but you can still find several ways of getting a bullet point on the worksheet because despite being a spreadsheet application, you may opt for lists to be a part of the data (e.g. to-do lists, notes, footnotes).
A bullet used in your Excel data can come from an external source through copy-paste or internal sources like Symbol, CHAR function, Custom Format, keyboard shortcuts, special fonts, Text Box, AutoCorrect, and if you must go all out for visual attention to your bulleted data, you do it the SmartArt way.
The most common understanding of a bullet point is a dot symbol i.e. a filled circle but it can take the form of any shape or symbol imaginable. Think of the bullet as a symbol or a character. This character can be in a separate cell or with the text string or list item in the same cell.

It depends on what you’re aiming for and in many cases, it would be more convenient to have the bullets in separate cells so that you can easily copy the bullets to more cells.
If you have the bullets in a separate column and want to join them with the list items, you can use the & operator to combine the two values in a new column.
To give bullet points the right touch-ups, you may need to expand or contract columns, and change the alignment, or the font size. Change the color of the bullets by changing the font color. That was a bit of a heads up on things and now…..
Let’s get bulleting! (and dodging?)
Method #1 – Copying & Pasting
What could be simpler than copying and pasting? Well, that quite depends on where you’re copying from because a different source could mean that the items might not copy well in Excel. Anyhow, it’s a very quick and convenient method and we have some bullet points you can copy to your worksheet and some pointers on how to use them:
• ○ ► ■ ➜ ✓ ➤ ♦- Select and copy a bullet point from the options above or the source of choice (another worksheet, workbook, or an external source e.g. a website or word processor).
- Paste it to the location where you want the bullet point.
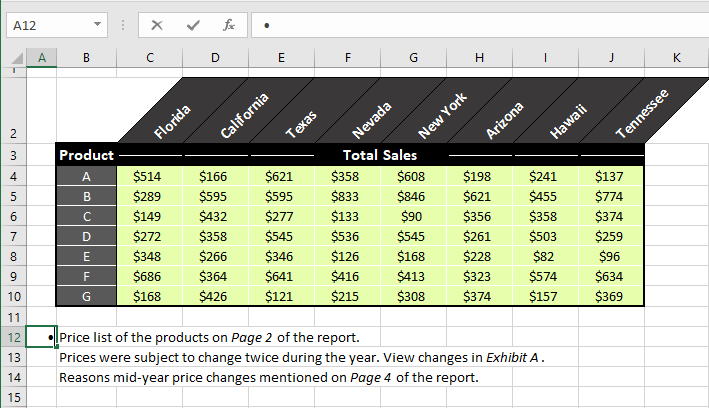
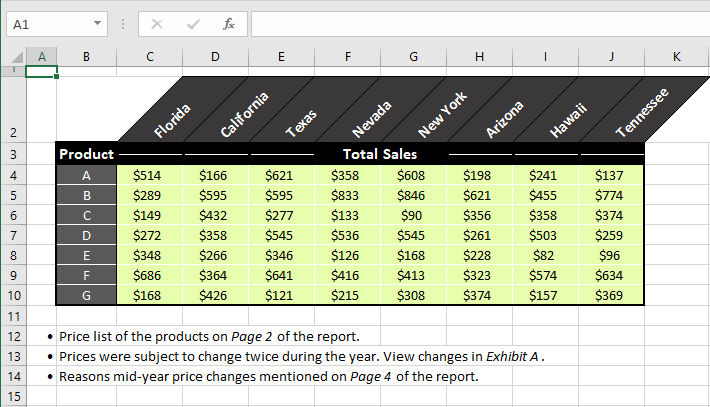
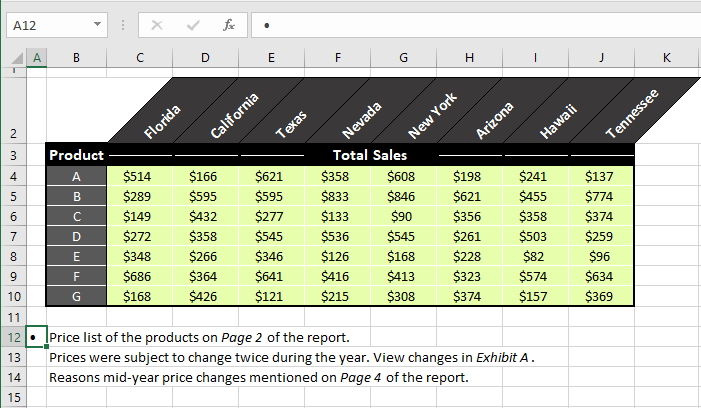
- In the example shown ahead, we’ll paste the bullet only before the first list item.
- Now copy the cell with the bullet and paste it to the range you want to cover.
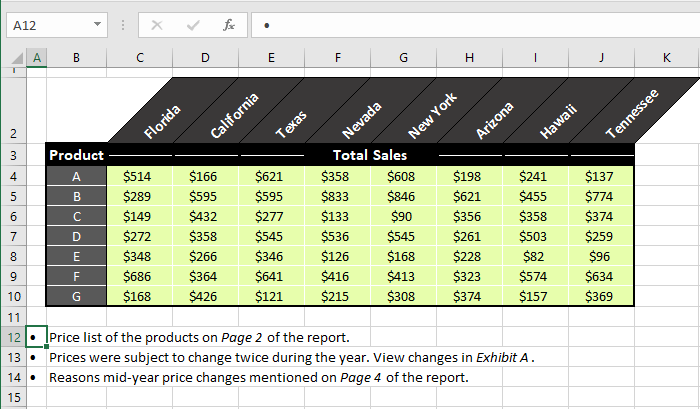
- We will paste it to A13 and A14.
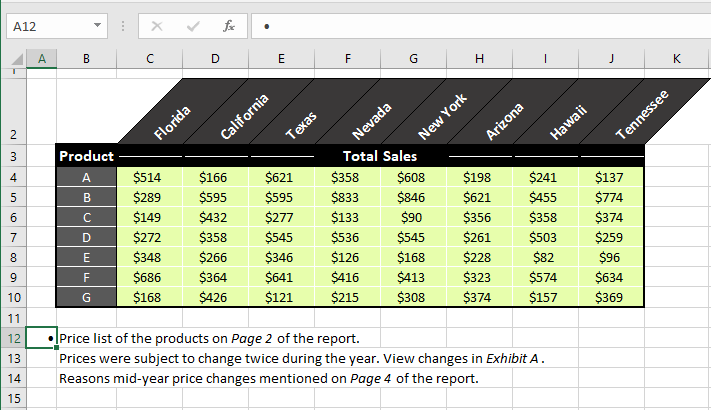
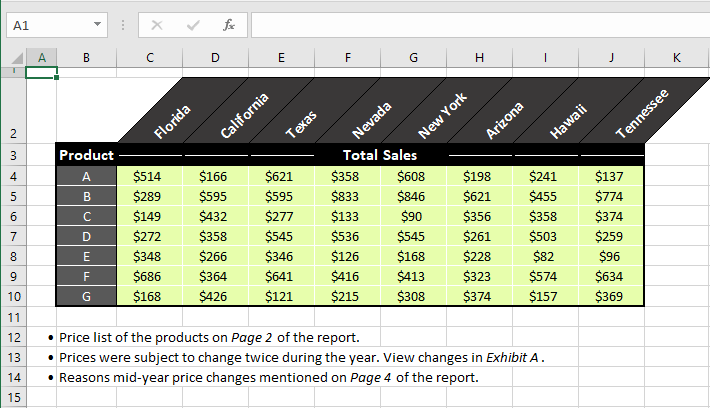
- The list of items will now include bullet points:
Wondering why we didn’t directly paste the bullets before all the items? If you copy a bullet from an external source, it cannot be pasted to a range and has to be pasted to a single cell first. Otherwise, you will bump into a pasting error pop-up like so:
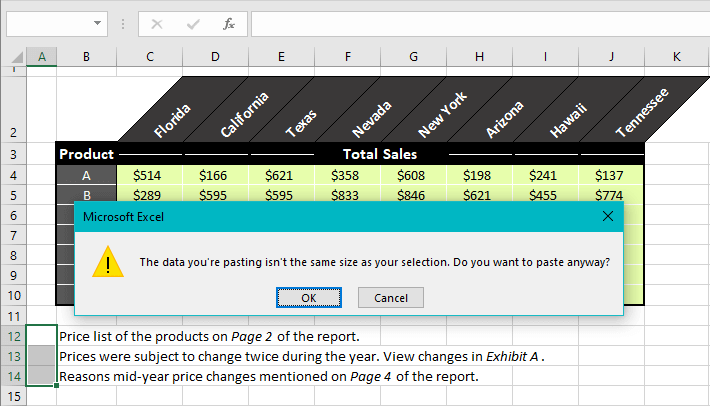
The size of the copied item (a single bullet point) differs from the size of the selection on the spreadsheet. If you choose to paste anyway by using the OK button, Excel will still paste the bullet to a single cell. Therefore, you can paste the bullet to one cell first, copy that cell and then paste it to a range or multiple cells.
Tips:
When copying from an external source, Ctrl + C Ctrl + V might not yield what you had in mind. Instead of a direct paste, right-click the target cell and explore the Paste Special options to copy the data correctly.
If you already have the items that you want to attach the bullets to and want the bullet point and the item in the same cell, edit the cell and paste the bullet before the item. There are much easier alternatives to this is to use a custom cell format (demonstrated later on).
Another way to copy and paste bullet points is to take the items that you want bulleted to a word processor, add the bullets there, and paste the items with the bullet points back to Excel. Besides, many will be more accepting of the idea of using bullets in word processors (think MS Word).
If the column is narrow and you cannot see the bullet point you have pasted, expand the column to view the bullet.
Method #2 – Using Symbol Option
Pasting was the only method using external sources, in the rest of this guide, we’ll show you 8 other ways Excel can insert bullet points. The Symbol option in Excel provides a vast menu of characters and symbols that can be best used for inserting characters that aren’t present on the keyboard.
From the many symbols in Symbol, we can pick out any style of a bullet (from a plain, filled circle to quirky ones like a smiley face, sun, clock or motif bullet).
Interested? Let’s see the steps that will add a bullet point to your worksheet:
- Select the cell where you want to insert the bullet.
- If you are adding it with a note or item present in the cell, enter cell edit mode and place the blinking cursor before the item.
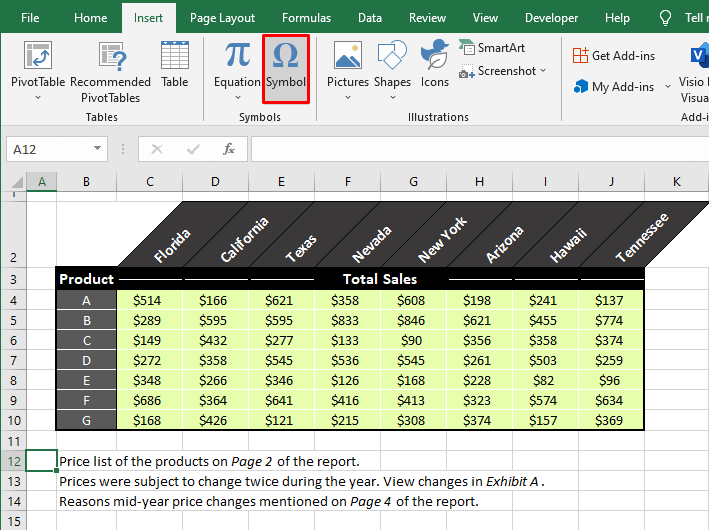
- Go to the Insert tab above the Ribbon and select Symbol from the Symbols
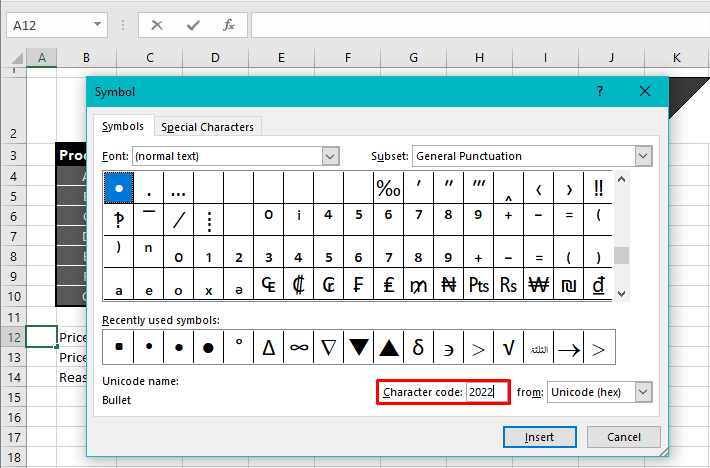
- You will see the Symbol dialog box now with an impressive menu of symbols and special characters. Scroll through the menu to find the preferred bullet. If you know the code, you can enter it in the Character Code box.
- Enter the code 2022 in the Character Code
- This is the code for a plain filled circle bullet and will be located once the code is entered.
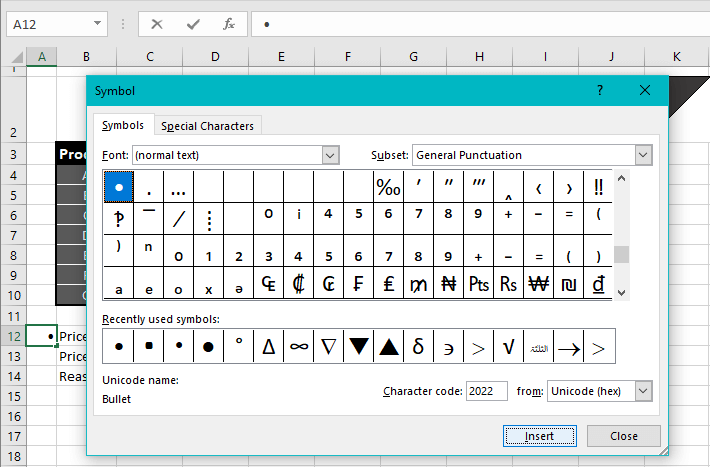
- Click Insert and the bullet will be inserted in the selected cell in the background.
- Close the dialog box and you will see that the bullet point has been entered in cell edit mode.
- To exit cell edit mode, click on any other cell on the worksheet or hit the Enter
- Instead of exiting the cell, you can type the item after the bullet or paste it.
- Once inserted in the cell, you can copy the cell and paste it to a range.
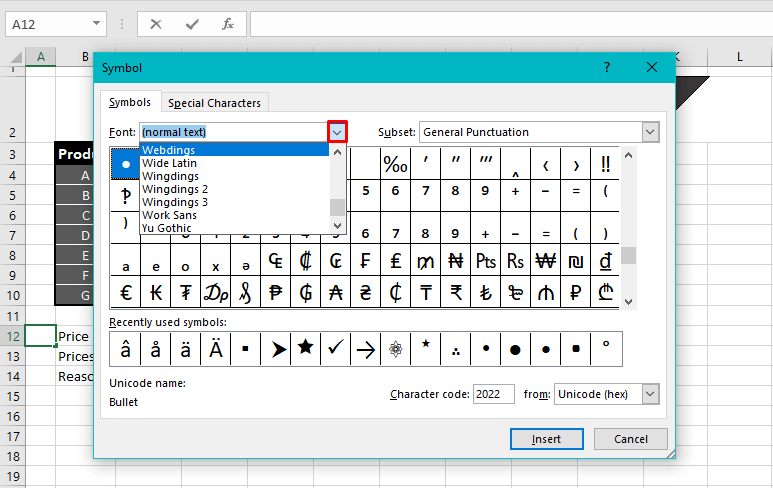
Other than the obvious menu in the Symbol dialog box, you have a switch to make even more symbols available to you. In the dialog box, use the arrow of the Font field to change the font from the drop-down menu. While different fonts will also change the look of regular characters, symbol fonts are the ones to look for such as Bookshelf Symbol 7, Webdings, and Wingdings.
These special fonts will change the characters shown in the dialog box into symbols. The codes of some bullets in regular and symbol fonts are listed below. You can use these codes in the Character Code field in the Symbol dialog box and arrive at its corresponding bullet point:
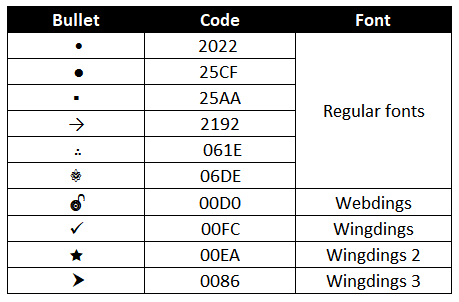
Other than these, you will also find a ring, hollow square, cross mark, and many other types of symbols that can be used as bullets. Biggest upside of this method you ask? Having all the possible options on display.
Method #3 – Using CHAR Function
Speaking of characters, the CHAR function can also return a bullet point in Excel. The CHAR function results in the character corresponding to the code number specified in the formula. The code number for a filled circle bullet point is 149.
To get the bullet point in your worksheet, use this number code in the CHAR function. The formula is given as follows:
=CHAR(149)Enter this formula in the cell preceding the item to add the bullet point.
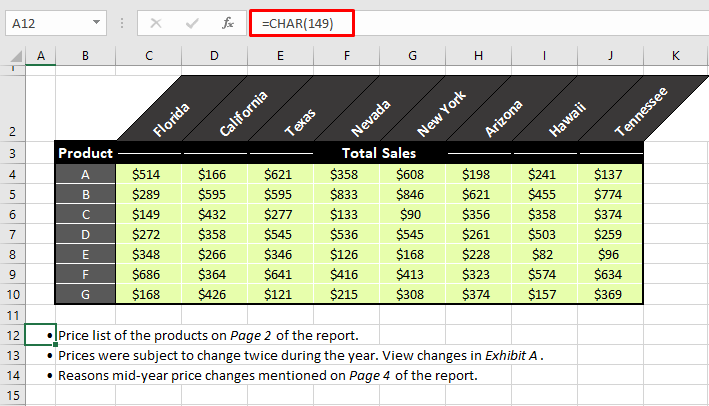
Note: This method is for inserting bullets in separate cells from the items. Although you can add the item to the same cell as the bullet (using the & operator to include the item), why go through the trouble when you can easily use a Custom Format for that? Let’s see what this custom format is all about.
Method #4 – Using Custom Format
Now we come to using a custom cell format in Excel to insert bullet points. When formatting cells, you can apply a formatting code that will change the way cells are displayed without altering the values in the cells. In this code, we can incorporate a bullet so that it appears at the beginning of each cell when a value is entered in it.
Let’s see what that formatting code is and what we need to do to make this code work to add bullets in the worksheet:
- Select the cells where you want the bullets displayed.
- Be mindful that the items proceeding the bullet will be in the same cell so if you have the items already on the worksheet, select those cells.
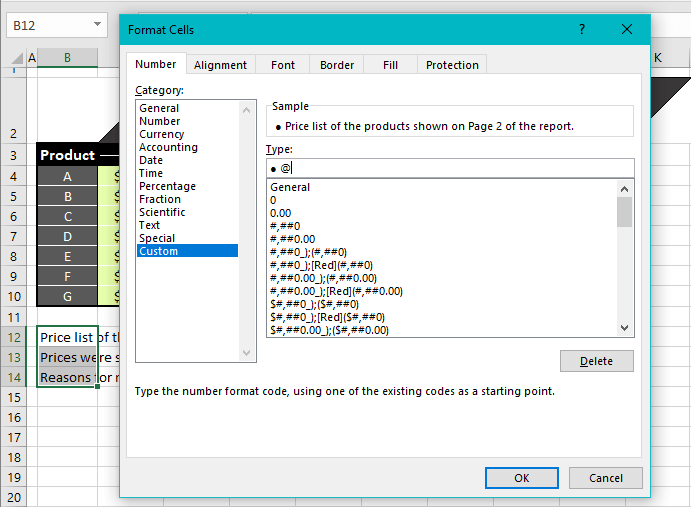
- Press the Ctrl + 1 keys to go to the Format Cells dialog box.
- Make sure the Number tab is selected in the dialog box. In the category pane on the left, click on Custom.
- In the Type bar, copy and paste the format code from below:
● @- As per this code, when a value is entered in the cell, that is when the bullet will appear because the formatting is related to the cell value and when will only show when a value is present in the cell. Despite being a formatted cell, the bullet will not be displayed until the cell contains a numeric or text value.
- Press the OK button to close the dialog box and apply the format.
The cells selected in our case example already contained the items. Hence, the bullets appeared when the format was applied.
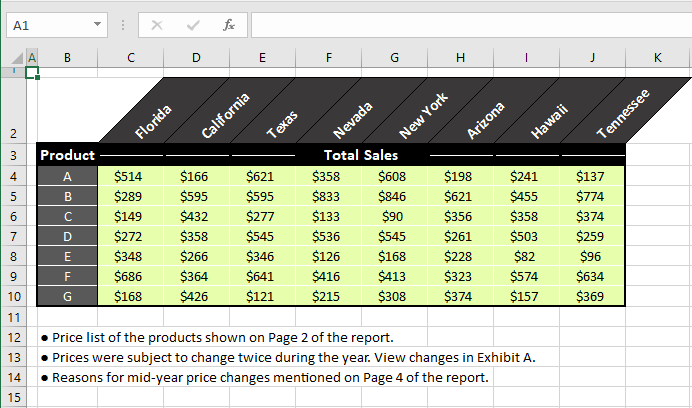
Notes: You can paste different symbols and characters as bullets in the formatting code.
The bullet can also be added to the format code via keyboard shortcuts. Further explained below.
Method #5 – Using Keyboard Shortcut
This here is the quickest method for inserting a bullet point and if you’re wondering why we haven’t talked about it earlier is because this method has its own little prerequisite; a numeric keypad.
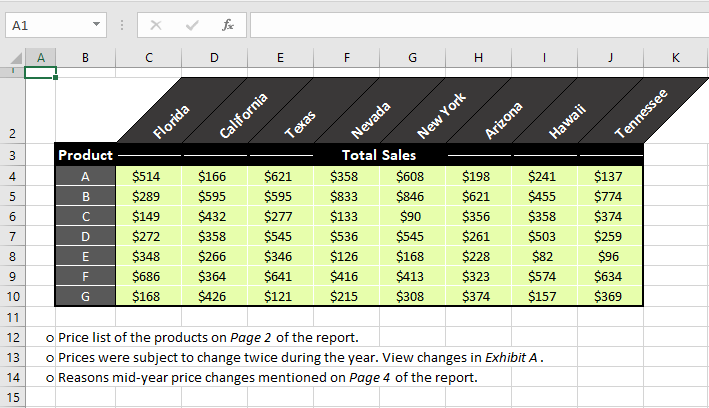
When the number part of this keyboard shortcut is entered using the numeric keypad on your keyboard, you will be able to enter a bullet point in the active cell. See the keyboard shortcuts to enter a filled circle and a ring bullet:
- Alt + 7 – Hold down the Alt key and press 7 on the numeric keypad to insert a regular filled circle bullet point.
- Alt + 9 – For a ring bullet (○), press 9 on the numeric keypad while pressing the Alt key.
Method #6 – Using Special Fonts
Variety lovers, this is another option for you; use special fonts. We are again talking about symbol fonts. Earlier we mentioned a few symbol fonts and skimmed over some characters we could use as bullet points in Excel via the Symbol option. With fonts, we need to switch to the relevant font, type the character corresponding to the bullet and the bullet will appear. Let’s see the process in step form:
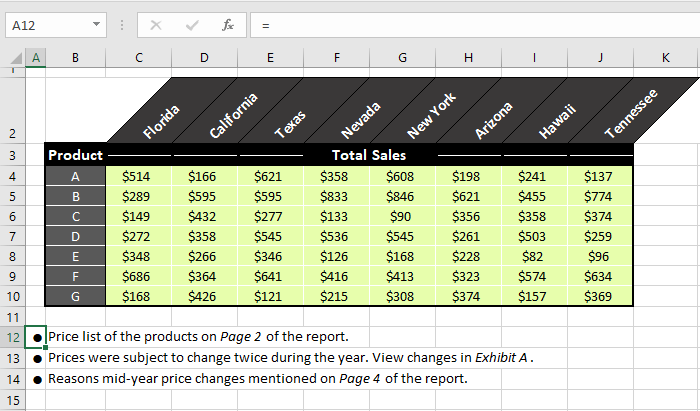
- Select a cell where you want to apply the font to enter a bullet (cell A12 for us).
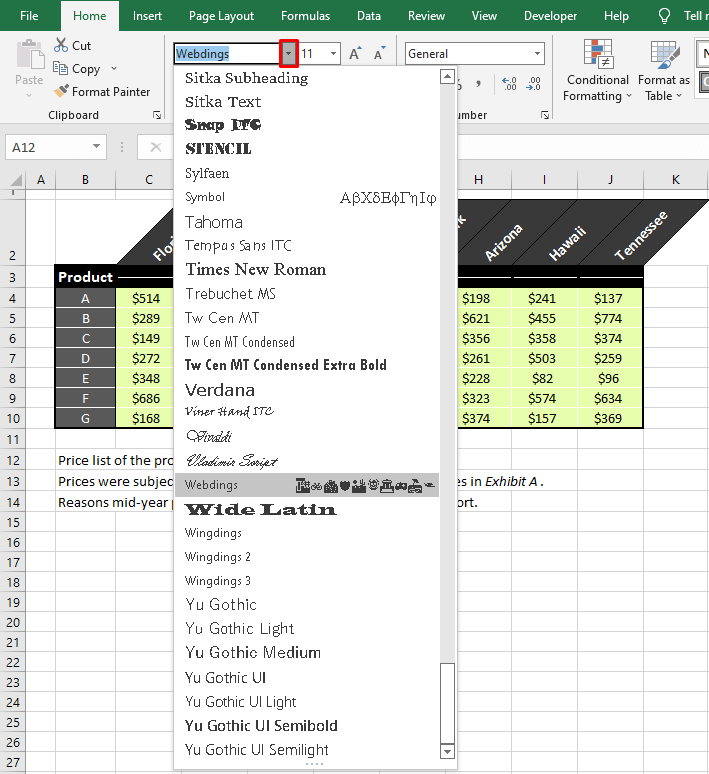
- Switch to the relevant special font by using the arrow on the Font bar to open the drop-down menu. The Font bar is located in the Home tab’s Font
- Let’s show you a sample bullet using the Webdings font.
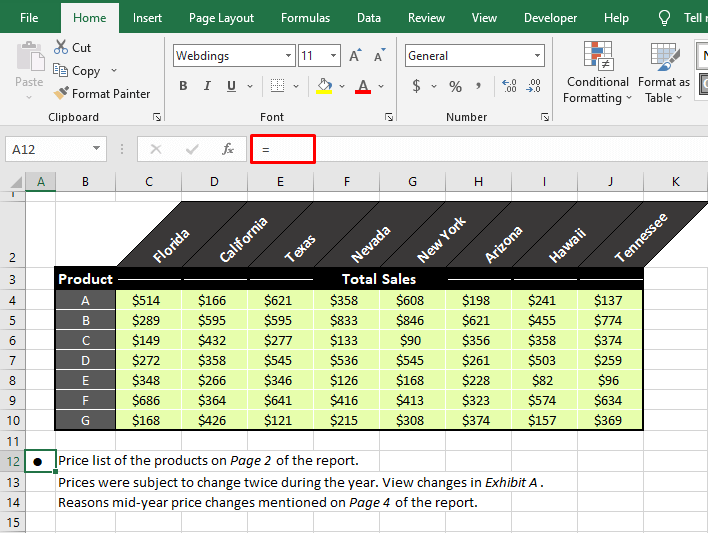
- Now type the character in the cell so it returns a bullet.
- One such character is the equal sign = and it returns a circular bullet point.
- We can now copy this cell and paste it to the range where we want the bullet points:
Below we've compiled some bullet-related characters from a few symbol fonts. Like the steps above, you will have to change the font for it to return the preferred bullet.
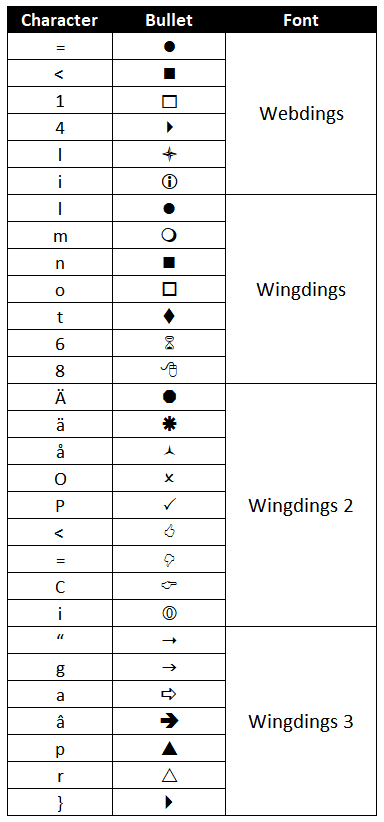
The thing about using special fonts is that you need to enter a specific character for the bullet point. Plus, if you need to enter a special character (e.g. the Latin character å for the Wingdings 2 font to return the symbol å as the bullet) you might have to resort to using the Symbol option or an external source where you can copy the special character from.
In that case, it would be far more convenient to use Symbol. If the particular character is easy to access and you remember it, (e.g. = returns= with the Webdings font) then it’s quite quick to use the font method. Otherwise use Symbol.
Method #7 – Using Text Box
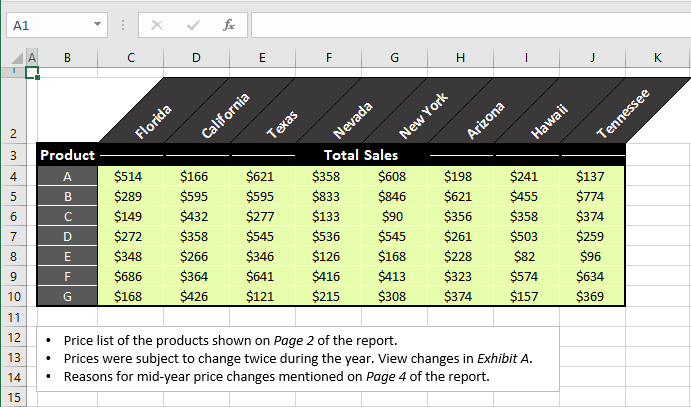
Bullets in Excel can be entered using a Text Box. This feature will allow the user to draw a text box or field anywhere on the worksheet. What the Text Box will do for us is provide a space where we can add bullets to our text items. We can show the steps for inserting bullets using Text Box with our case example:
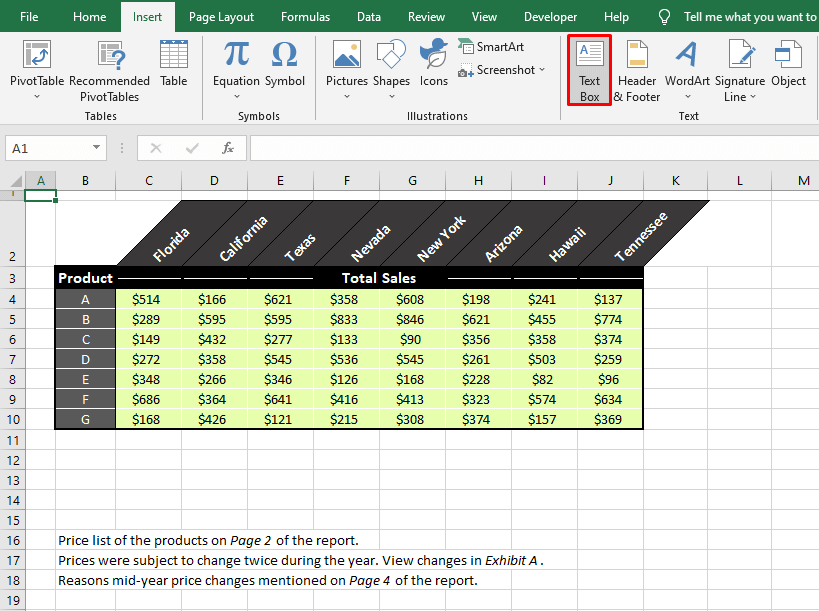
- Select the Insert tab’s Text Box icon in the Text
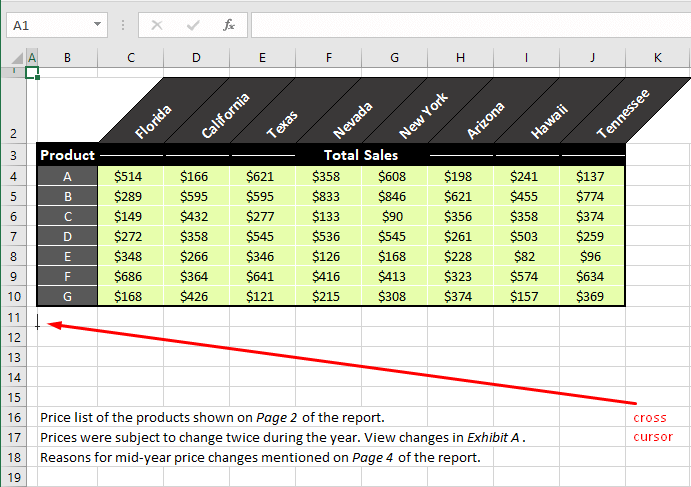
- The cursor will change to a cross.
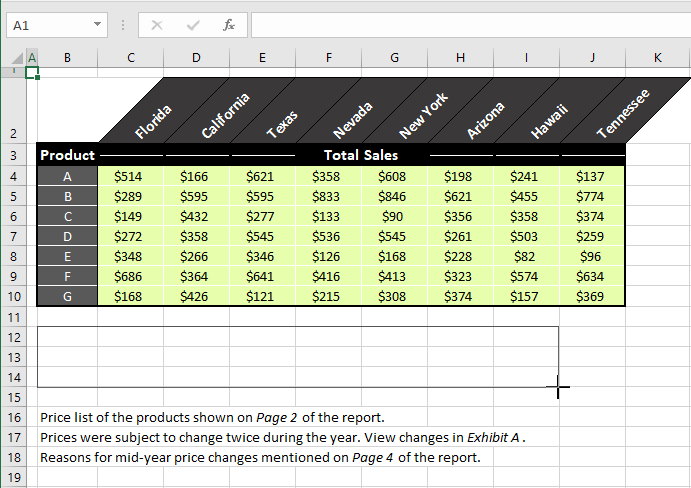
- Use this cursor as a pen to draw the Text Box and use the cross to align the box’s position.
- You can adjust the size later.
- Paste the text items in the Text Box and select them.
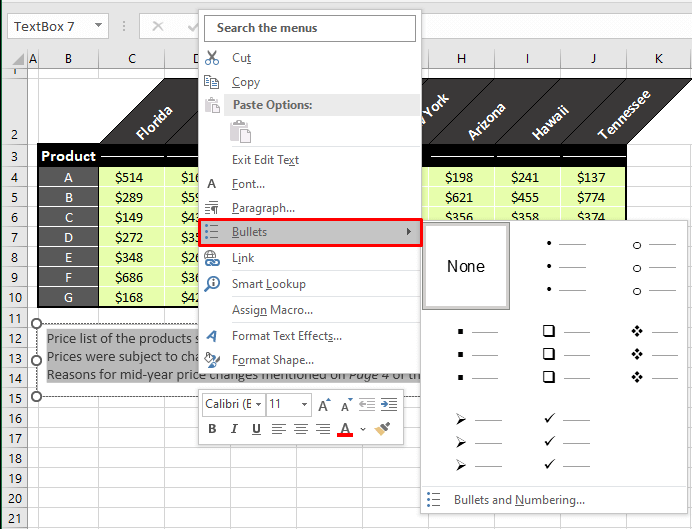
- Right-click the selection and select Bullets from the context menu.
- Choose your preferred bullet from the submenu.
- Resize the box if required and do all the text and box alignment finishing touches.
- When done, press the Esc key twice or click on any cell to exit editing the Text Box.
And there the bullets are, thank you Text Box!
Method #8 – Using SmartArt
Excel is not short on means if you want something a little more graphic and communicative. SmartArt is used in Excel to insert graphics representing lists, diagrams, and charts. A few of these have bullet options and you can add something intricate that will allow apt description but for now, we're good with something simple to get our text items across. However, don't miss on checking out the SmartArt range.
If you’re up for this option, you can use the steps below to add bullet points in Excel with SmartArt:
- Clear the space for where you want your SmartArt graphic to land.
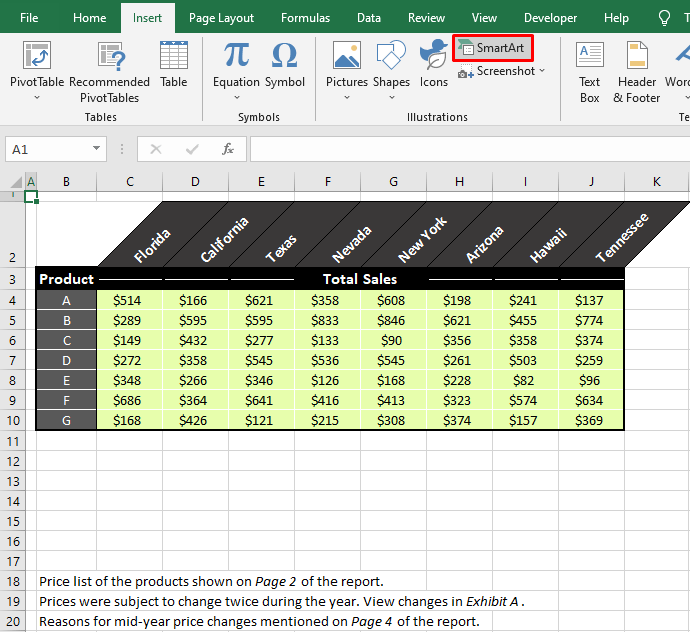
- Head to the Insert tab and select the SmartArt button in the Illustrations
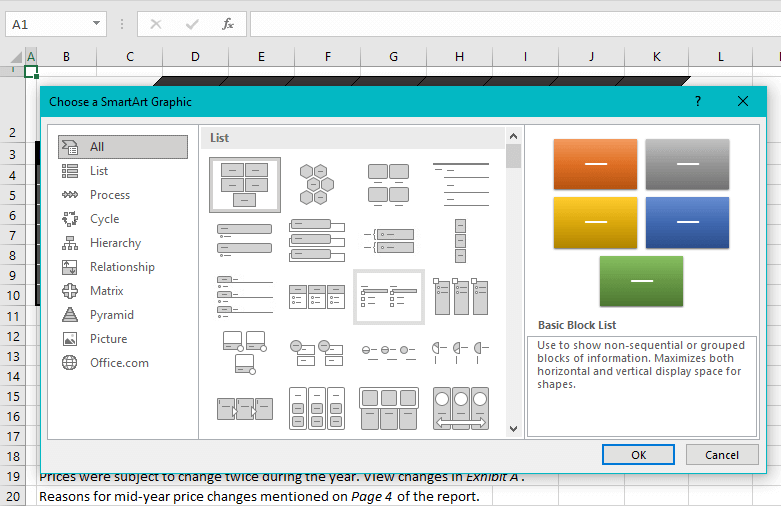
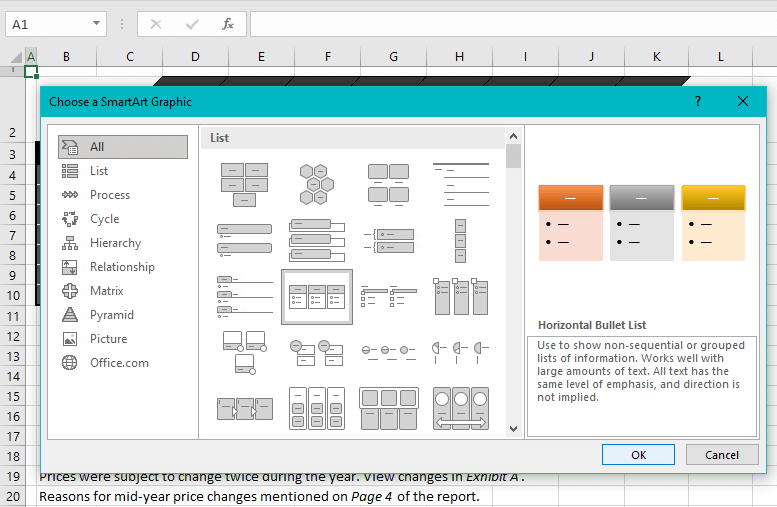
- You will be led to a dialog box to select your SmartArt graphic. The broad categories are mentioned on the left-side pane, the options in every category are displayed in the middle, and on the right, you can view a colorful sample of the graphic before you decide which one to apply.
- Pick a SmartArt graphic from the menu.
- Our selection is a simple list with bullet points.
- Select the OK button to insert the SmartArt graphic on the worksheet.
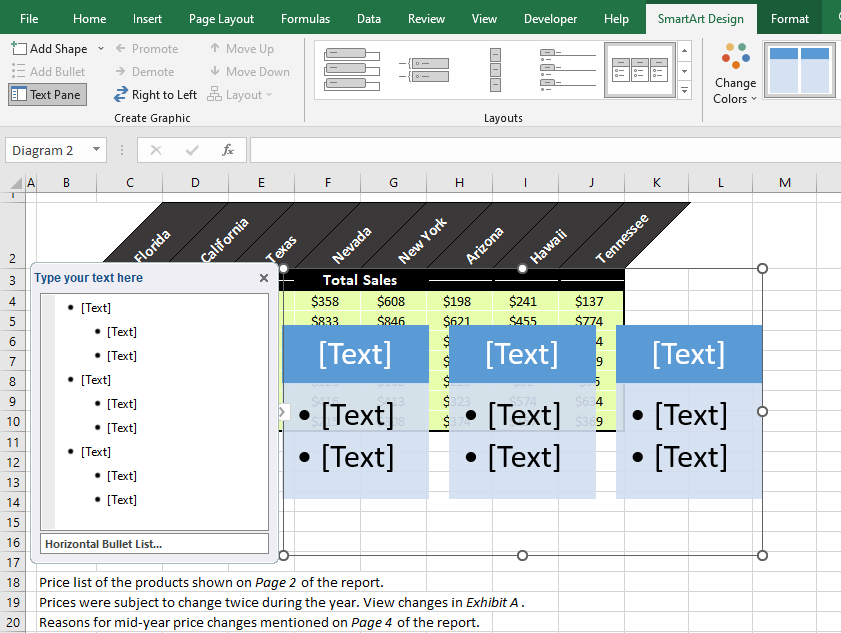
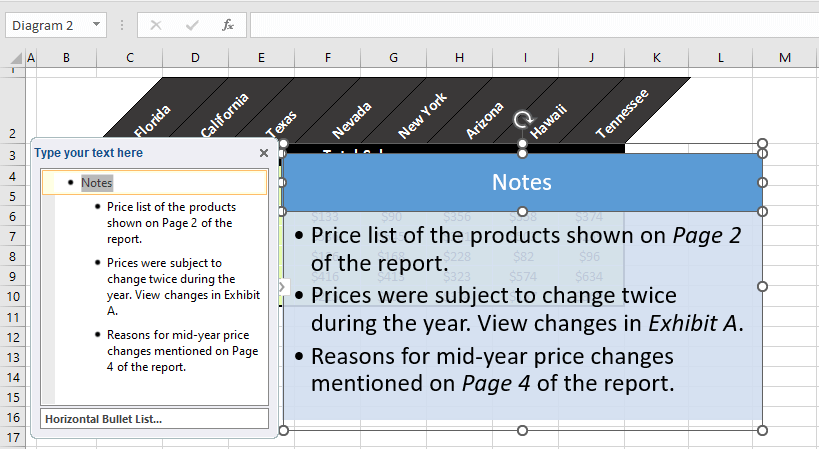
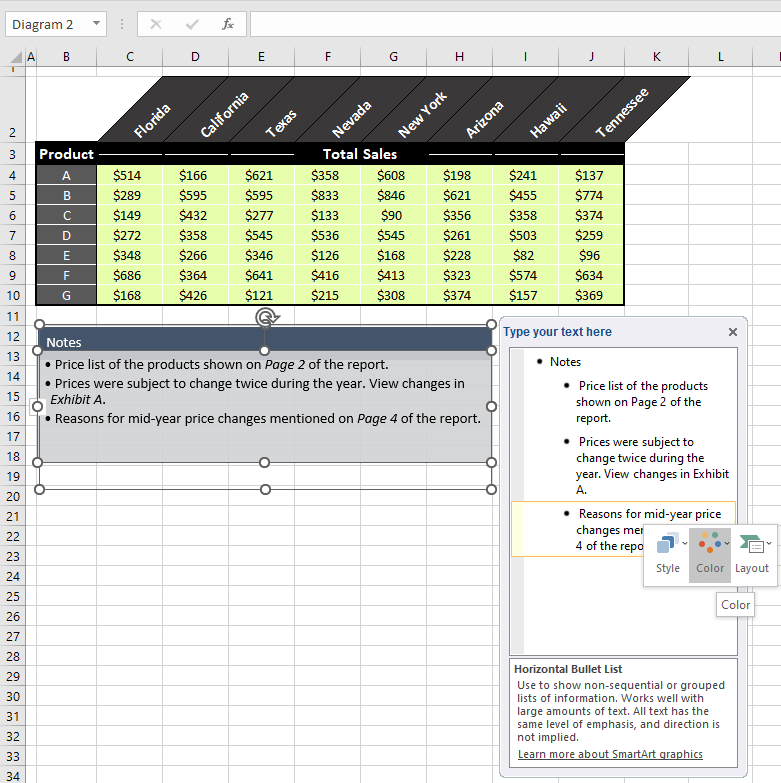
- This is what our horizontal bullet list looks like unedited:
- Now edit the graphic; add your text items, delete or add bullets; promote or demote items (promote an item from a sub-category to the main category and vice versa for demoting).
- Here’s a tip. Adding and deleting bullets will be easier to do from the actual graphic itself instead of the Type your text here box since, essentially, it is a text box and the regular rules will apply (e.g. pressing the Enter key will add a bullet below the item, etc.)
- Edit the graphic with the other settings if you want.
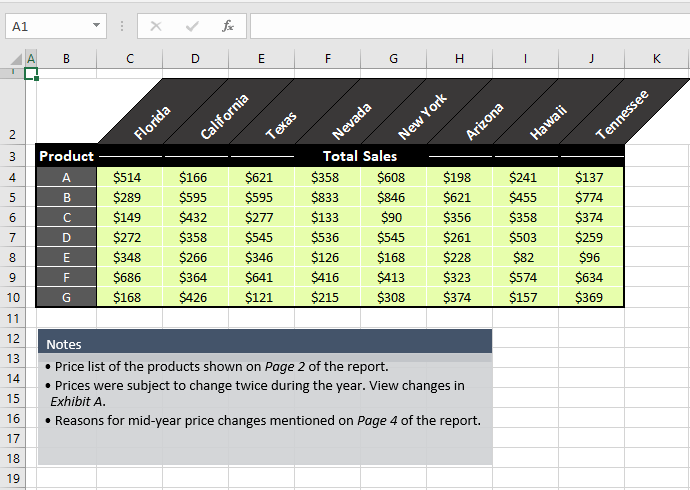
And there’s a preset fancy Text Box added, courtesy of SmartArt:
Method #9 – Using the Excel AutoCorrect Feature
Someone said fancy. Here we are with our last method but we're ending it the fancy way because this is an Excel trick liked by many (who doesn't like to have things at their fingertips?) Now we’re going to add bullets with AutoCorrect.
Mainly, we’re treating bullets here as a symbol or character that can be returned in a cell’s value when a user-specified code is entered. It’s really quite simple and quite very cool. Below you’ll find the steps to use AutoCorrect in Excel to insert bullets:
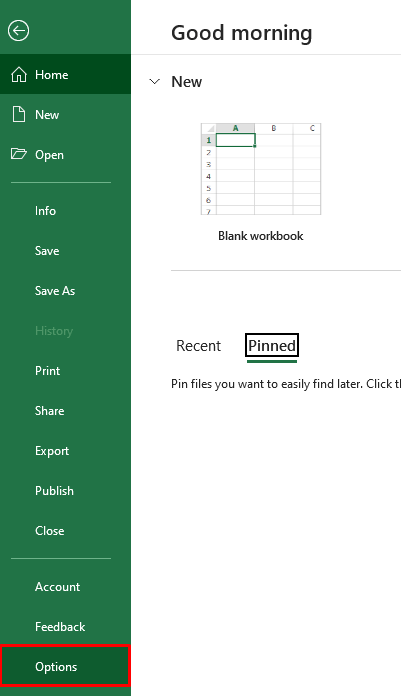
- Click on the File tab above the Ribbon.
- Select Options from the panel on the left.
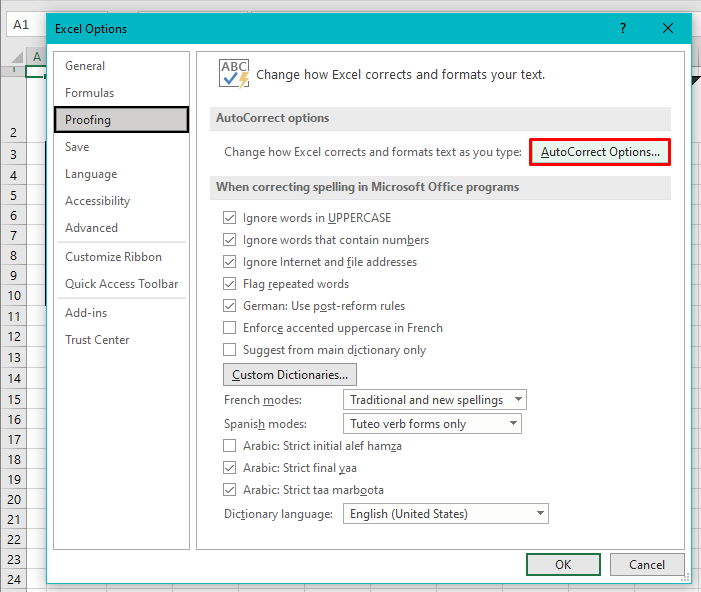
- In the opened Excel Options window, select the Proofing tab from the left panel.
- Now select the AutoCorrect Options button from the options.
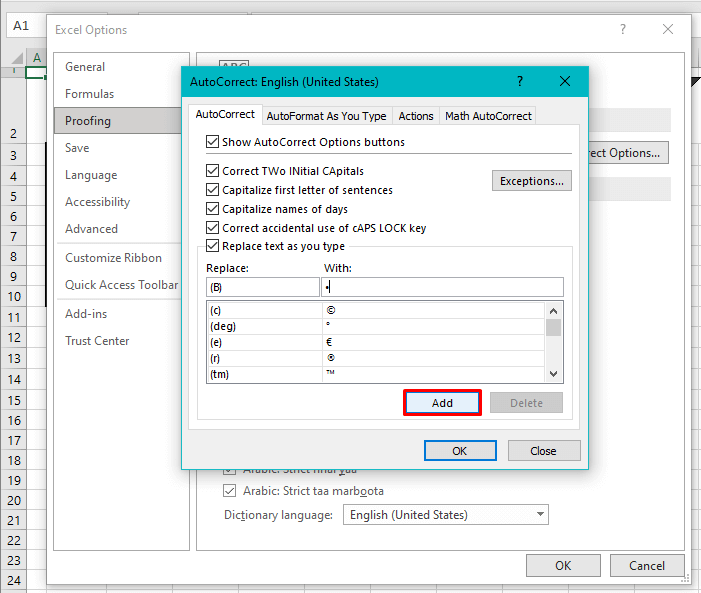
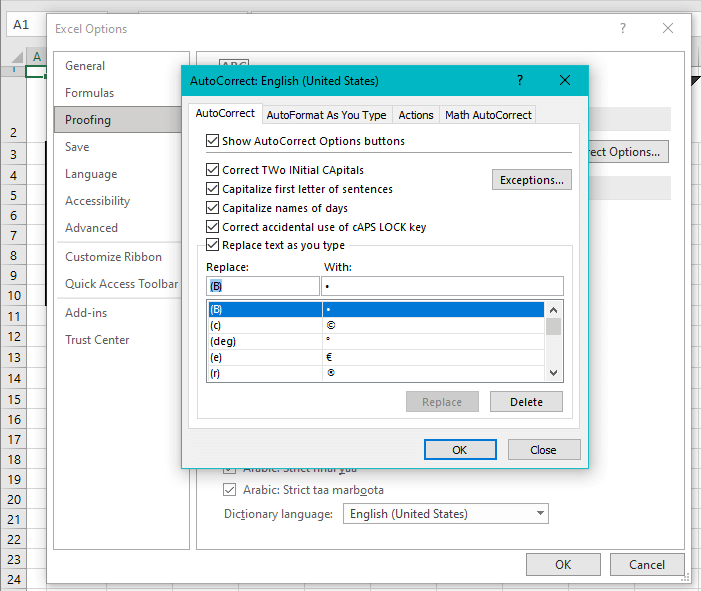
- You will get an AutoCorrect dialog box:
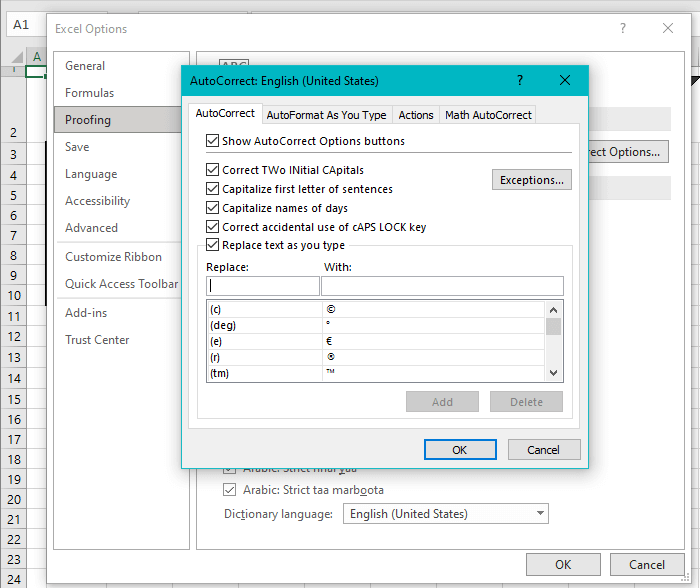
Here, you need to enter the code that you want to set for the bullet. You will use this code while typing in a cell. In the dialog box, you can see the AutoCorrect entries so just make sure the code you are setting isn’t already in use and is also one that you can remember. While typing the code that you’re trying to set, if there is a matching entry, it will be highlighted; this is a good way to check if you’re creating a duplicate code.
- In the Replace box, type the code you are setting for a bullet point.
- We’ll set the code (B).
- Now you can paste or enter the bullet that you want the code to return in the With box.
- We’re pasting a plain bullet.
- Click on the Add button to make the entry.
- The entry will show among the list of AutoCorrect entries. You can edit or delete this any time.
- Select the OK command on both windows to confirm the AutoCorrect entry and return to the worksheet.
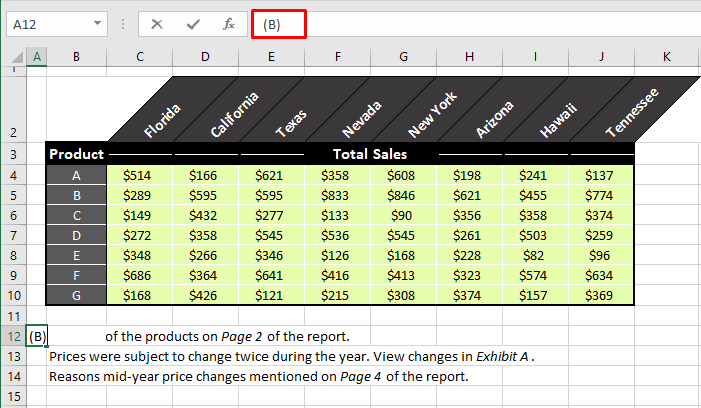
- Type the code in a cell where you want the bullet.
- This could be part of the cell with the item or in a separate cell. Our code for a circular bullet is (B).
- Press the Enter key or spacebar to trigger AutoCorrect to return the bullet in place of the code.
The bullet can be copy-pasted after adding it once to the sheet.
What have we gathered today? There are several ways of getting work done on Excel so it comes down to your requirement and/or your preference and adding bullets is no exception. That’s all for now. Let’s refocus our energies for another Excel probe.
