In the last few decades, Microsoft has grown by leaps and bounds and so are its fabulous products. Microsoft Excel is one such product that has grown immensely. It has wonderful features and options to make your tasks easier. But one feature that it lacks is the ability to insert multiple rows. The default insert option that Excel has allows you to insert only one row at a time.
This can be very annoying in cases where you have to insert multiple rows in your spreadsheet. And this is what I am going to write today. In this post, I will present a few ways which allow you to insert multiple rows.
Method 1 – By making use of the repeat functionality of excel:
This is the simplest way to insert multiple rows in your excel spreadsheet. In this method, we will first add one row manually to the excel sheet then repeat that action multiple times. Follow the below steps to use this method:
- Open your spreadsheet, and first of all insert one row to your excel sheet manually.
- Then simply repeatedly press the “F4” key on your keyboard, till the required number of rows are inserted.
- This will repeat your last action and the rows will be added.
Method 2 – By using the insert functionality:
In this method, we will use a hidden feature that excel offers to insert multiple rows to your sheet. Follow the below steps to use this method:
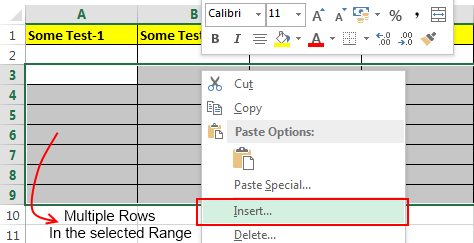
- Open your spreadsheet and select the number of rows that you want to insert to your sheet. It doesn’t matter if the rows are empty but they must include the place where you want to perform the insert.
- Now simply right-click anywhere in the previously selected range and select the ‘Insert’ option.
- Now excel will ask you whether to shift the cells down or shift them to right. Select the option ‘Shift Cells Down’ and multiple cells will be inserted in the location.
Method 3 – By using the insert copied cells functionality:
In this method, we are going to take the advantage of the “Insert Copied Cells” functionality that excel has. Follow the below steps to use this method:
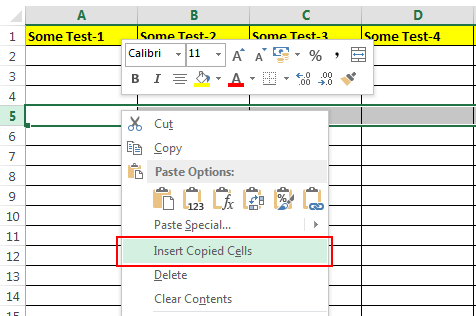
- First of all select multiple rows in your spreadsheet, by multiple I mean they should be equal to the number of rows that you want to insert.
- Next, copy these rows and scroll to the place where you want to insert multiple rows.
- Right-click and select the option ‘Insert Copied Cells’ and this will insert multiple rows at that place.
Method 4 – Programmatically inserting multiple rows in excel:
Although this method is a bit complex than the first three, still this can be used if you are more inclined towards the coding side. Follow the below steps to use this method:
- Navigate to the ‘View’ tab on the top ribbon, click on the ‘Macros’ button.
- Now type the name for the macro say “Insert_Lines” (without quotes) and hit the create button.
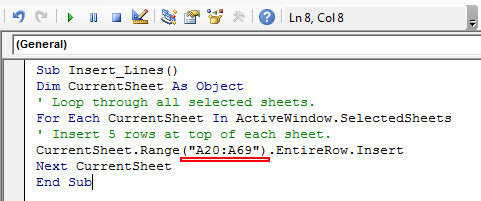
- Next, a VBA editor will be opened, simply paste the below macro code after the first line.
Sub Insert_Lines()
Dim CurrentSheet As Object
' Loop through all selected sheets.
For Each CurrentSheet In ActiveWindow.SelectedSheets
' Insert 5 rows at top of each sheet.
CurrentSheet.Range("A20:A69").EntireRow.Insert
Next CurrentSheet
End Sub
- Now comes the important thing, in the above macro the range is (“A20:A69”). The first parameter i.e. A20 tells the position from where you wish to insert the rows and the second parameter .i.e. A69 is the number of rows to be inserted added with the start position and subtracted by 1 (for instance: If you want to insert 50 rows starting from A20 then the second parameter of the range should be (50+20-1), so the range will be (“A20:A69”))
- After adding the code you can press the “F5” key and the code will insert the required rows.
- This macro is referenced from the Microsoft article: http://support.microsoft.com/kb/291305
So, these were the few methods to insert multiple rows in excel. If you know some other ways then feel free to comment below.


