If you feel your data is crowding the page it is to be printed on and dividing the data would help with clarity, you can insert page breaks on your sheet. Page breaks are more for the print aesthetic than anything else, as you wouldn’t want to unnecessarily see gray lines on the worksheet if it wasn’t going to be printed.
Page breaks aren’t just dependent on manual insertion. According to the formats in the sheet (empty column/row causing a gap in the dataset, borders, etc.), Excel will have automatically set page breaks. If you check any worksheet in Print Preview or Page Break Preview (how-to explained later), you will see how Excel has distributed the data into multiple pages. That is Excel’s doing; this tutorial will be about your doing and how you can work with page breaks.
Let’s start by understanding the types of Page Breaks in Excel.

What are Automatic and Manual Page Breaks
Page breaks are the separators that determine where one-page ends and the next one begins while printing a worksheet. Excel, by default, adds page break marks automatically at regular intervals according to paper dimensions, margin, and scale options selected while printing.
These default page breaks that Excel automatically inserts are known as automatic page breaks. Automatic page breaks are denoted by a dotted/dashed line.

However, if you want to have more control over the way your worksheet gets printed, you can create your own page breaks and insert them manually. Such page breaks are known as manual page breaks. Manual page breaks are denoted by a solid line.

In Page Break Preview mode, manual page breaks are depicted by a solid blue line while automatic ones are shown by dashed blue lines as shown above. Do not worry if you are not aware of the Page Break Preview mode, we are going to see that in the subsequent sections.
Let’s try finding out how we can add a page break manually.
How to Insert Manual Page Breaks in Excel
Manually you can add the following three types of page breaks to your worksheet:
- Horizontal
- Vertical
- Double (horizontal and vertical)
We will walk you through each of them. However, before you insert any page breaks, try checking the Page Break Preview. Maybe Excel’s automatic page breaking is similar to your idea of page breaks which can also be adjusted (read below for details). If you’d rather add your own touches first, here’s how to add page breaks.
The keyboard shortcut to insert a page break:
Alt + P + B + I
It might be helpful to remember the shortcut with its initials i.e. PBI (page break insert).
How to Manually Insert a Horizontal Page Break
The steps to add a horizontal page break on the worksheet are:
- Select the row where you want to add the page break. The page break will be inserted just above the selection. In our example, we want a page break between rows 11 and 12 so we have selected row 12.

- Go to Page Layout tab > Page Setup section > Breaks button > Insert Page Break
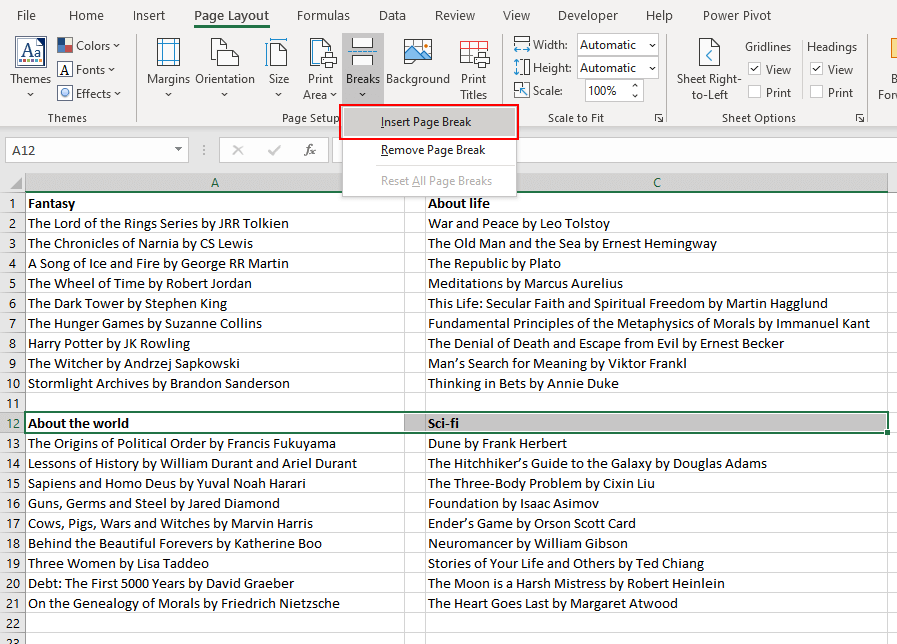
- And that inserts the page break in a gray line which is slightly darker than gridlines.

If the page break didn’t quite make the statement you wanted it to, you can remove the gridlines to see it better but it is very much there. One of the few ways to blank out the gridlines: in the Page Layout tab, Sheet Options section, uncheck the View checkbox for Gridlines.
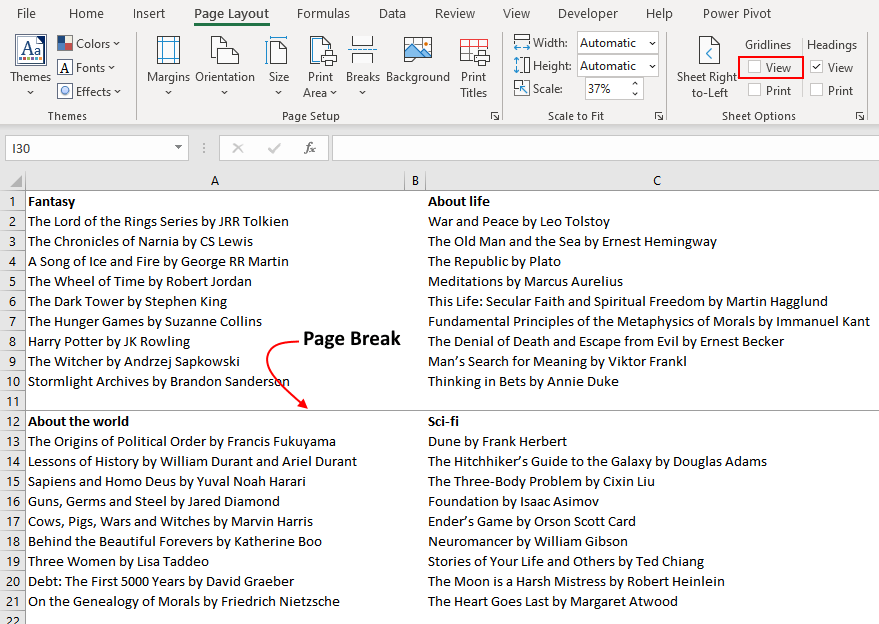
Now the page break is more visible.
Note – The page break can also be previewed in Page Break Preview (Alt + WI). Press (Alt + WN) to revert to Normal view.
How to Manually Insert a Vertical Page Break
The process of adding a vertical page break is very similar to that of adding a horizontal page break. Here we have the steps to add a vertical page break on the worksheet:
- Select the column where you want to add the page break. The page break will be inserted on the left of the selection. We want a page break between columns B and C so we have selected column C.

- Go to Page Layout tab > Page Setup section > Breaks button > Insert Page Break
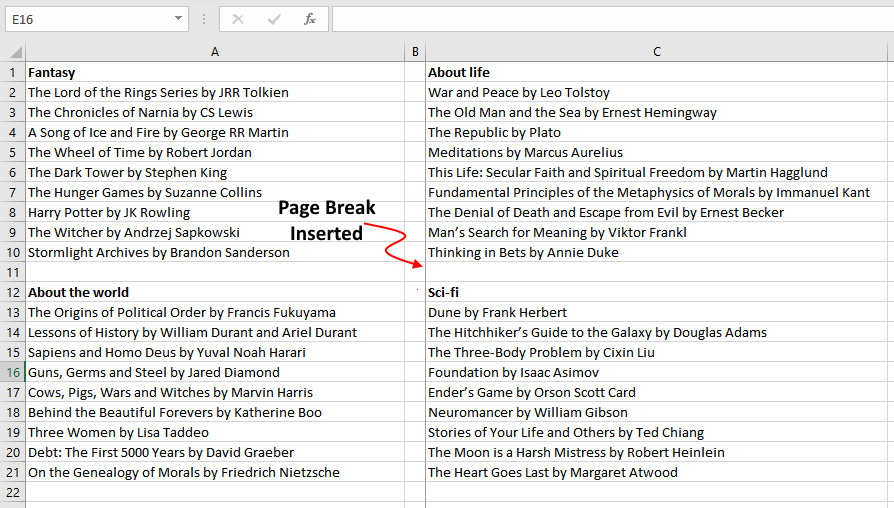
These steps add the vertical page break which is a gray line slightly darker than gridlines:
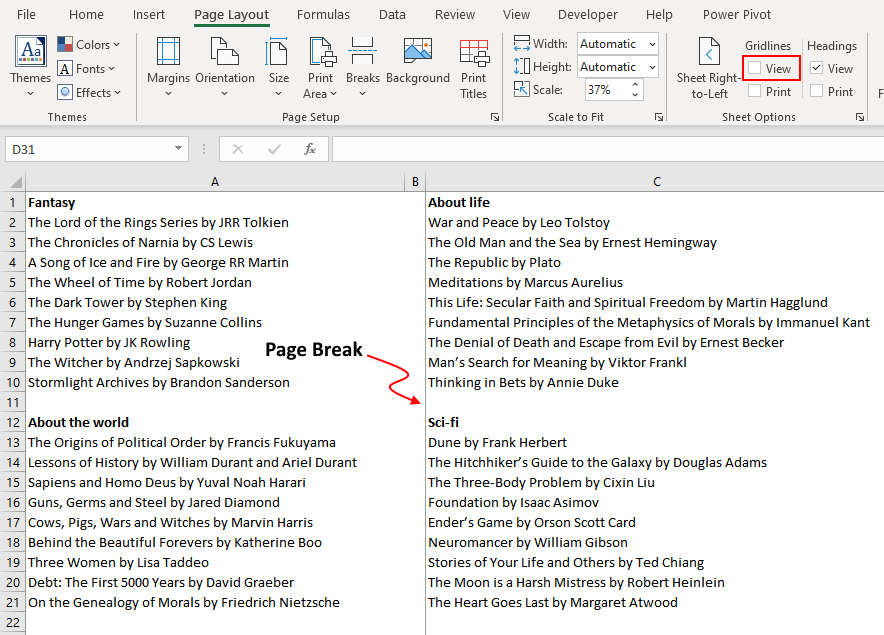
If the page break isn’t up to your level of visibility, you can remove the gridlines to see it better.
How to Manually Insert Double Page Breaks (Horizontal & Vertical)
Here we will show you how to add a crisscross page break. With this method, Excel will add a horizontal and vertical page break simultaneously. Instead of selecting a row and a column, you need to select the cell, combining selection criteria of both horizontal and vertical page break selection. The crisscross page break will appear on the top left corner of the selected cell. Let us show you:
- Select the cell where you want to insert the page break. The page break will appear above and on the left of the selection. We want the page break between rows 11 and 12 and between columns B and C so we have selected C12.
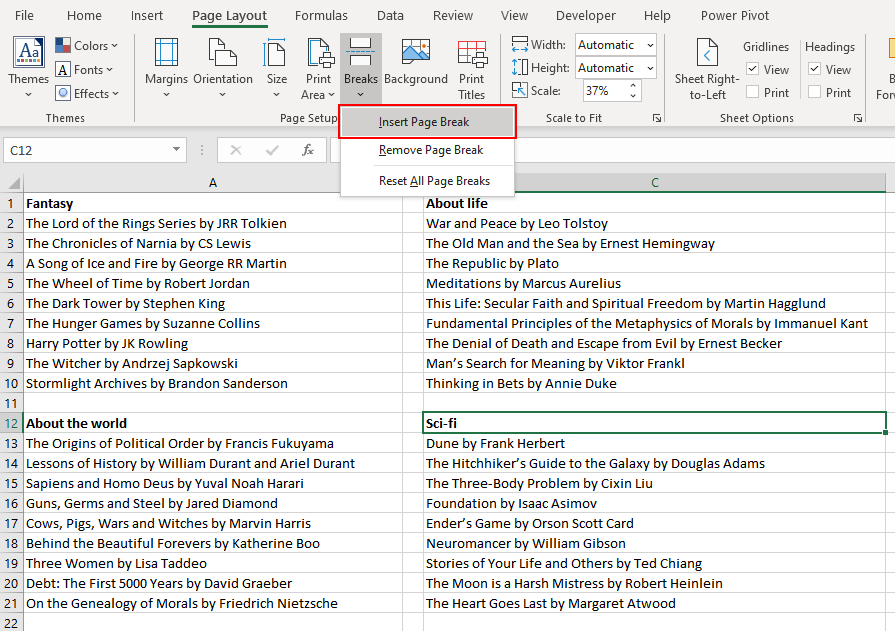
- Go to Page Layout tab > Page Setup section > Breaks button > Insert Page Break

These steps add the horizontal and vertical page breaks which is a gray crisscross line slightly darker than gridlines:

With gridlines removed the page breaks can be seen clearly.
Recommended Reading: All About Named Ranges in Excel
View All Page Breaks
By default, the workbook is in normal view. You can view all the page breaks in the Page Break Preview from:
- Page Break Preview icon in the Status Bar.
- Page Break Preview button on the ribbon menu.
- Keyboard shortcuts.
Let’s go over all three.
Page Break Preview Using Status Bar
A single-click option lies at the bottom of the workbook in the Status Bar in the form of these icons:
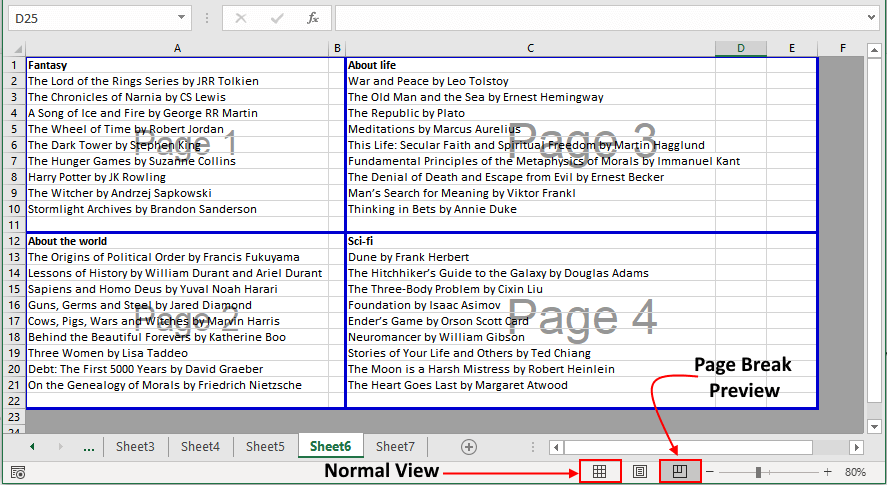
The left one is by default the Normal view and the rightmost one is the Page Break Preview icon. The Page Break Preview will look like this:
The page breaks in the Page Break Preview are represented by blue lines and the pages will appear numbered. The zoom level will automatically shrink to 60% to allow maximum page breaks to be seen.
The page breaks can be adjusted (explained in the next segment). Click on the Normal icon to go back to the normal view.
Page Break Preview Using Ribbon Menu
Another way to see the Page Break Preview is from the top ribbon. Click on the View In the Workbook Views section, you will note that the Normal option is selected.
Select the Page Break Preview option next to it.
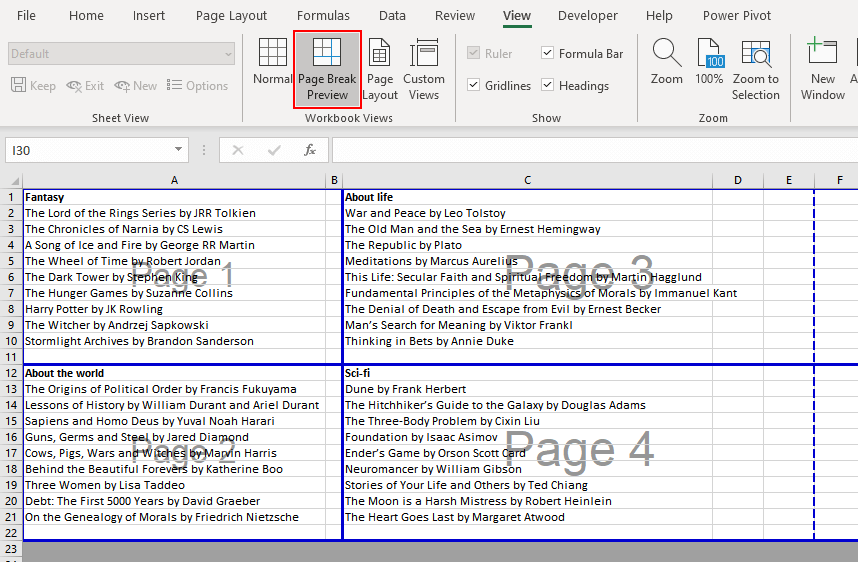
Here also the Page Breaks are represented by solid blue lines for manual page breaks and dashed blue lines for automatic page breaks. The pages are numbered. You can click on the Normal button to go back to the normal view.
Page Break Preview Using Keyboard Shortcuts
Press (Alt + WI) for Page Break Preview.
Page breaks to some extent can also be seen in the Print Preview. The difference between viewing page breaks in Print Preview and Page Break Preview is that the Print Preview will only show the contents of a single page and though you may understand the distribution page by page, the Page Break Preview will display all the pages and page breaks showing the complete distribution.
And of course, the page breaks can be adjusted by moving them in Page Break Preview. Let’s show you how.
Move a Page Break in Excel
Page breaks can be adjusted by moving them in Page Break Preview. It’s as simple as accessing the Page Break Preview by any one of the three ways above and adjusting the blue lines.
In this section, we will try to see how to move both manual as well as automatic page breaks in Excel.
Adjust a Manual Page Break
Let’s say we want to adjust the manual page break from being between columns B and C to being between A and B:

- Click on the Page Break Preview icon on the Status Bar or navigate to it from the Ribbon View > Page Break Preview.
- Hover the cursor to the page break you want to adjust. The cursor will change to a double-headed arrow, indicating the directions in which the page break can be moved. For our case, we will drag the page break to the adjacent column.

We have adjusted the page break to the next column.
Adjust an Automatic Page Break
Like Manual Page Breaks, Automatic Page Breaks can also be moved and adjusted. However, after moving an automatic page break (with dashed line) it transforms into a manual page break (with solid line).
Let's see this in action:

We are trying to move the automatic page break between columns B and C to be between A and B.
- Click on the Page Break Preview icon on the Status Bar or navigate to it from the Ribbon View > Page Break Preview.
- Hover the cursor to the page break you want to adjust. The cursor will change to a double-headed arrow, indicating the directions in which the page break can be moved. For our case, we will drag the page break to the adjacent column.

- You will notice that the page break changes its position as intended but also changes its style from a dashed blue line to a solid blue line. This change in style signifies that the page break has now become a manual page break.
Remove Page Breaks in Excel
Manual page breaks can be deleted in the Page Break Preview. Let’s see how to:
- Remove a manual page break
- Reset all manual page breaks
Note: Automatic page breaks cannot be removed, you can just reposition them.
Remove a Manual Page Break
Manual page breaks can be removed by selection but since a page break itself cannot be selected, we have to select the row below the page break (for a horizontal page break) or the column on the right of the page break (for a vertical page break).
Let's try to do it:
- Click on the Page Break Preview icon on the Status Bar or navigate to it from the Ribbon View > Page Break Preview.
- Next, you need to select the appropriate row, column, or cell in order to delete the page break.
- To delete a horizontal page break select the row just beneath the page break that you want to remove.
- To delete a vertical page break select the column just next (rightwards) to the page break that you want to remove.
- To delete a criss-cross page break select the cell in the bottom right of the page break as shown.
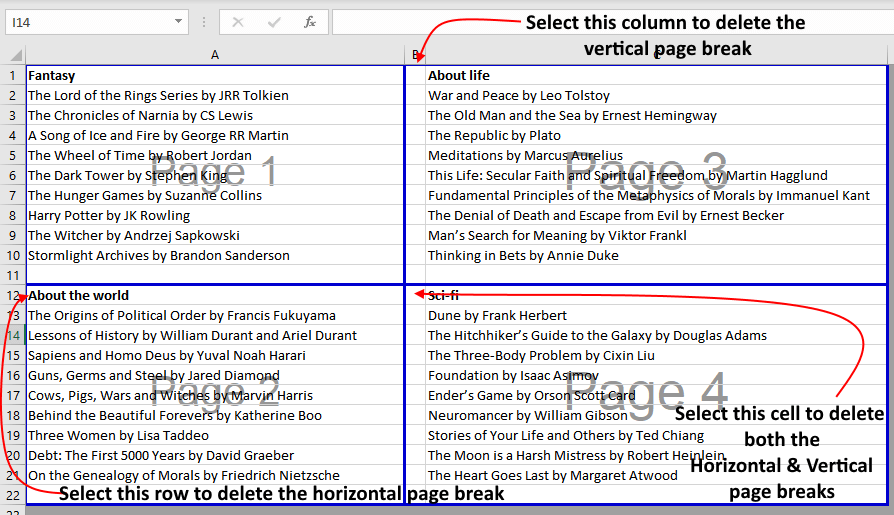
- After selecting the appropriate cell, row, or column. Navigate to the Page Layout tab > Page Setup section > Breaks button > Remove Page Break option.
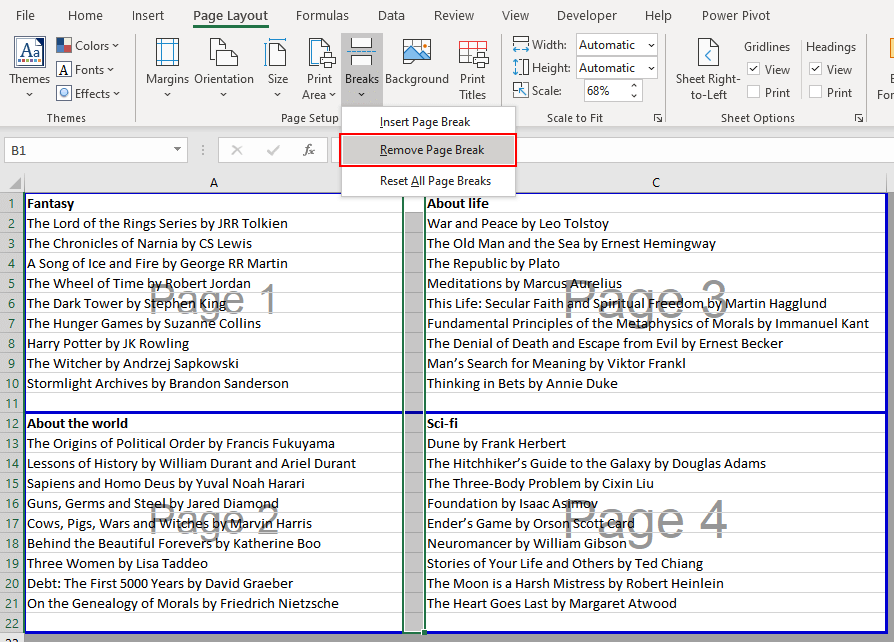
- Alternatively, you can also, right-click the selection and select Remove Page Break from the context menu. Or you can also use the keyboard shortcut ALT + P + B + R
Reset all Manual Page Breaks
With this method, all the manual page breaks can be removed from the worksheet. This option will basically reset all the manually inserted page breaks.
Let’s show you how to make use of this feature.
- Click on the Page Break Preview icon on the Status Bar or navigate to it from the Ribbon View > Page Break Preview.
- Navigate to Page Layout tab > Page Setup section > Breaks button > Reset all Page Breaks option.
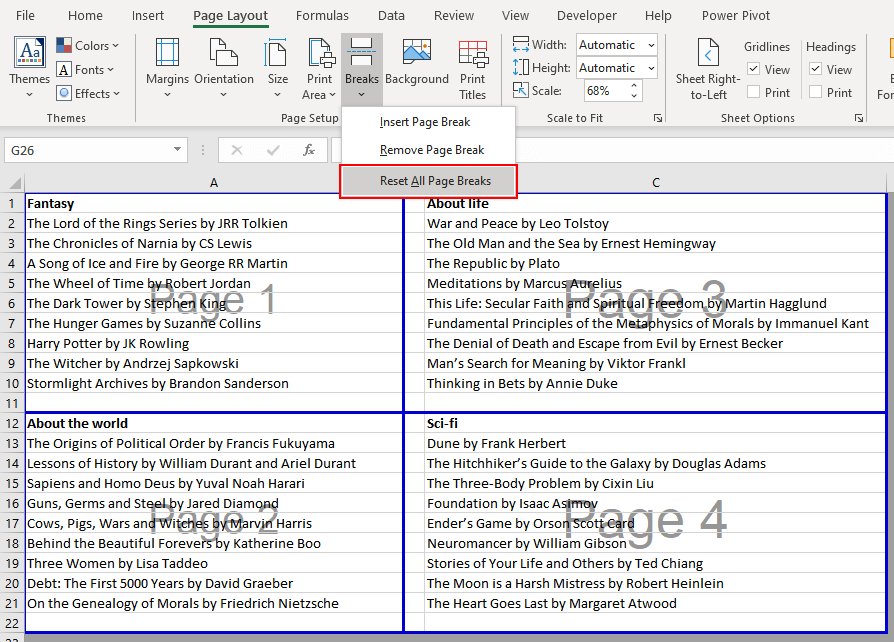
- Alternatively, you can also, right-click anywhere on the sheet and select Reset all Page Breaks from the context menu. Or you can also use the keyboard shortcut ALT + P + B + A
Hide or Show Page Break Marks
If the page break marks are bothering you while working on the sheet, you can hide the marks from Excel options. Here’s how:
This is what the page breaks are looking like on the worksheet with the gridlines removed.

- Click on the File tab and select Options from the left panel.
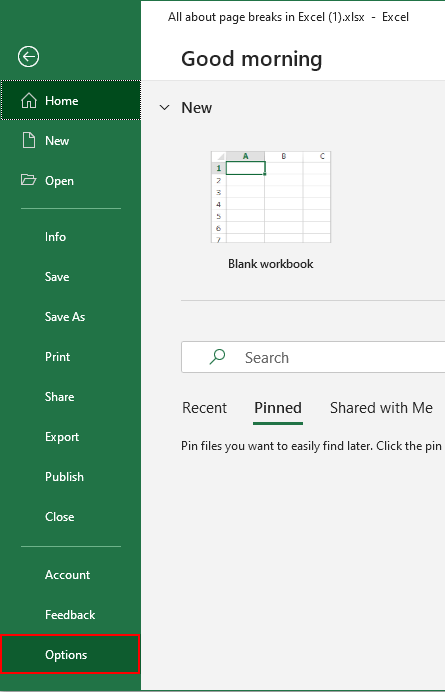
- Select Advanced from the left pane and scroll below to Display options for this worksheet. Uncheck the Show page break checkbox.
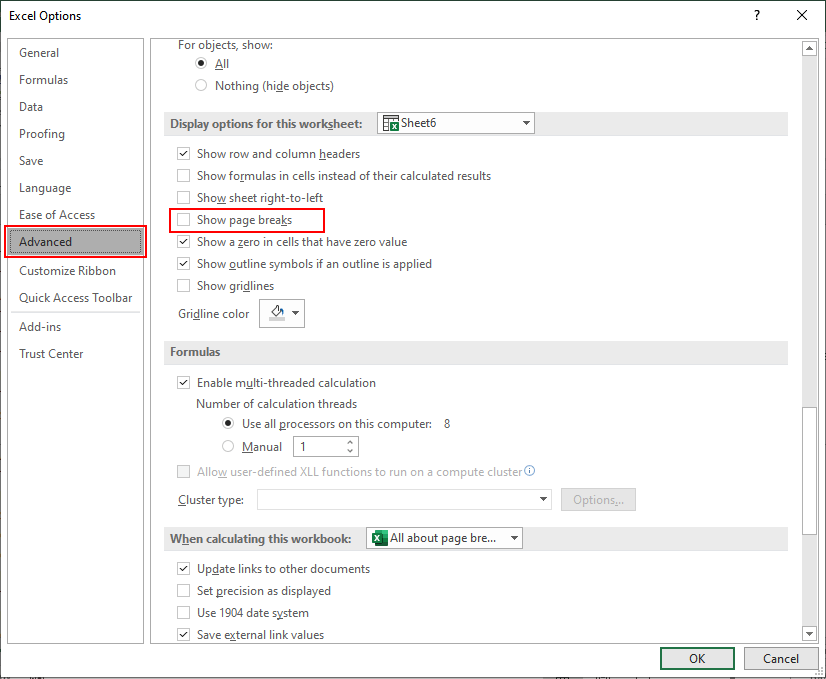
- Click OK and close the Excel Options dialog box.
Coming back to your worksheet, the page break marks have disappeared.

Use the same steps and tick the Show page break checkbox to make the page break marks visible again.
Page Break along with Subtotal
Now here’s one of the nifty things about Excel; the control over the data. You can have Excel automatically adding page breaks to group categories in a dataset by using the Subtotal feature. Let's see how to make it happen:
We have sales data regarding a hair salon.
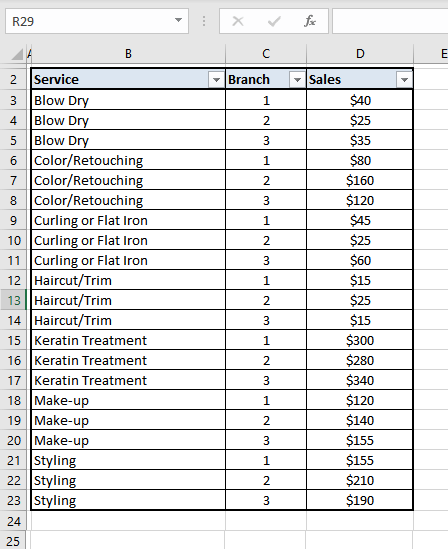
The data can be arranged to group the performance of branches or even the services to highlight which services are the cash cows in the salon. For now, we will check the performance of the branches.
First, we filter the data according to the Branch. Then we apply the Subtotal feature. Find the steps below:
- Filter the data, sorting it from smallest to largest.
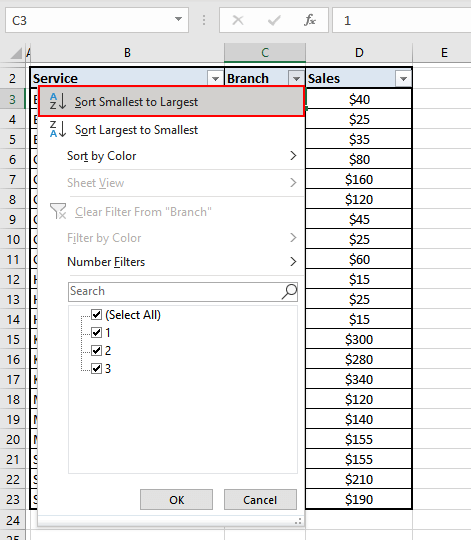
- This will filter the data branch-wise.
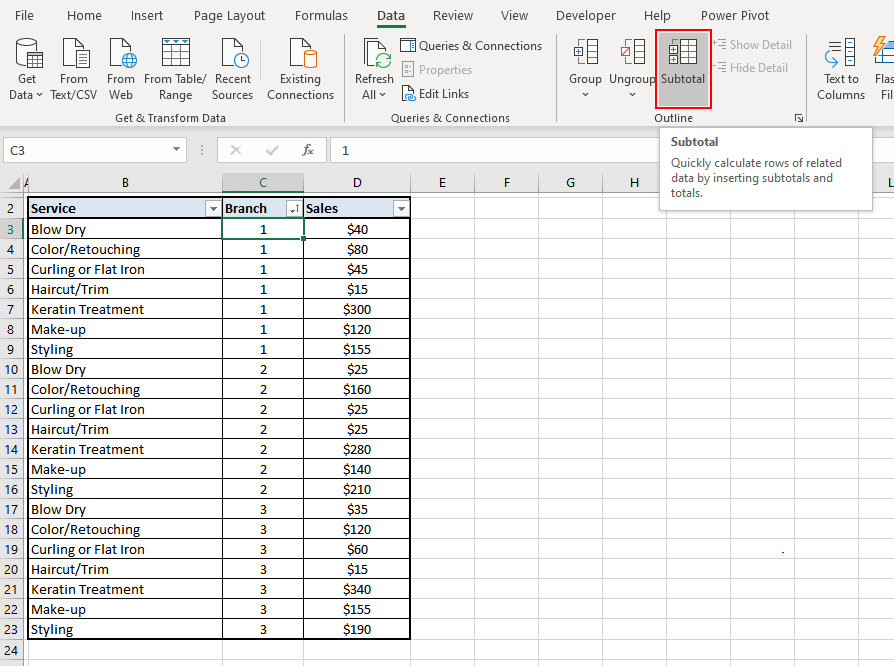
- Now, let’s add the Subtotal feature. To do this, navigate to the Data tab > Outline section > Subtotal
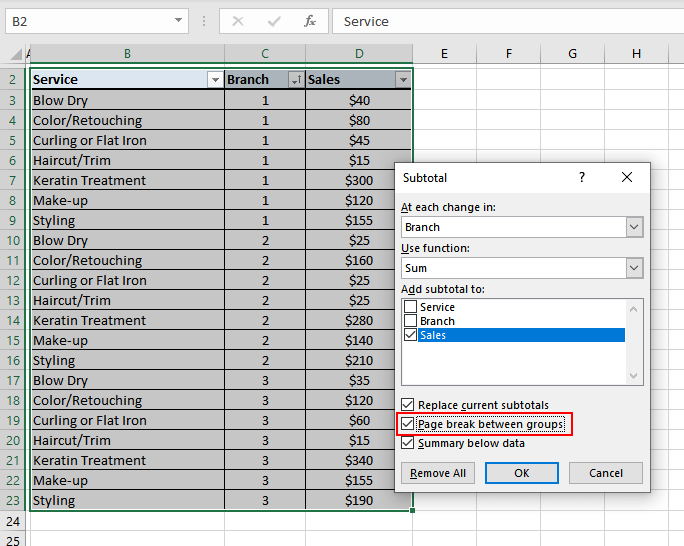
- This will launch the Subtotal dialog box. From the At each change in: menu, select Branch as we want to focus on the changes related to the Branch. Tick the Sales checkbox to add the subtotals for Sales. Tick the Page break between groups checkbox for the page breaks to be added.
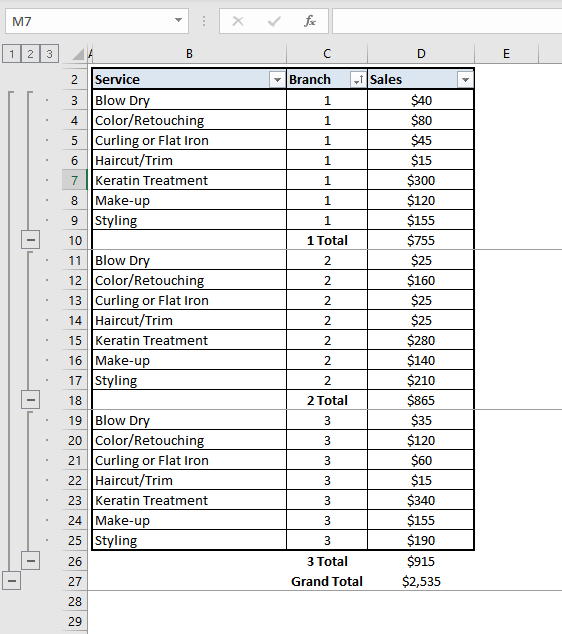
Neat isn’t it? Conveniently, each branch’s data can be printed on separate pages with the totals of each branch and the page breaks added, thanks to the page break option in the Subtotal feature.
We should call the end now. That was really interesting, learning how things can be controlled around the humble page break. Looks like page break got its big break today. Next time you’re having trouble with what to print on your sheets, try taking pointers from this tutorial instead of having a breakdown over page breaks. We always have more from Excel ready for you and we’ll keep it coming.


