Do you remember seeing vertical text somewhere and tried to copy that style into your sheets by typing each letter with Alt + Enter in between? If we have spotted you correctly, today is your day and this post is for you. You will learn how to adorn your worksheets with vertical text and diagonal text and how to restore the text in case you don’t like the changes.
By text rotation, we mean changing its orientation from horizontal to diagonal or vertical. What’s the purpose of rotating the text? Should you do it because it’s something new you found out and it looks more interesting.

Well, sure, that’s not a bad reason for rotating text but there is a bit more to this than just looks. Depending on where the text sits and which setting is applied, the orientation of the text can save some space making the data more compact and easier to read.
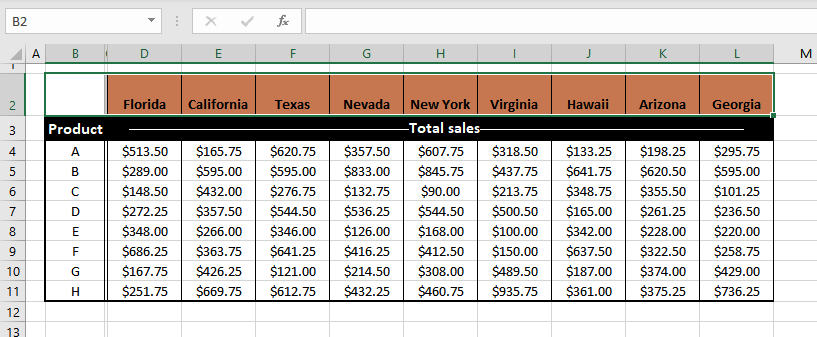
Of course, there's also a little thing called Word Wrap but let's not steal text rotation's limelight; for one-word headings, what good would Word Wrap be? Now let’s get down to the practical part of this guide. Here is our problem case for this tutorial; we will be meddling with the headers in row 2:
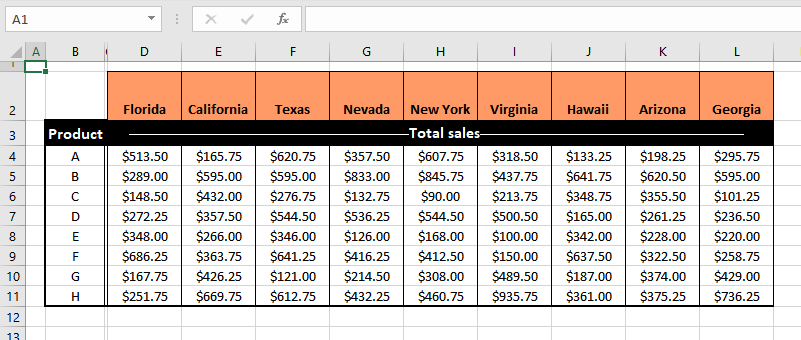
If we were to add more columns to this dataset, there would be a lot of scrolling back and forth. Evidently, it would be a good idea here to rotate the text diagonally. This will shrink the width of the columns subsequently shrinking the width of the dataset for compacting the data and/or for fitting more columns in.
Thanks to the Excel gods, accomplishing this is no tricky work, so let’s look at the how-to of rotating text in Excel.
Rotate Text Using Ribbon Alignment Option
In a few simple steps, the text in a cell can be rotated and we will rotate the headers in our dataset to compress the columns as much as we can. Here are the steps:
- Select the cells with the text that needs rotation. For our example, we need to select row 2 with the State name headers.
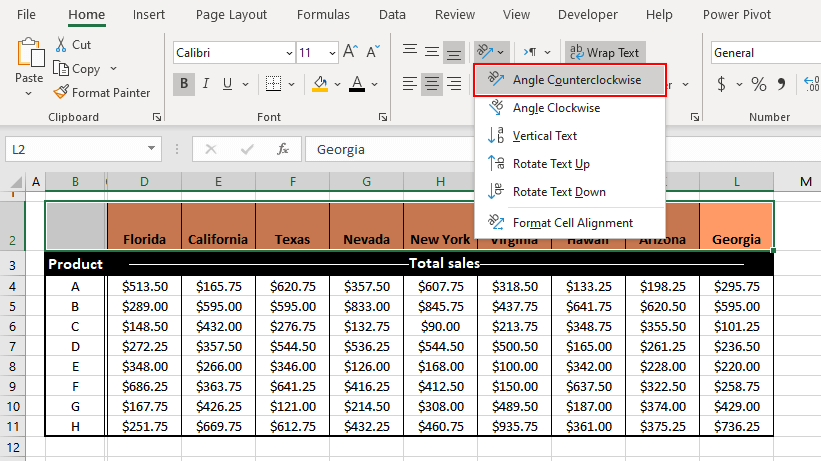
- In the Home tab, in the Alignment section, click the Orientation button to open its menu. Select the Angle Counterclockwise option to rotate the text to a diagonal orientation.
- These steps will have rotated the text by 45 degrees to a diagonal setting:
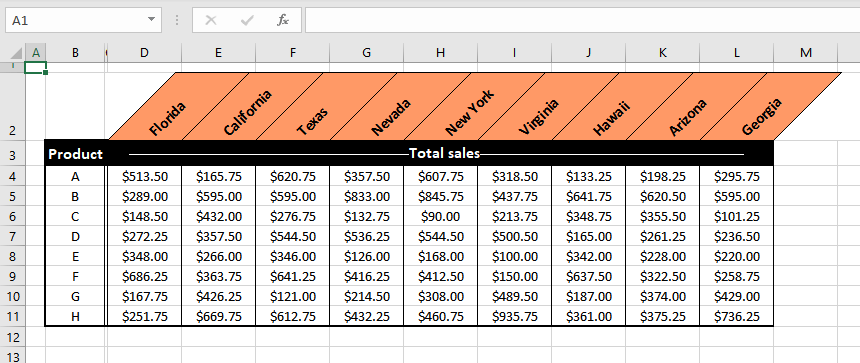
Nifty isn’t it? This is what our sheet looks like after rotating the text, adjusting the horizontal and vertical alignment of the text (using the buttons next to the Orientation button), and adjusting the column width.
There are other options in the Orientation drop-down menu and you can choose how you want to rotate the text. If you thought this was giving you control over how you want the text to look, you really need to discover the next option! You can choose exactly how much you want the text to rotate. Find out how below.
Rotate Text Using Format Cells Dialog Box
Above we rotated the text using a preset option which rotates the text by 45 degrees. To control how much the text can be rotated, use the following steps:
- Select the cells with the text that needs rotation. For our problem case, we need to select row 2 with the State name headers.
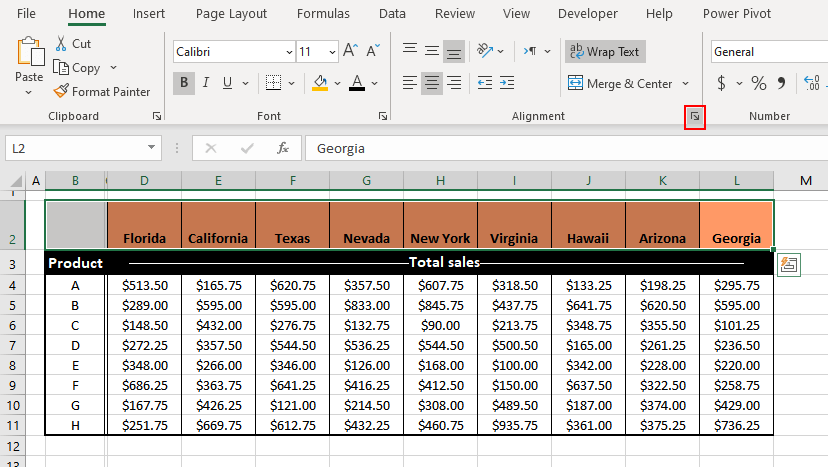
- In the Home tab, in the Alignment section, click the Alignment Settings option (Ctrl + 1) to launch the Format Cells dialog box.
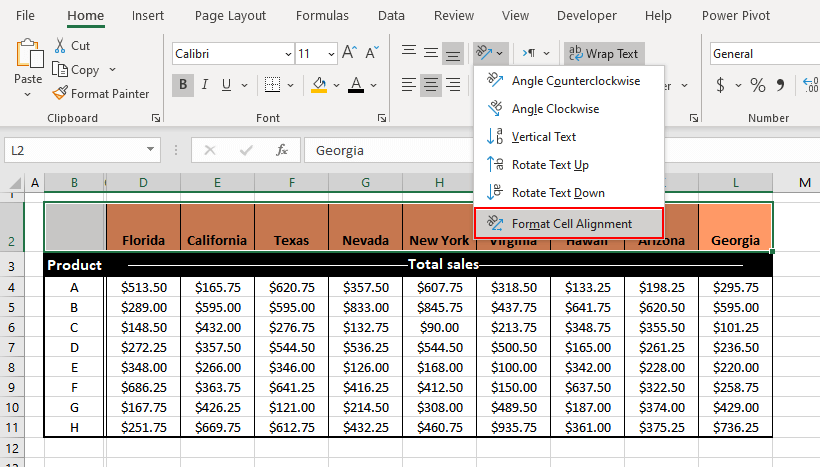
- Alternatively, you can also click the Orientation button to open its menu. Select the last option Format Cell Alignment to launch the Format Cells dialog box.
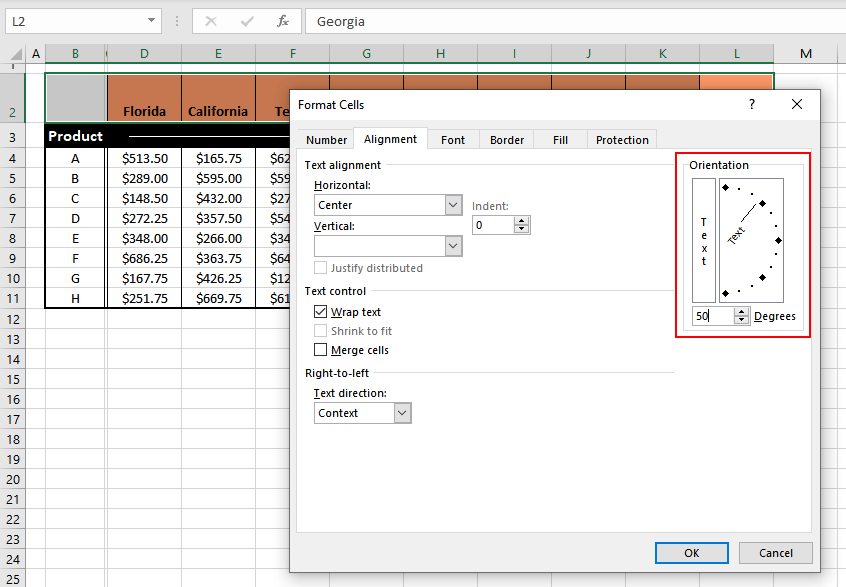
- In the orientation section, you can enter the degrees by which you want the text to be rotated (if you have good protractor eyes). You can also click and drag to adjust the rotation in the provided orientation box. Here we will adjust the text in the box which turns out to be 50 degrees.
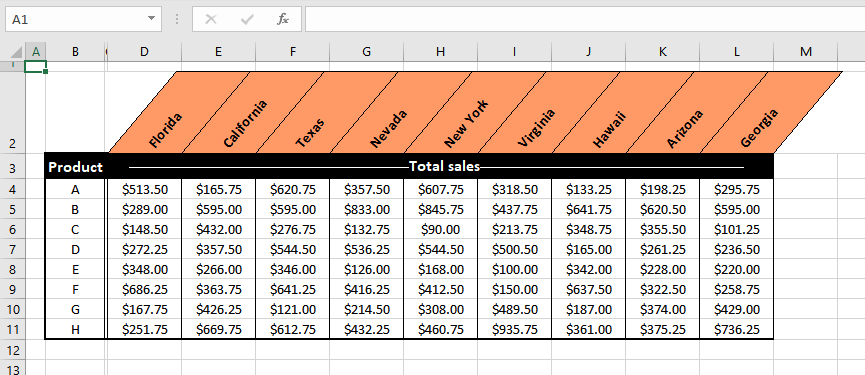
- Click OK.
Here is our text rotated, aligned, and the column width adjusted. Due to rotating the text slightly more, we are further able to shrink the column widths.
Keyboard Shortcuts to Rotate Text
This is the shortcut you will start with:
ALT, H, F, Q
Press the above keys one by one. Basically, as you press the keys, you will notice where the shortcut is taking you. H in the shortcut is for the Home tab. F is for formatting. FQ will open the Orientation drop-down menu.
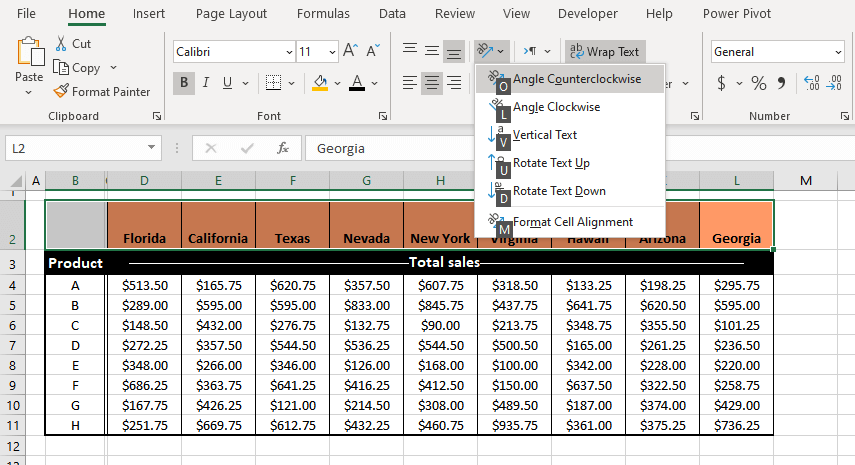
The drop-down menu is shown with further indications of keyboard shortcuts for the text rotation orientation. Press the relevant key for your task. The keyboard shortcuts hence become:
ALT, H, F, Q, O for rotating the text angle counterclockwise
ALT, H, F, Q, L for rotating the text angle clockwise
ALT, H, F, Q, V for vertical text
ALT, H, F, Q, U for rotating the text upward (bottom to top)
ALT, H, F, Q, D for rotating the text downward (top to bottom)
ALT, H, F, Q, M or Ctrl + 1 for opening the Format Cells dialog box
VBA Code To Rotate Text By Changing Orientation
Although there are plenty of easily accessible options to rotate text in Excel. But if you are a fan of VBA and looking to accomplish this using VBA, we've got you covered.
Here is the VBA code that helps you rotate text by changing the text orientation:
Sub RotateCellRange()
'Declare variables
Dim rng As Range
Dim orientation As Double
'Ingore errors if user clicks Cancel or X
On Error Resume Next
'Input Box to select cell Range
Set rng = Application.InputBox(Prompt:="Select cell range", Title:="Cell range", Type:=8)
'Input Box to enter the celllink offset
orientation = Application.InputBox("Set the orientation angle", "Orientation angle")
'Exit the code if user clicks Cancel or X
If Err.Number <> 0 Then Exit Sub
'Turn error checking back on
On Error GoTo 0
 rng.HorizontalAlignment = xlGeneral
 rng.VerticalAlignment = xlBottom
 rng.WrapText = False
 rng.orientation = orientation
 rng.ShrinkToFit = True
 rng.MergeCells = False
End Sub
To use this VBA code follow the below steps:
- While on the worksheet, press Alt + F11 to open the VBA editor.
- Navigate to the Insert tab and click the Module option. This will open the module window.
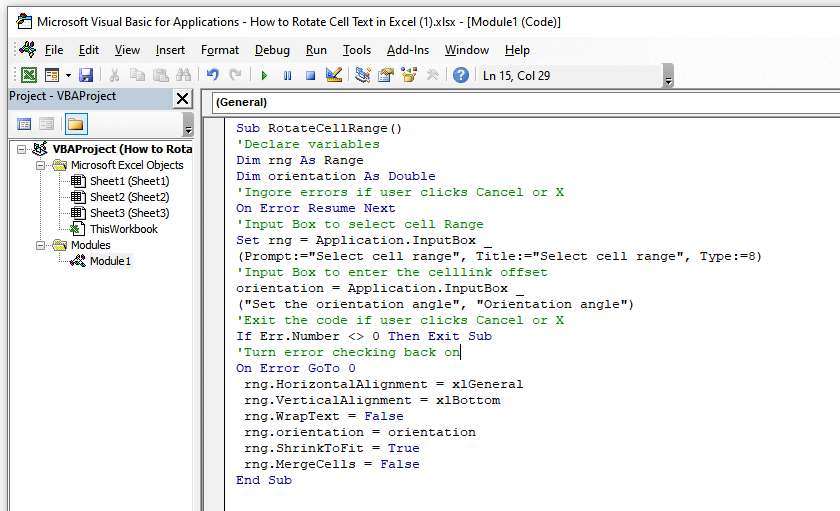
- In the module window that opens, paste the above code.
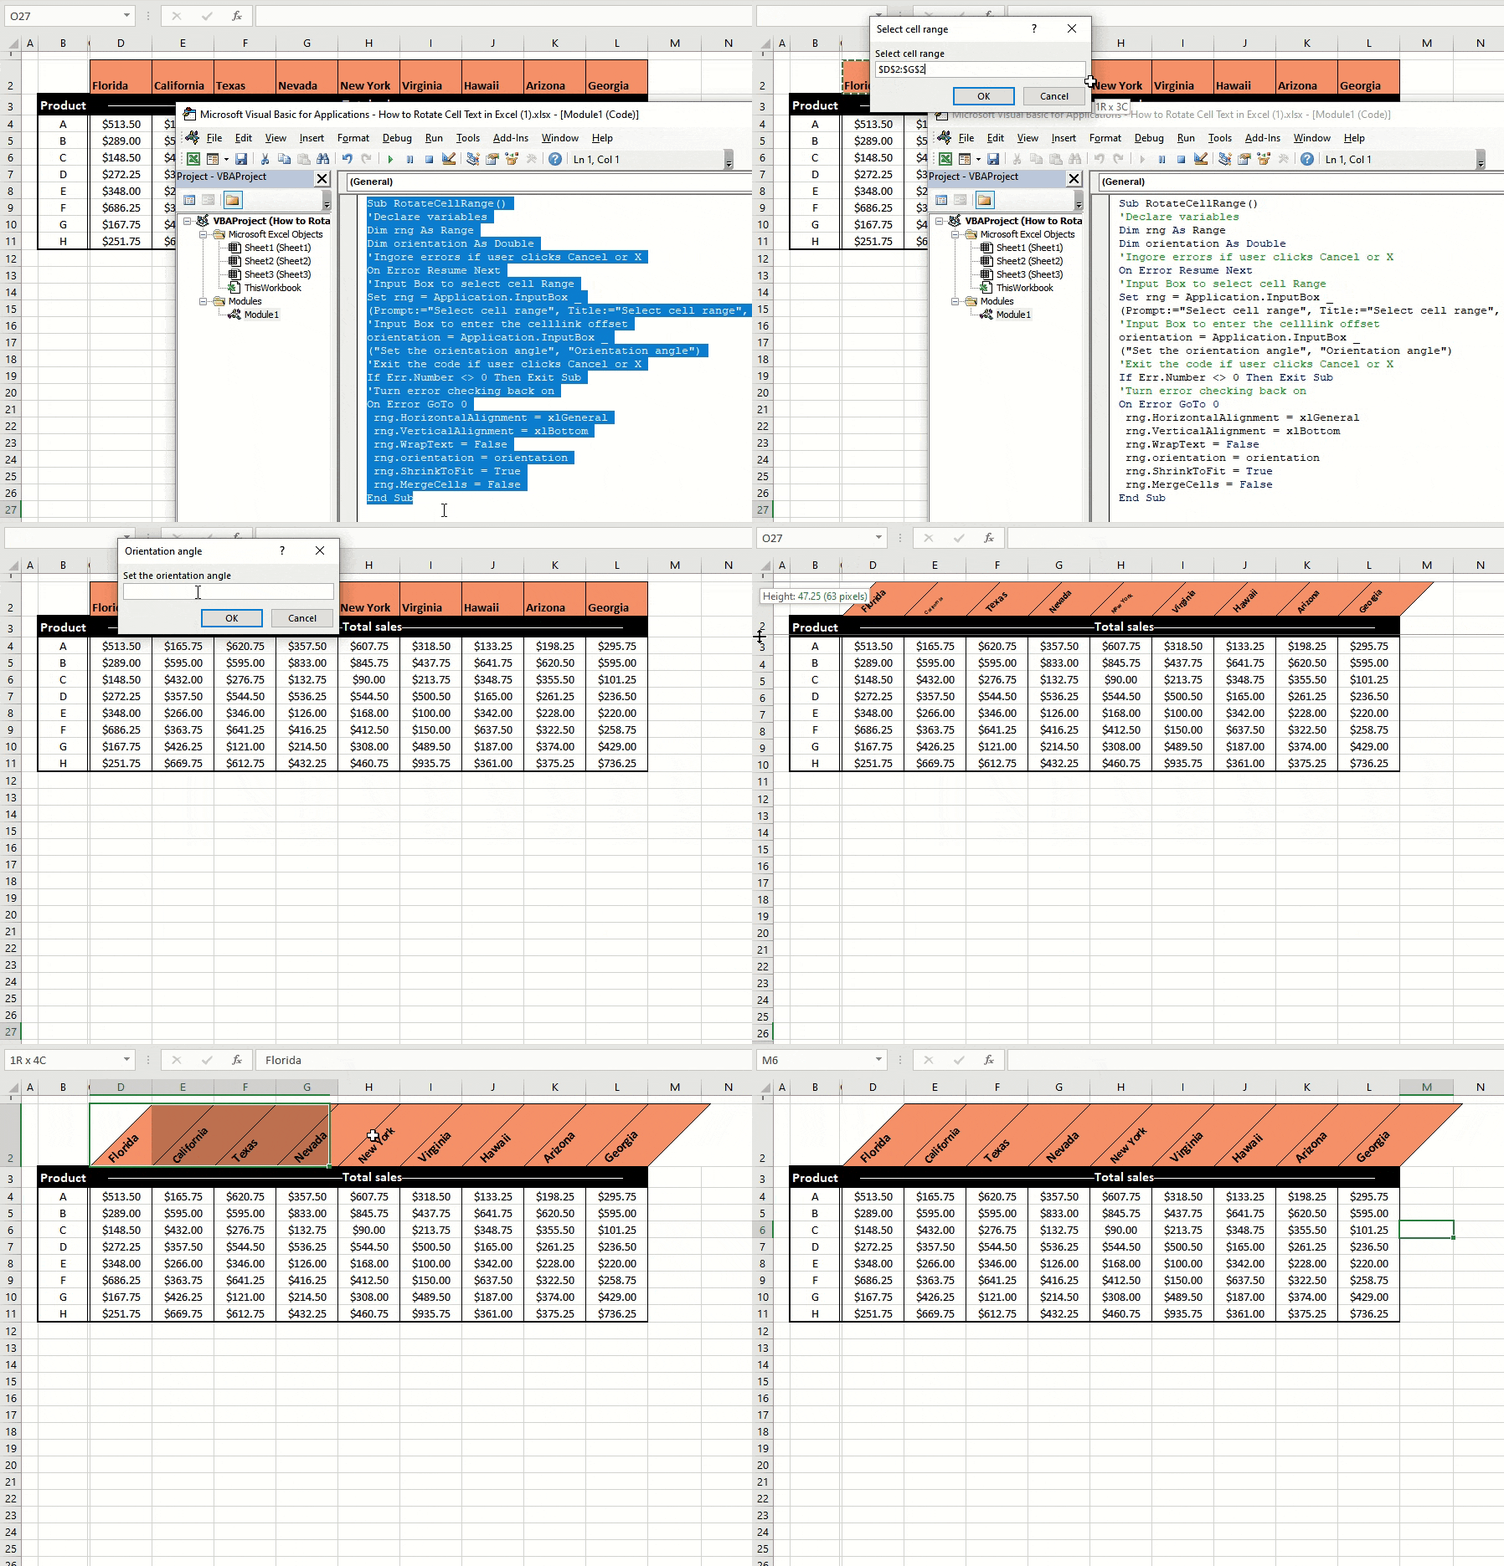
- Run the code, follow the prompts, and it is done. See the VBA in action above.
Change the Text Orientation Back to Horizontal (Default State)
There are two ways (or three ways if you count Undo as a way) to restore the text back to its default setting – horizontal left to right.
Method #1 – Toggle Angle Counterclockwise
Re-select the option from the Orientation drop-down menu. In our example for rotating text, we had rotated the headers anticlockwise from the Orientation options in the ribbon menu. If we re-do the steps and re-select Angle Counterclockwise from the options, the text will be restored to its original state.
Similarly, whichever option you have chosen from the Orientation options, re-select the option and the text will return to being horizontal. Here are the steps:
- Select the rotated text.
- Go to the Home tab > Alignment section > Orientation button > Angle Counterclockwise
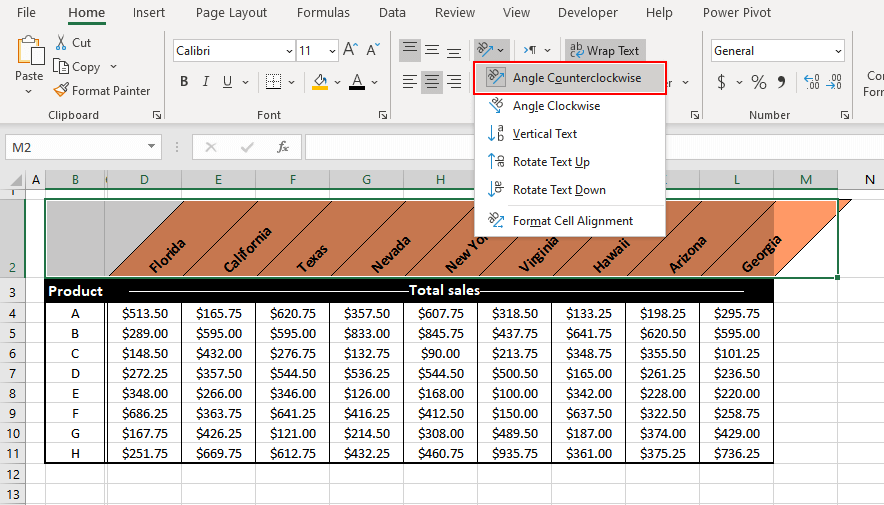
- Reselecting the option works like a switch button. We have restored the text to its original orientation with these steps.
Method #2 – Set Text Orientation Angle To Zero Degrees
The other way is to adjust the orientation of the text to 0 degrees. The steps are as follows:
- Select the rotated text.
- Press Ctrl + 1 or go to the Home tab > Alignment section > Alignment Settings option. Both will open the Format Cells dialog box.
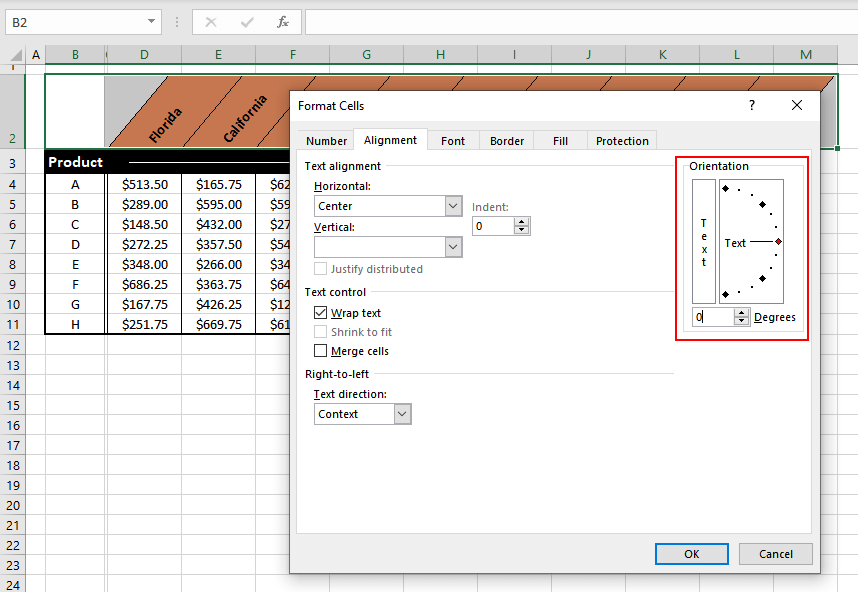
- In the Alignment tab, set the Orientation to 0 degrees.

- Click OK.
The text has been restored to its default horizontal setting:
Rotating cell text – mission accomplished! So here were a couple of ways in which you can rotate the text in a cell in Excel. If this is something new to you, we hope to have enlightened you. Don’t be afraid to carry out some experiments while you’re at your worksheets; if all goes south, there’s always Ctrl + Z. We’ll be back with more experiments for you (can we call them Excelliments? – probably not).

