One scenario is where you need to join multiple strings of text into a single text string. The flip of that is seperating a single text string into multiple text strings. If the data at hand was copied from somewhere or created by someone who completely missed the point of Excel columns, you will find that you need to split a block of text to categorize it.
Splitting the text largely depends on the delimiter in the text string. A delimiter is a character or symbol that marks the beginning or end of a character string. Examples of a delimiter are a space character, hyphen, period, comma.

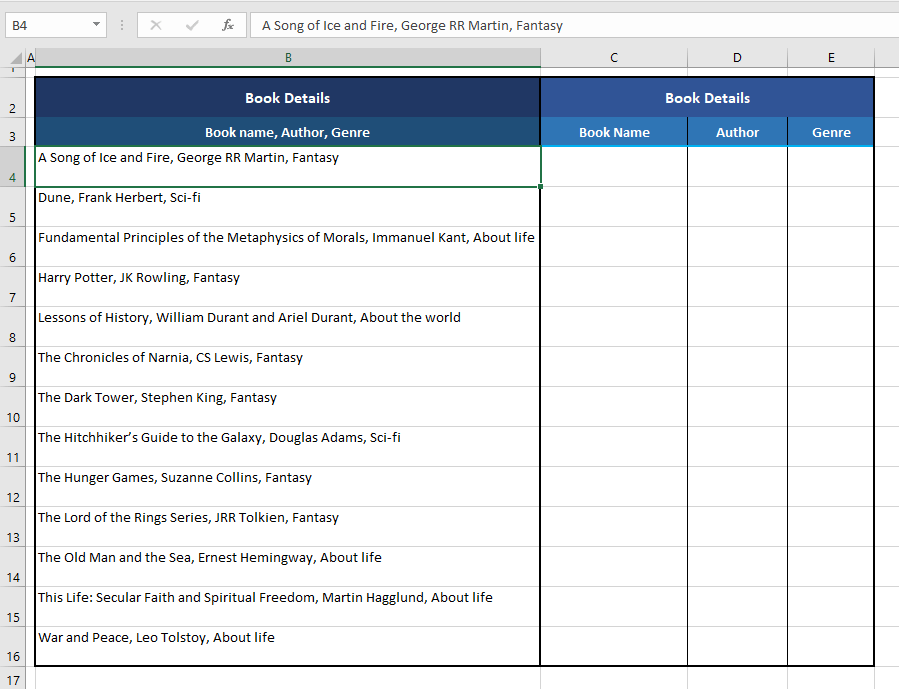
Our example case for this guide involves splitting book details into book title, author, and genre. The delimiter we’ve used is a comma:
This tutorial will teach you how to split text in Excel with the Text to Columns and Flash Fill features, formulas, and VBA. The formulas method includes splitting text by a specific character. That’s the menu today.
Let’s get splitting!
Method #1 – Using Text to Columns
This feature lives up to its name. Text to Columns featue splits a column of text into multiple columns with specified controls. Text to Columns can seperate text with delimiters and since our data contains only a comma as the delimiter, using the feature becomes very easy. See the following steps to split text using Text to Columns:
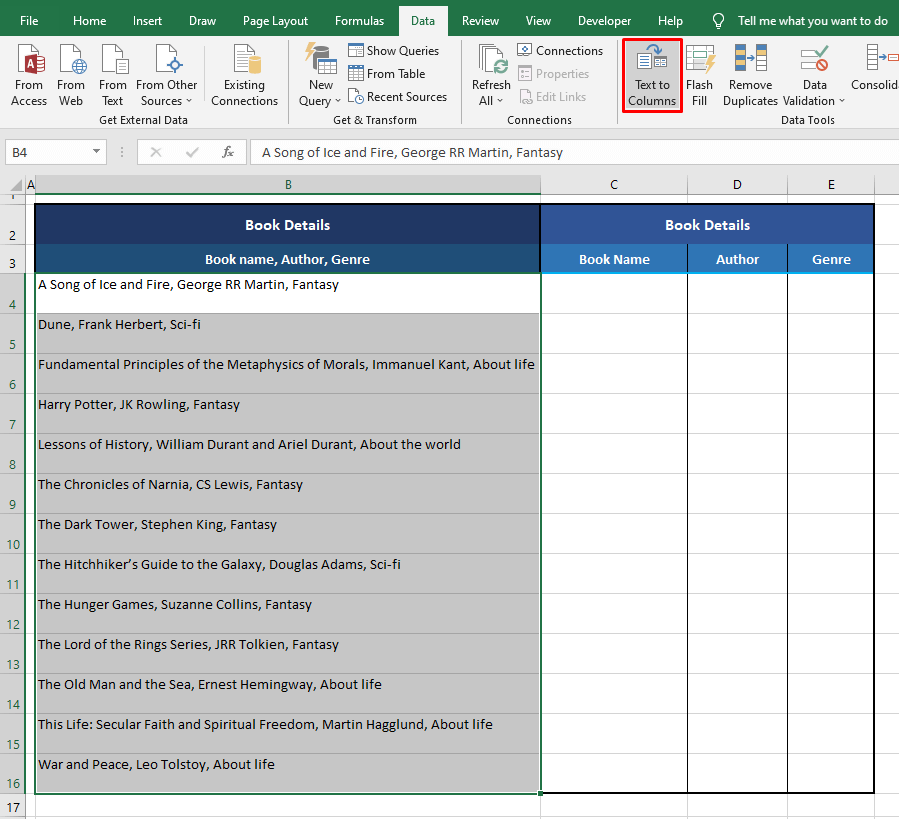
- Select the data you want to seperate.
- Go to the Data tab and select the Text to Columns icon from the Data Tools
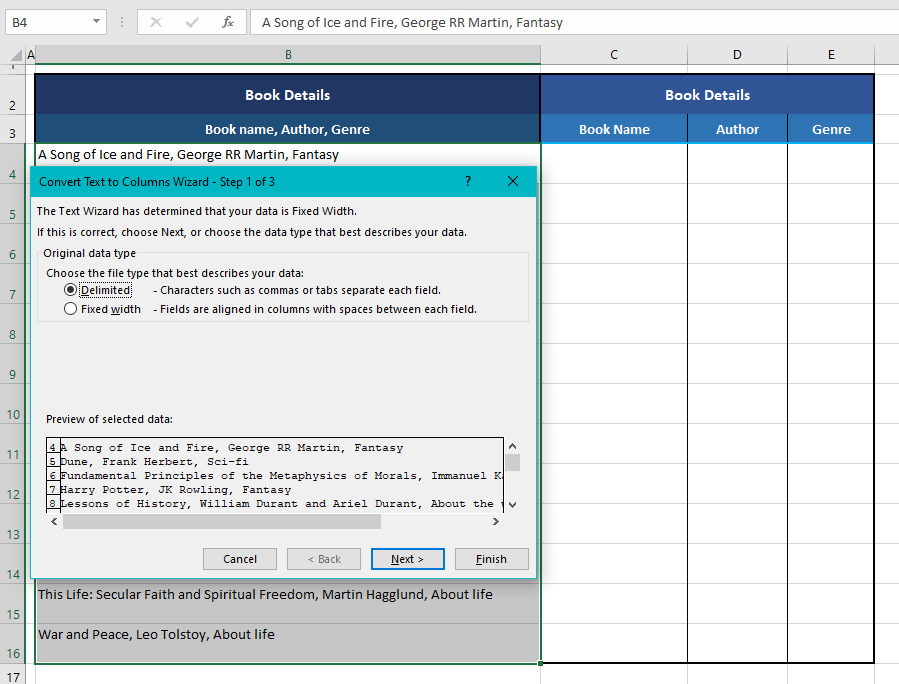
- Select the Delimited radio button and then click on the Next
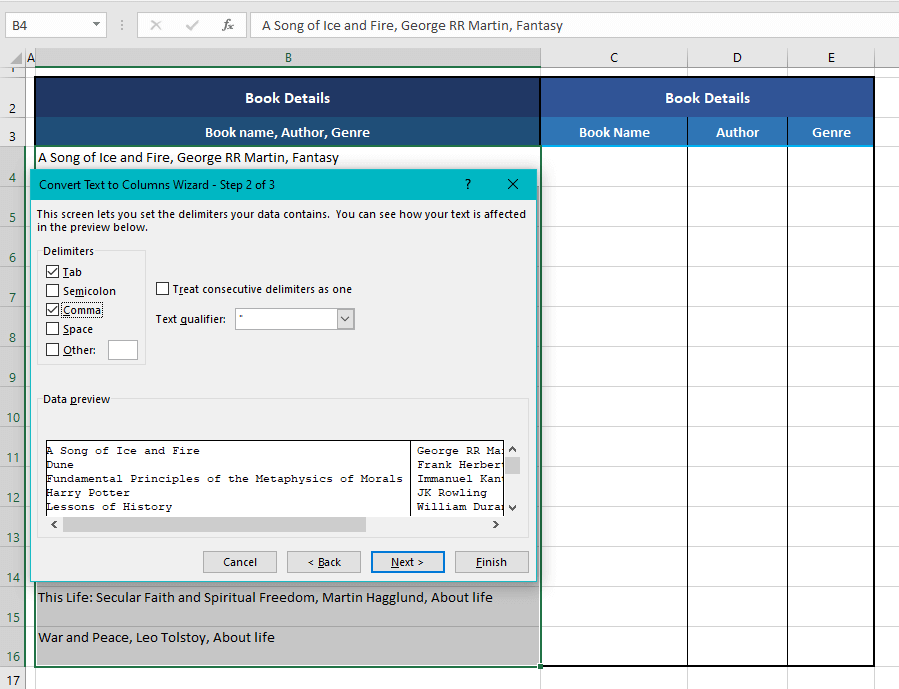
- In the Delimiters section, select the Comma
- Then select the Next button.
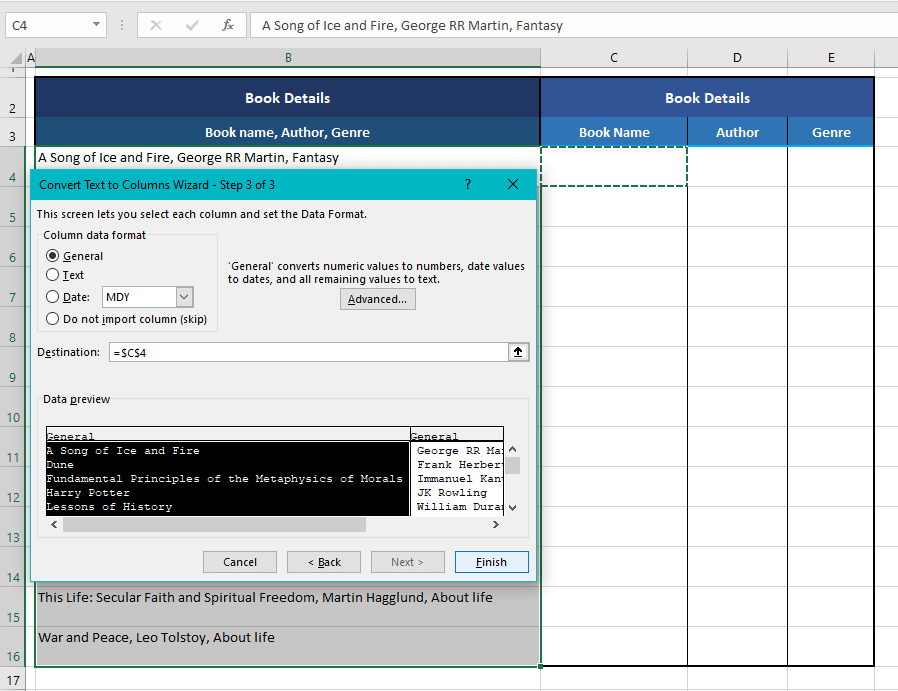
- Now you need to choose where you want the split text. Click on the Destination field, then select the destination cell on the worksheet in the background where you want the split text to start.
- Select the Finish button to close the Text to Columns
Using the comma delimiter to separate the text string, Text to Columns has split the text from our example case into three columns:
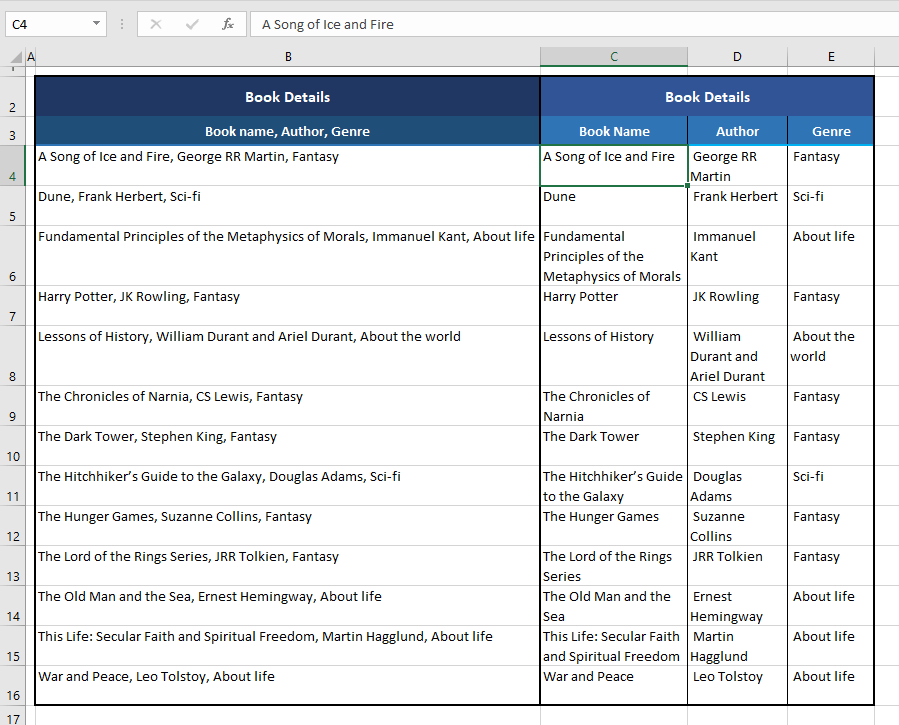
Luckily, our data doesn’t contain a book with commas in the book name. If we had the book Cows, Pigs, Wars and Witches by Marvin Harris in the dataset, the text would be split into 5 columns instead of 3 like the rest. If the delimiter in your data is appearing in the text string for more than delimiting, you’ll have better luck splitting text with other methods. Now unto another observation.
Using TRIM Function to Trim Extra Spaces
Let’s cast a closer look at the output of Text to Columns. Notice how the last two columns carry one leading space? You can see that the values in columns D and E are not a hundred percent aligned to the left:
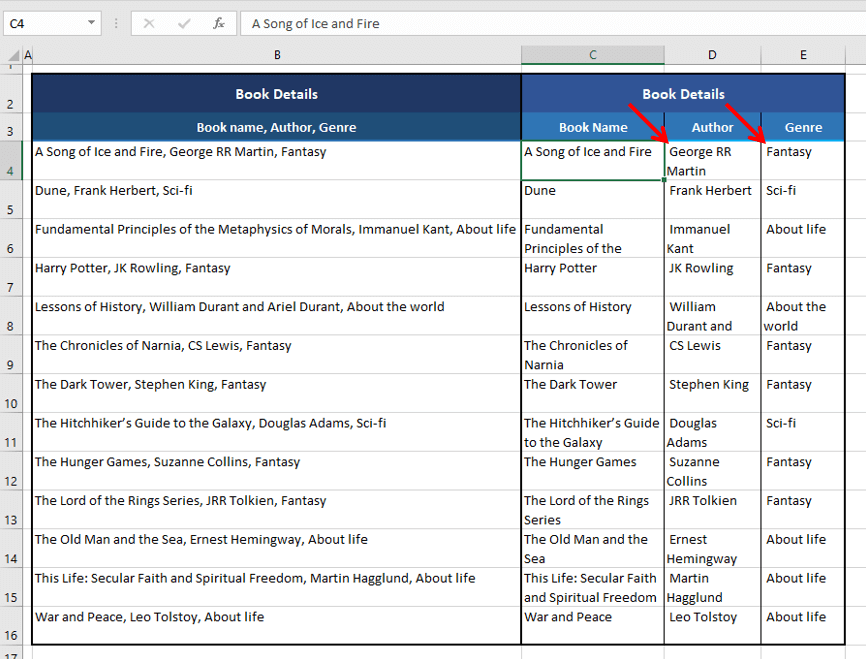
The last two columns carry a leading space because Text to Columns only takes the delimiter as a mark from where to split the text. The space character after the comma is carried with the next unit of text and that has our data with a leading space.
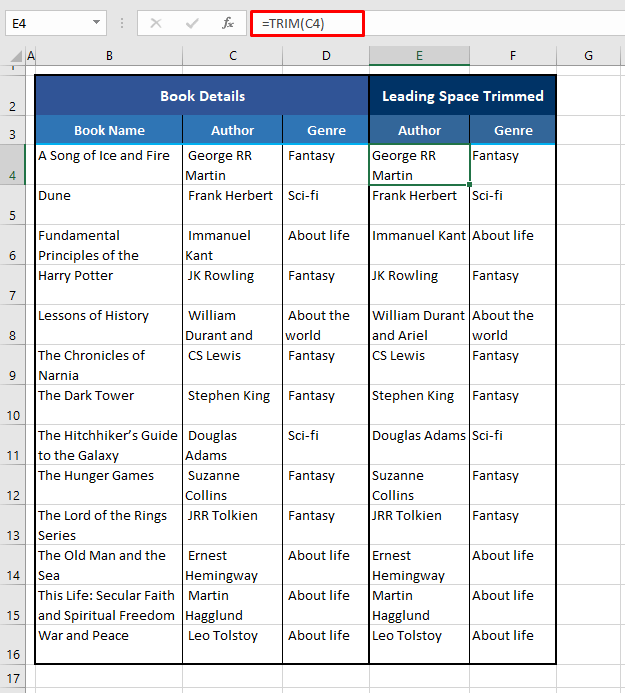
A quick fix for this is to use the TRIM function to clear up extra spaces. Here is the formula we have used to remove leading spaces from columns D and E:
=TRIM(C4)The TRIM function removes all spaces from a text string other than a single space character between two words. Any leading, trailing, or extra spaces will be removed from the cell’s value. We have simply used the formula with a reference of the cell containing the leading space.
And that cleaned up the leading spaces for us. Data – good to go!
Method #2 – Using Formula To Separate Text in Excel
We can make use to Excel functions to construct formulas that can help us in splitting a text string into multiple.
Split String with Delimiter
Using a formula can also split a single text string into multiple strings but it will require a combo of functions. Let’s have a little briefing on the functions that make part of this formula we will use for splitting text.
The SUBSTITUTE function replaces old text in a text string with new text.
The REPT function repeats text a given number of times.
The LEN function returns the number of characters in a text string.
The MID function returns a given number of characters from the middle of a text string with a specified starting position.
The TRIM function removes all spaces, other than single spaces between words, from a text string.
Now let’s see how these functions combined can be used to split text with a single formula:
=TRIM(MID(SUBSTITUTE($B5,",",REPT(" ",LEN($B5))),(C$4-1)*LEN($B5)+1,LEN($B5)))In our example, the first cell we are using this formula on is cell B5. The number of characters in B5 as counted by the LEN function is 49. The REPT function repeats spaces (denoted by “ “ in the formula) in B5 for the number of characters supplied by the LEN function i.e. 49.
The SUBSTITUTE function replaces the commas “,” in B5 with 49 space characters supplied by the REPT function. Since there are two commas in B5, one after the book name and one after the author, 49 spaces will be entered after the book name and 49 spaces after the author, creating a decent gap between the text we want to split.
Now let’s see the calculations for the MID function. The first bit is (C$4-1). In row 4, we added serial numbering for each of the columns for our categories. The row has been locked in the formula with a $ sign so the row doesn’t change as the formula is copied down. But we have left the column free so that the serial number changes for the respective columns used in the formula.
In the formula, 1 is subtracted from C4 (1-1=0) and the result is multiplied by the number of characters in B5 i.e. LEN($B5) and then 1 is added to the expression. The calculation for the starting position in the MID function, i.e. (C$4-1)*LEN($B5)+1, becomes (1-1)*49+1 which equals 1.
The MID function returns the text from the middle of B5, the starting position is 1 (that means the text to be returned is to start from the first character) and the number of characters to be returned is LEN($B5) i.e 49 characters. Since we have added 49 spaces in place of each of the commas, that gives us plenty of area to safely return just one chunk of text along with some extra spaces. The result up until the MID function is A Song of Ice and Fire with lots of trailing spaces.
The extra spaces are no problem. The TRIM function cleans any extra spaces leaving the single spaces between words and so we finally have the book name returned as A Song of Ice and Fire.
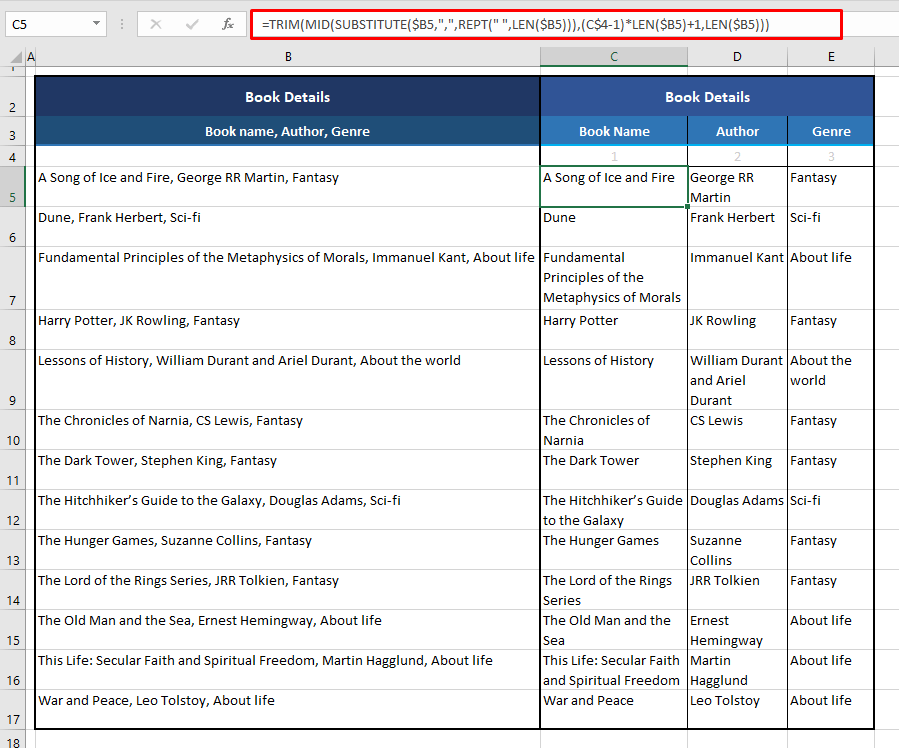
Now for the next column and hence the next category, the calculation for the starting position in the MID function will change like so (D$4-1)*LEN($B5)+1. The expression comes down to (2-1)*49+1 which equals 50. If the MID function is to return characters starting from the 50th character, with all the extra spaces added by the REPT function, what the MID function will return will be along this pattern: spaces author spaces.
The leading and trailing spaces will be trimmed by the TRIM function and the result will be George RR Martin.
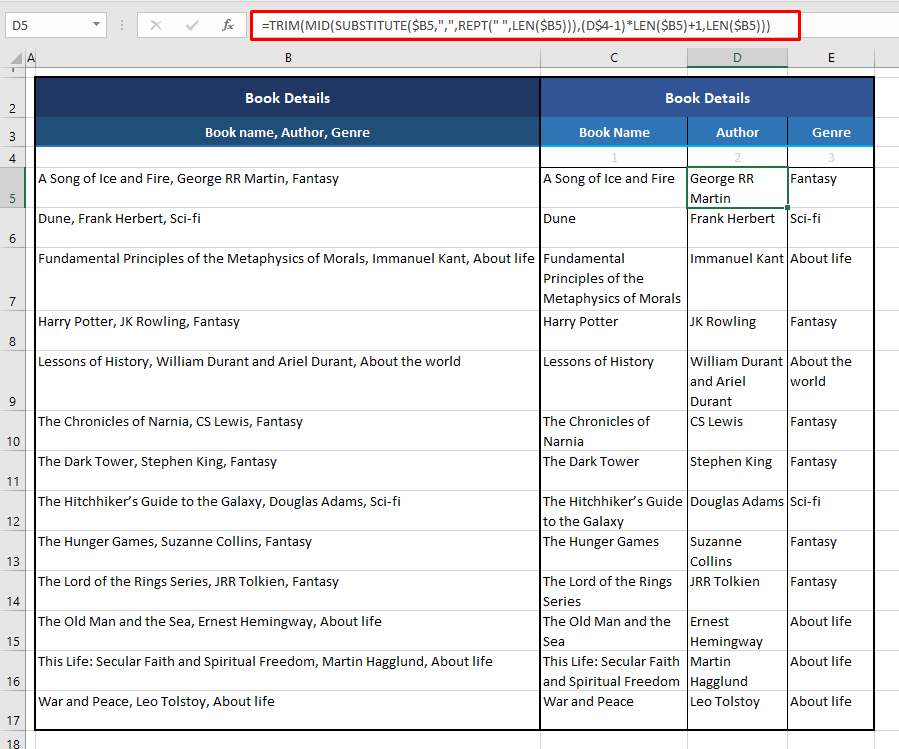
The “+1” in the starting position argument of the MID function has no relevance for the subsequent columns, only for the first. That is because, without the “+1” in the first column’s calculation, it would be 0*49 which will end up in a #VALUE! error.
The formula copied along column E gives us the genre from the combined text in column B and that completes our set.
Split String at Specific Character
If there is only a single delimiter that is a specific character, such a lengthy formula as above will not be required to split the text. Let’s say, like our case example below, we are to split product code and product type which is joined by a hyphen.
Now this would be easier if the product code had a fixed number of characters; we would only have to use the LEFT function to return a certain number of characters. But what’s the fun in that?
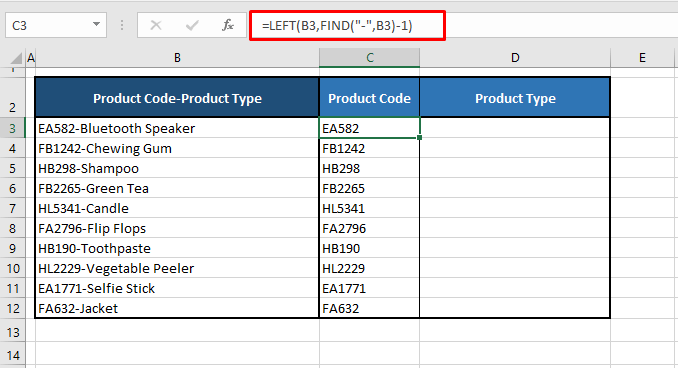
We are going to let the FIND function do a bit of search work for us and find the hyphen in the text so the LEFT function and RIGHT function can return the surrounding text. This is the formula with the LEFT function for returning the first extract:
=LEFT(B3,FIND("-",B3)-1)The FIND function searches B3 for the position of the hyphen “-“ in the text string, which is 6. The LEFT function then returns the characters starting from the left of the text and the number of characters to return is 6-1. “-1” at the end ensures that the characters returned do not include the hyphen itself. Here are the results of this formula for returning the first segment of split text:
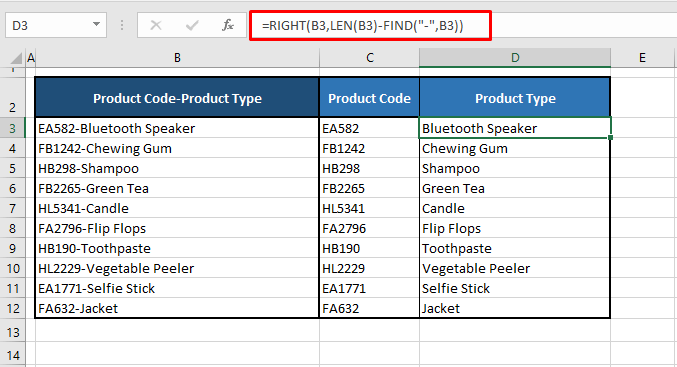
Now for the second segment of text, the RIGHT function comes into play with this formula:
=RIGHT(B3,LEN(B3)-FIND("-",B3))The FIND function is again used to find the location of the hyphen in B3 which we know is the 6th character. The LEN function returns the number of characters in B3 as 23. The RIGHT function extracts 23-6 characters from B3 and returns the product type “Bluetooth Speaker”. This is how it has worked for our example:
Method #3 – Using Flash Fill
The Flash Fill feature in Excel automatically fills in values based on a couple of manually provided examples. The ease of Flash Fill is that you need not remember any formulas, use any wizards, or fiddle with any settings. If your data is consistent, Flash Fill will be the quickest to pick up on what you are trying to get done. Let’s see the steps for using Flash Fill to split text and how it works for our example case:
- Type the first text as an example for Flash Fill to pick up the pattern and press the Enter
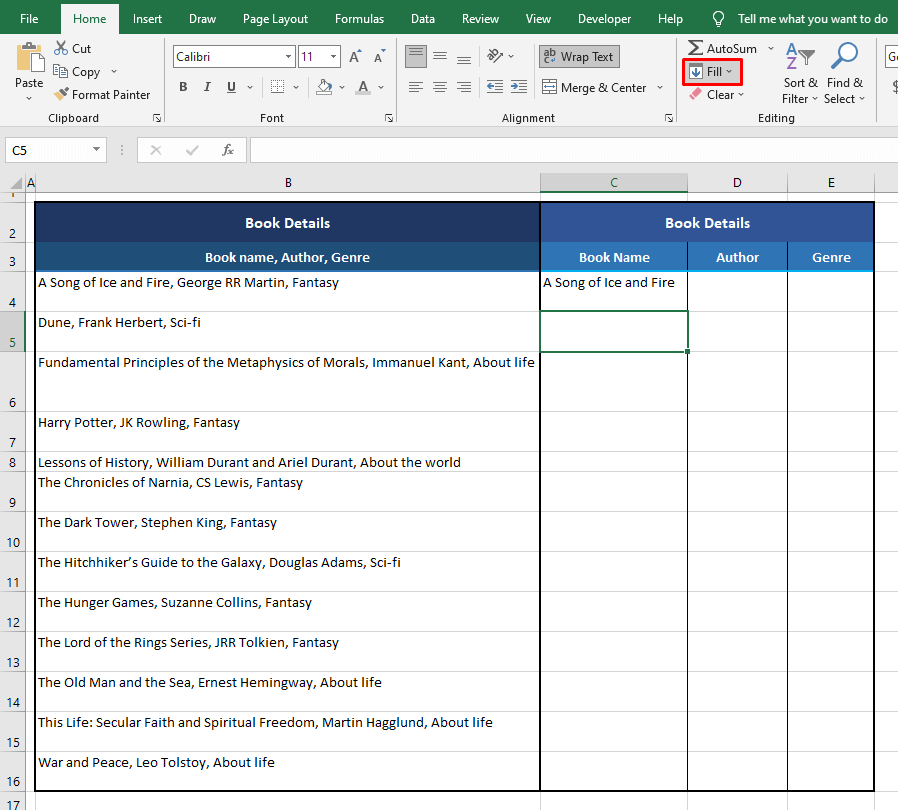
- From the Home tab’s Editing group, click on the Fill icon and select Flash Fill from the menu.
- Alternatively, use the shortcut keys Ctrl + E.
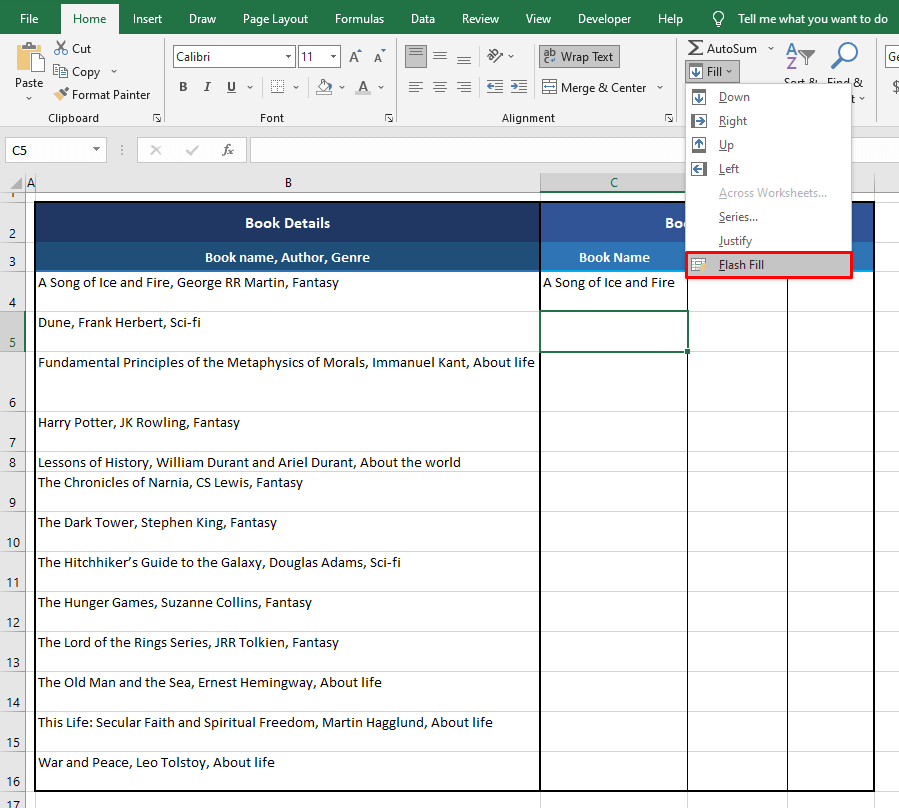
- Picking up on the provided example, Flash Fill will seperate the text and fill the column according to the same pattern:
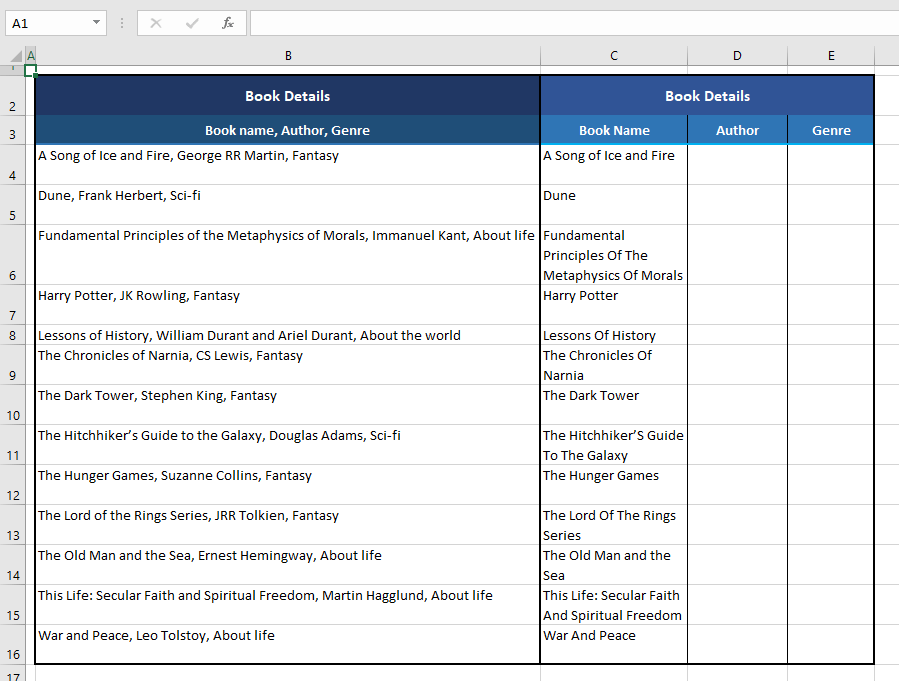
- Repeat the same steps for each column to be Flash-Filled.
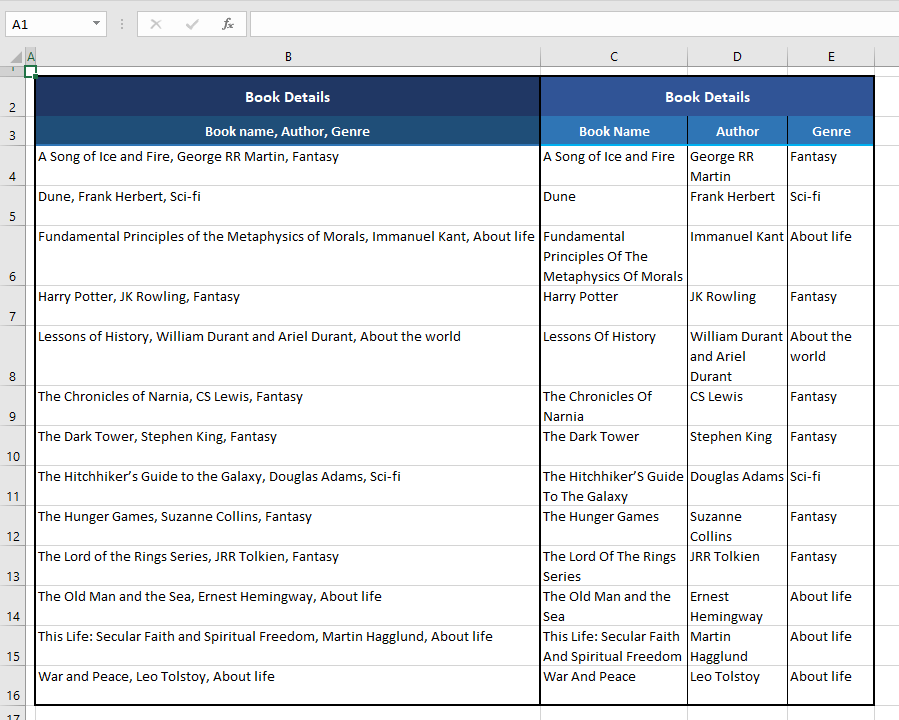
Flash Fill will save the trouble of having to trim leading and trailing spaces but as mentioned, if there are any anomalies or inconsistencies in the data (e.g a space before and after the comma), Flash Fill won’t be a reliable method of splitting text and due to the bulk of the data, the problem may go ignored. If you doubt the data to have inconsistencies, use the other methods for splitting the text.
Method #4 – Using VBA Function
The final method we will be discussing today for splitting text will be a VBA function. In order to automate tasks in MS Office applications, macros can be created and used with VBA. Our task is to split text in Excel and below are the steps for doing this using VBA:
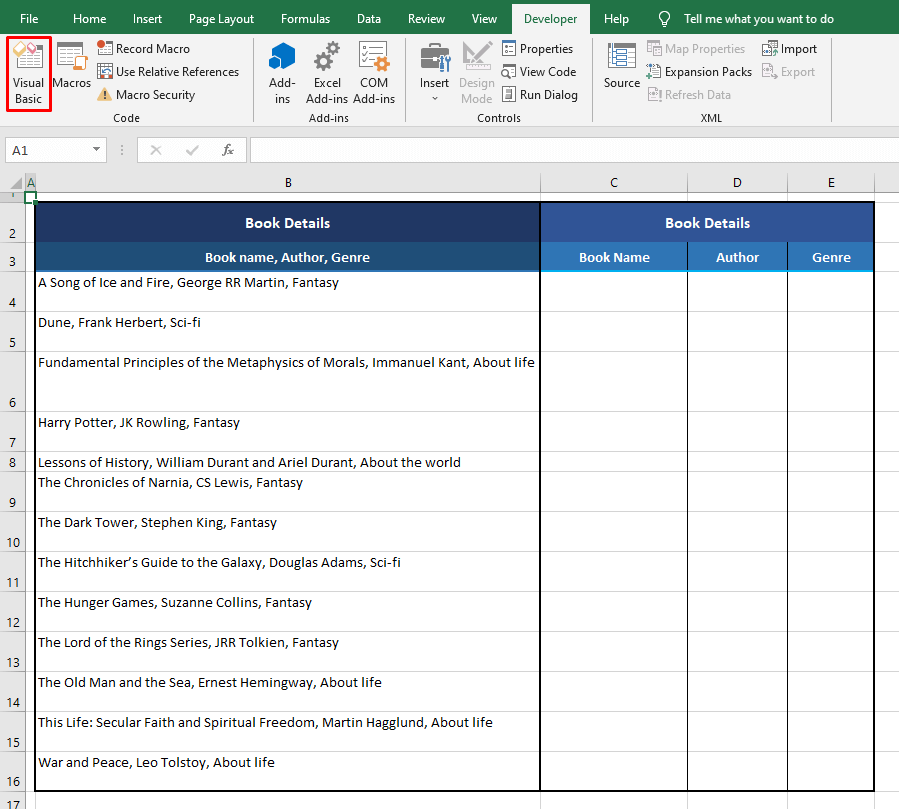
- If you have the Developer tab added to the toolbar Ribbon, click on the Developer tab and then select the Visual Basic icon in the Code group to launch the Visual Basic
- You can also use the Alt + F11 keys.
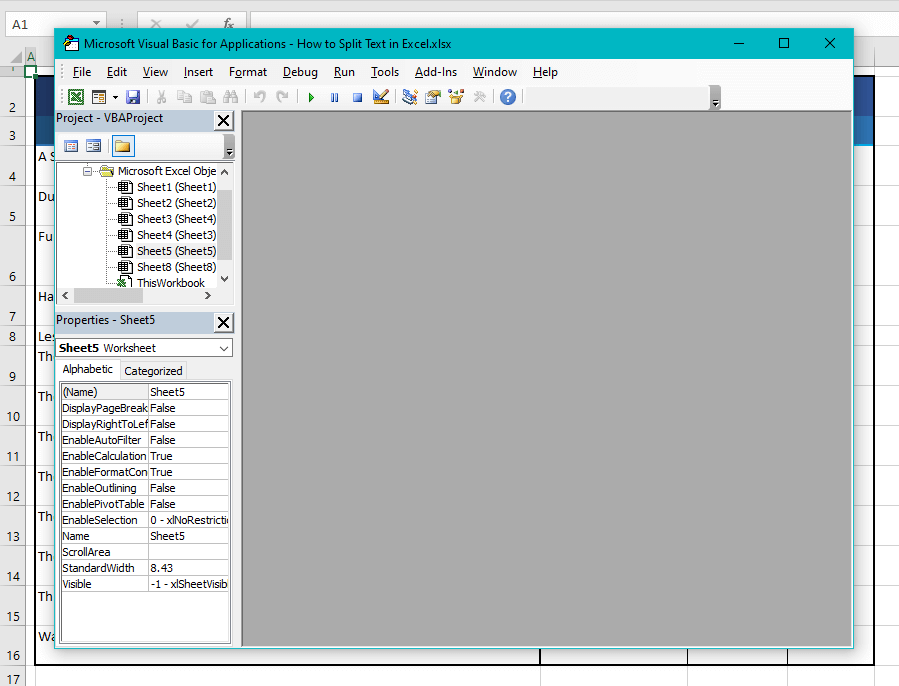
- The Visual Basic editor will have opened:
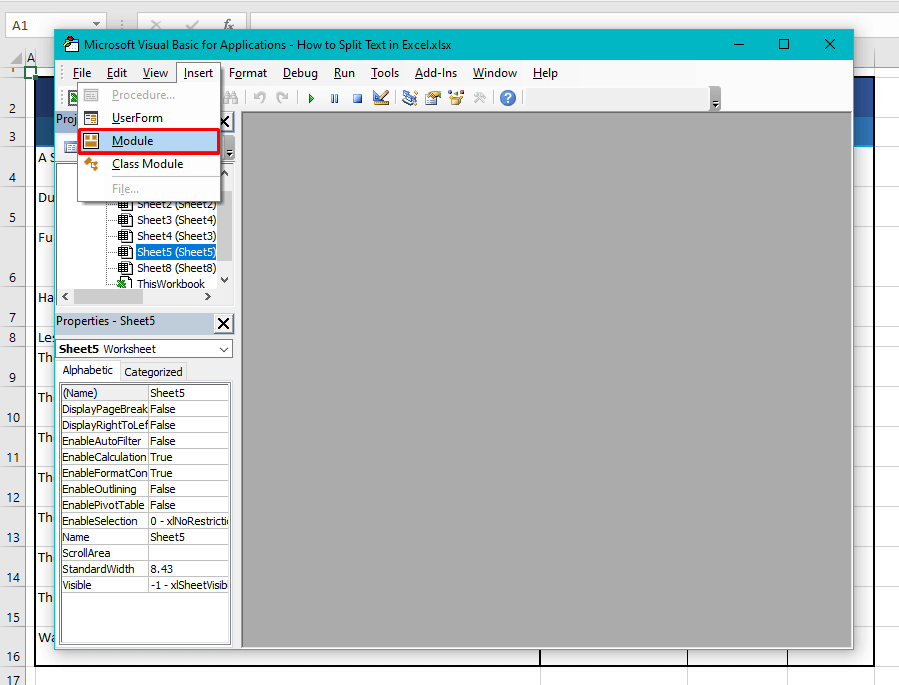
- Open the Insert tab and select Module from the list. A Module window will open.
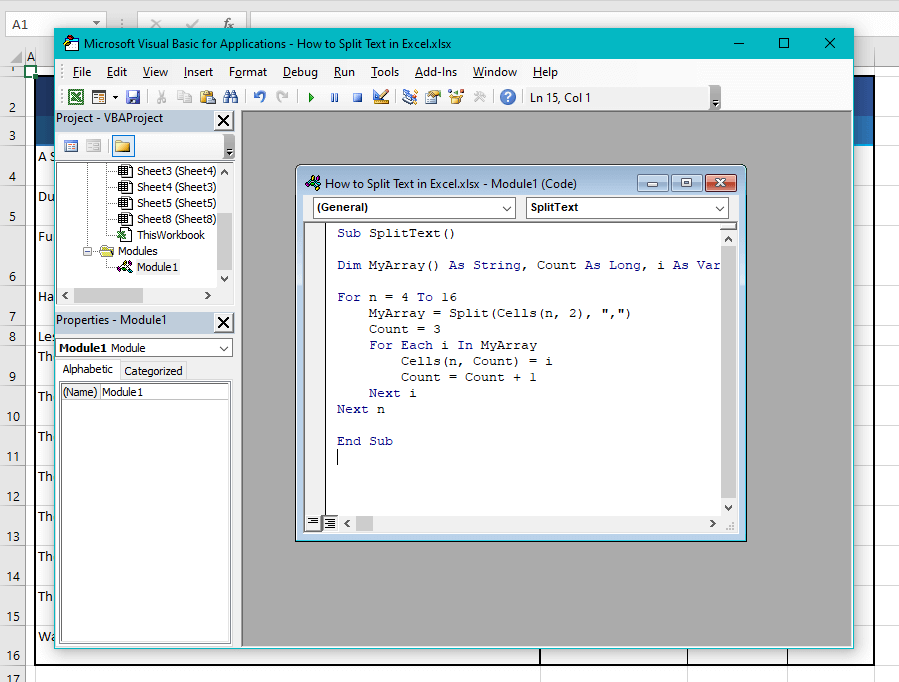
- In the Module window, copy-paste the following code to create a macro titled SplitText:
Sub SplitText()
Dim MyArray() As String, Count As Long, i As Variant
For n = 4 To 16
 MyArray = Split(Cells(n, 2), ",")
 Count = 3
 For Each i In MyArray
 Cells(n, Count) = i
 Count = Count + 1
 Next i
Next n
End Sub
Edit the following parts of the code as per your data:
- 'For n = 4 To 16' – 4 and 16 represent the first and last rows of the dataset.
- 'MyArray = Split(Cells(n, 2), ",")' – The comma enclosed with double quotes is the delimiter.
- 'Count = 3' – 3 is the column number of the first column that the resulting data will be returned in.
- To run the code, press the F5
The data will be split as per the supplied values:

- Clean up the leading spaces in columns D and E using the TRIM function:

Now let’s split the active guide from its conclusion. Today you learned a few ways on how to split text in Excel. If you find yourself splitting hairs on your ability to split text next time, pocket this one and be ready to give it a go! We’ll be back with more Excel-ness to fill your pockets. Make some space!


