Excel can be your savior when it comes to data but can Excel be your savior when it comes to saving? The answer is yes, and it can do it automatically. Automatically.
Isn't that a word that gives you computeresque joy?
Today's tutorial is about automatic saving in Excel, shortened to AutoSave and we suppose you're here to find out how it works. Those who can't get in the habit of frequent usage of Ctrl + S, get a Microsoft 365 subscription and get AutoSaving.
Let's save the Excel world!

What is AutoSave?
AutoSave is a new feature that automatically saves the file that you're working on after every few seconds. This facility is new to limited Microsoft applications, including Excel, and is available only on Microsoft 365. Automatically enable AutoSave by storing the file on OneDrive or SharePoint Online storage systems.
AutoSaving is not just helpful for saving the file but just as well for version history, file sharing, co-authoring, file access, and tracking versions. These facilities help in retrieving a certain variant of the file, granting multiple users file access, accessing the file yourself from a different location, and tracking when and who made changes to the file.
AutoSave is not available for old file formats. Among the applications, AutoSave is only available for Excel, Word, and PowerPoint.
AutoSave Vs AutoRecover
The key difference between the two features can be found in the wording; one helps save the file while the other helps recover it and you might be thinking that is synonymous but let us explain. AutoSave saves a file as you work and is automatic while AutoRecover saves the file and workspace at user-specified intervals which can then be saved after recovering the files following a recovery trigger event.
That is, AutoRecover will reboot your workspace (all open spreadsheets) if possible, in case of a crash. You may have encountered the Document Recovery task pane asking which files you want to open, save or delete – that is the product of AutoRecover.
The file is saved to your online storage of selection in AutoSave and can be accessed and shared any time. AutoRecover keeps a temporary copy of the unsaved file that is only of use in the event of a crash of an Excel session and is deleted when the file is manually saved or closed.
AutoSave features only for Microsoft 365 subscribers implying the latest Excel version while AutoRecover is an option even in previous versions (going earlier than 2002).
Method #1 – Enabling Default AutoSave from Options Dialog Box
In this section, you will see how to enable AutoSave by default when the file is saved in the Cloud. Let us debunk something for you; this option does NOT turn AutoSave on for the file nor is it a prerequisite for AutoSave.
It will only smoothen the autosaving process so you can avoid having to enable AutoSave twice. The story is that with this option, every file that is saved to the Cloud will automatically have AutoSave on. Without it, you will have to switch it on after storing it on the Cloud.
The how-to for enabling the above-mentioned option along with AutoRecover in the settings that is complementary to file saving is right below.
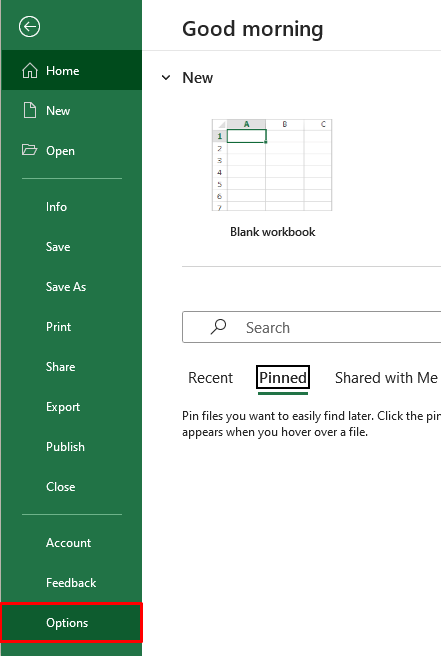
- Click on the File tab above the Ribbon
- Select Options from the bottom of the pane.
- This grants you access to Excel Options.
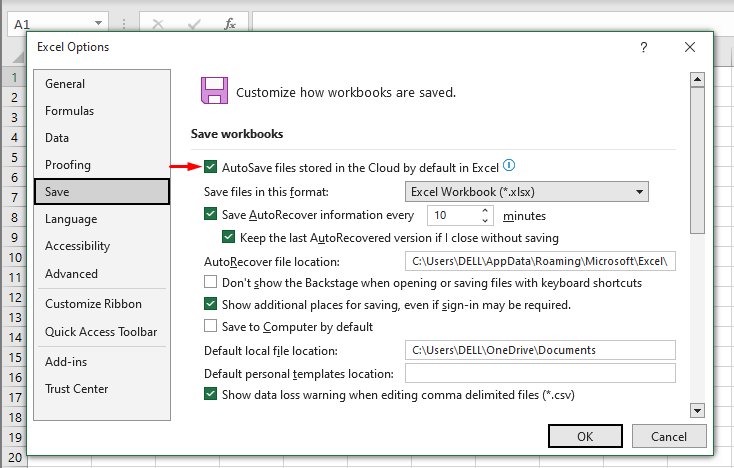
- Select the Save tab from the panel.
- Make sure the AutoSave files stored in the Cloud by default in Excel option is check marked.
- Click on the OK command to close the Options dialog box and return to the worksheet.
Now every Excel file saved to your Cloud storage will automatically have the AutoSave feature on. This brings us to the next step which is actually turning on a file's AutoSave. For that, catch the next section. But before that, have a look at the next option in Excel Options.
You would want to have the Save AutoRecover information every xx minutes box checked. Considering you are checking on how to autosave, AutoRecover should help restore your Excel session as it was stored at the last AutoRecovery before the event of a crash.
By default, the interval is set to 10 minutes and can be increased or decreased. A shorter interval means the sessions would be saved more frequently but will make Office slower.
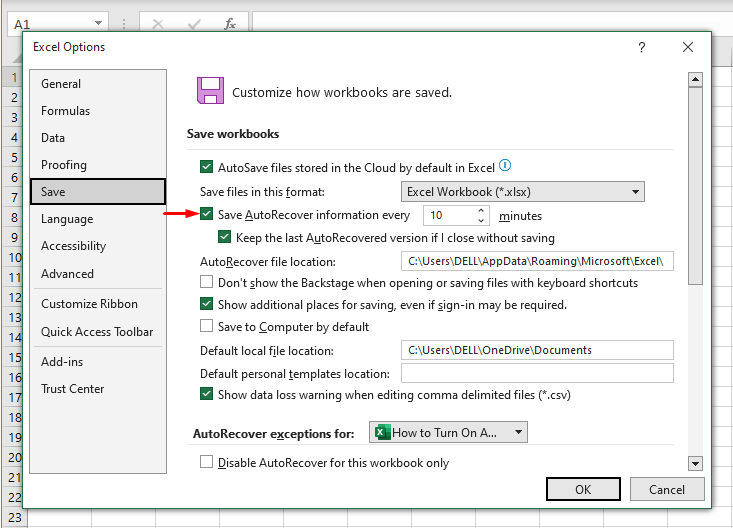
Additionally keep the next box, i.e. Keep the last AutoRecovered version if I close without saving, checked. This option can help you retrieve a file at the point of the last AutoRecover save.
Method #2 – Turn On AutoSave from Save As
Now we talk about turning AutoSave on in Excel – putting AutoSave into motion. Here you will learn what to do to apply AutoSave to a file. Note that AutoSave doesn't apply to the whole Excel application, it's for individual files. Meaning, AutoSave must be switched on or off for each file individually.
To recap, AutoSave backs up a file to your choice of Cloud storage. Therefore, make sure you are signed in. If not, you'll get the option while AutoSaving. Find the steps below to activate AutoSave for a file in Excel.
Actually, the very first step is to have a Microsoft 365 subscription. You're welcome for the reminder. To proceed:
- Select the File
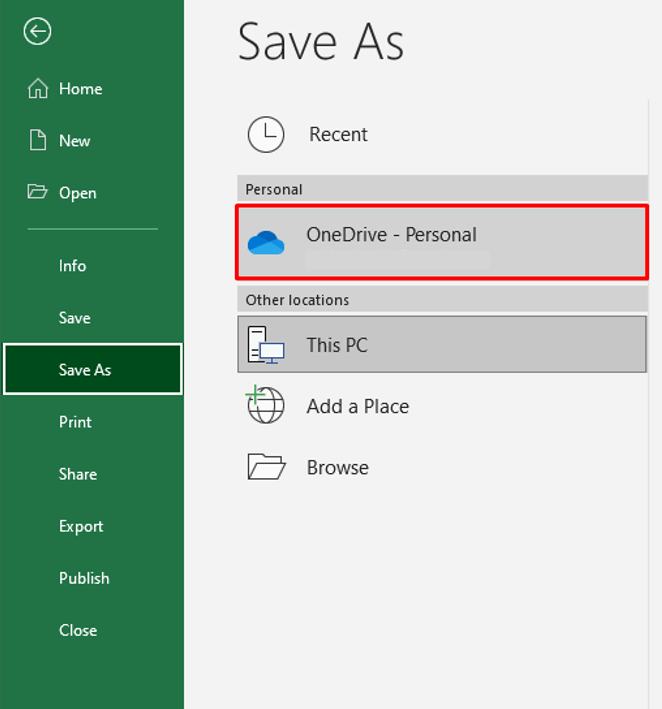
- Then select Save As from the left pane.
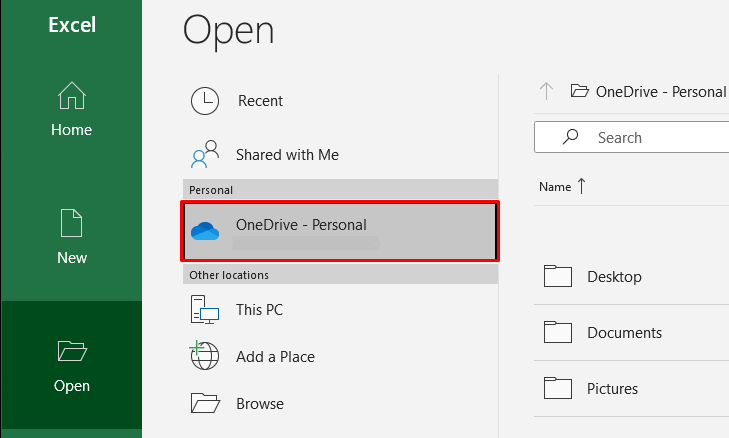
- Click on the Cloud storage button – OneDrive – Personal in our case.
- Selecting the storage option will change the file location on the right, switching it to the storage folder on your computer (if the storage folders are synced to your computer). Change the file name if you prefer and be mindful of not changing the file format to an old one as AutoSave does not work on them.
- Press the Save button to the right of the window.
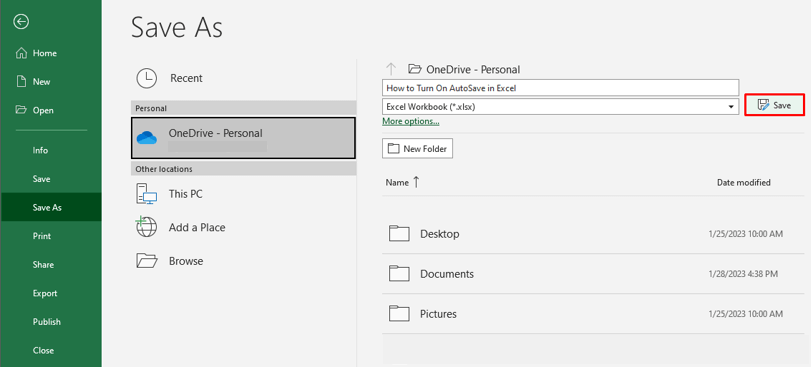
You will return to the worksheet with AutoSave on for the file.
But when have we believed in something we don't see? Going back to the File tab, you will see that the Save As option has converted to Save a Copy.
The option now saves a copy of the file to the Cloud storage. If that's still not convincing enough, you can open the location folder and see the file there. But the quickest, smartest way to confirm AutoSave or switch it on and off is the AutoSave toggle. Let's show you how to get that.
Method #3 – Adding and Enabling AutoSave from QAT
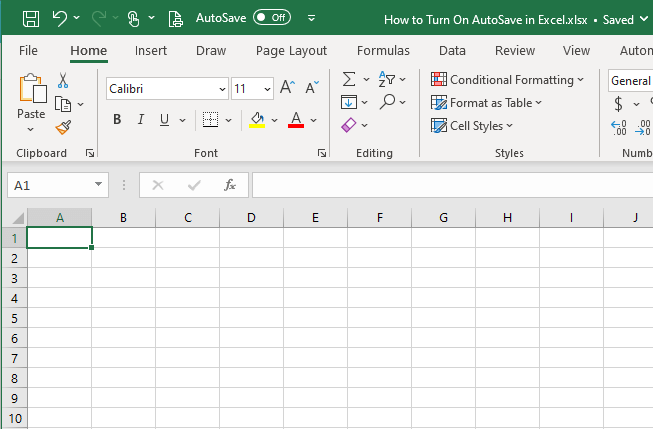
This section concerns adding AutoSave to the Quick Access Toolbar. Although AutoSave in the Quick Access Toolbar comes with the Microsoft 365 subscription, if you don't see it or had removed it, this is a 2-click action that will add an AutoSave toggle to the title bar on the top of the spreadsheet that can be used to quickly switch AutoSave on and off and to check the AutoSave status of a file.
Here's how to add the AutoSave toggle to the QAT:
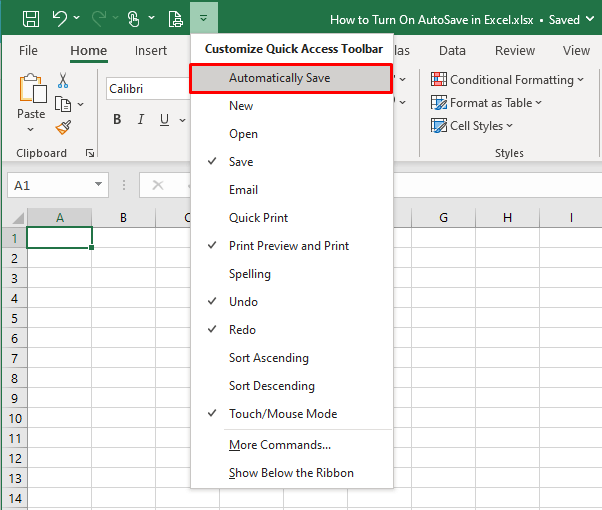
- Click on the Customize Quick Access Toolbar drop arrow left of the title bar.
- Select Automatically Save from the drop menu.
- The AutoSave toggle will be added to the QAT:
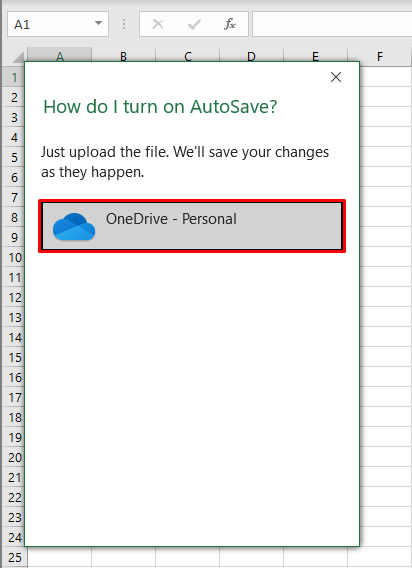
- Simply click on the toggle to turn it on or off. You may see the following window appear. Just double-click on the Cloud option and AutoSave will be activated.
How to Open AutoSaved File
If you return to your original file's location, you will notice that it is not being updated. This is because the AutoSaved file is being saved to the Cloud. So where is the AutoSaved file and how do we get to it? There are a few ways to access your AutoSaved files. Two of them include opening the online storage or the Cloud's folder synced on your computer. The third is to open the file from Excel which you can see is done in the steps below:
- Click on the File tab and select Open from the leftward pane.
- You will see your recent files show up on the right. If your file of interest appears, you can select it from here but make sure the file location is that of the Cloud. The file path will be mentioned under the file name.
- To narrow down your search to just the AutoSaved files instead, proceed with the next steps:
- Click on the Cloud storage button.
- Now you should see the folders and/or files in the Cloud folder appear on the right:
- If you see your file, select it now. Otherwise, open the subfolders leading to the file. Select the file with a single click.
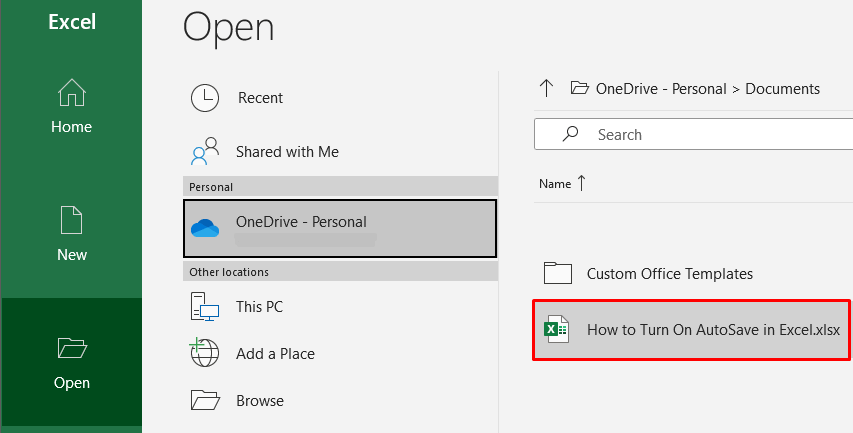
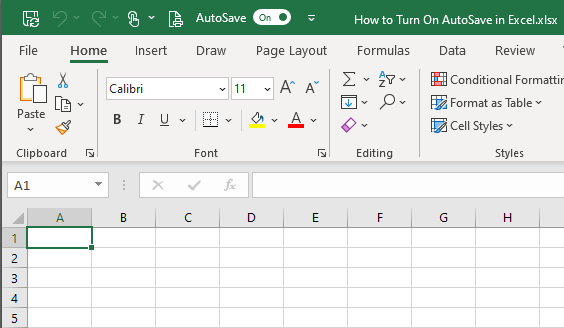
The selected AutoSaved file will open:
How to Turn Off AutoSave
The very easy and obvious single click on the AutoSave toggle will instantly turn AutoSave off. So, if you haven't added AutoSave to your QAT, you quickly should for the ease of enabling and disabling AutoSave.
To turn AutoSave off, click on the AutoSave toggle in the Quick Access Toolbar.
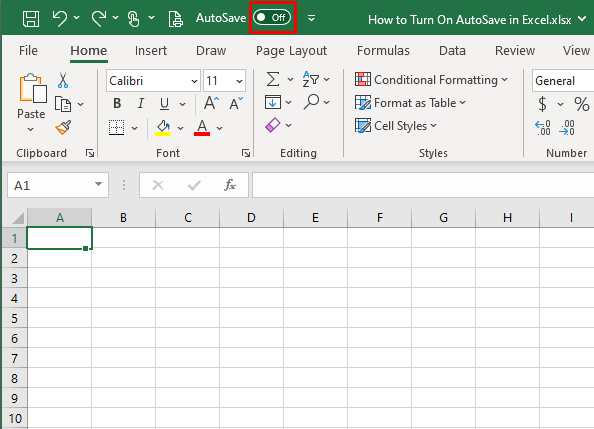
And that's done, AutoSave is switched off for the file.
To avoid confusion, you can shift the file from the online storage to the original location on your computer. Because even with AutoSave off, the file will remain in the Cloud storage.
What if my Version of Excel Doesn't Have AutoSave?
From a purely file-saving point of view, you still have AutoRecover which we are certain must have saved you some Excel data woes more than once. AutoSave available or not, take keeping AutoRecover on as a standard Excel operating procedure. Also, hit that Ctrl + S as frequently as you can.
From a file sharing and saving point of view, you have other online storage options like Google Drive and Dropbox. You may even take these options as the first resort if the other users of the file prefer one of these storages due to access or familiarity. And of course, think about your preference and storage or privacy issues. Both, Dropbox and Google Drive provide file sharing, saving, and version history facilities.
If, however, you want to simulate a facet of AutoSave without having Microsoft 365, there is a VBA workaround for that. See the subsection ahead for details.
Save File Before Closing with VBA
It is possible to get a file to save automatically when you close it and that can be done using VBA. VBA automates Excel tasks with user-defined codes. We can program the file to be saved when we close it without manually saving it. With the code and the steps given below, you wouldn't have to worry about forgetting to save the file yourself.
- Open the Visual Basic editor from the Developer tab > Code group > Visual Basic Or use the keyboard shortcut: Alt + F11 keys.
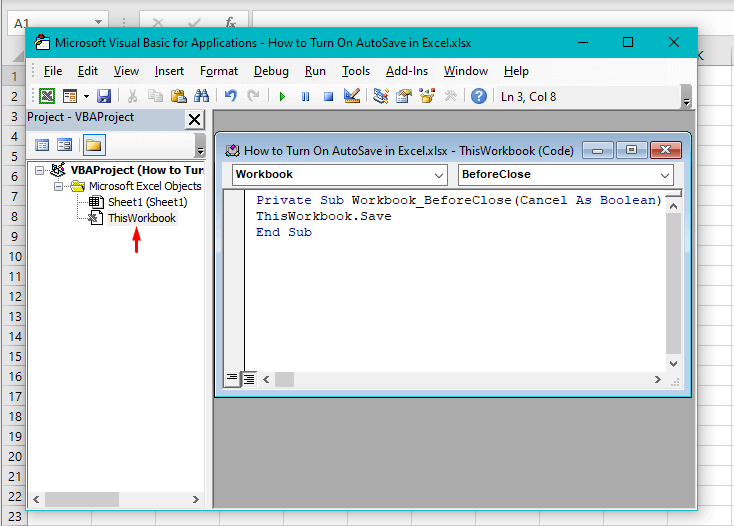
- Double-click on ThisWorkbook in the Project Explorer to open a window for adding the code.
- In the window that has launched, copy-paste this code:
Private Sub Workbook_BeforeClose(Cancel As Boolean)
ThisWorkbook.Save
End Sub
This code will save the workbook when you hit the close button without asking if you want to save the file or without you having to manually save it.
- Close the Visual Basic
You will return to your worksheet. Continue working on the file. If you forget to save the file before closing it, the fed code will do the work for you and automatically save the file.
Save that in your memory bank. Today you became acquainted with AutoSaving like a boss in Excel and what to do if your Excel version is devoid of the AutoSave feature. We have plenty more Excel tricks site-wide that will amp up your Excel boss mode; you'll never get bored this side of the town. We hope to catch you reading more boss amplifiers.
