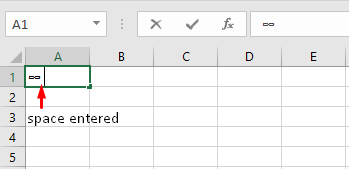
If we had a dime for every time AutoCorrect saved us from first and secondhand embarrassment, we’d be minted. We’d also be equally rich for every dime when AutoCorrect was over-efficient and replaced our words with words uncalled for.
Anyway, today we’re going into how AutoCorrect works, how to make it stop working, how to alter the way it works, how to make it work our way, and how to reverse its work. Reading that, you’d think this tutorial is about “work” but it’s about the Excel feature called AutoCorrect.

At its most fundamental level, AutoCorrect (or replace-as-you-type) is known to us all as a correction tool that edits spelling errors, typos, and incorrect grammar. Let’s see a small demonstration here. In Excel, if you were to type “should of been”:
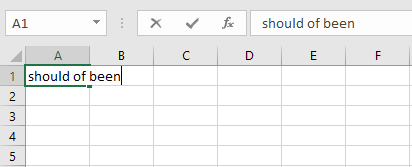
It will automatically be corrected to “should have been”:
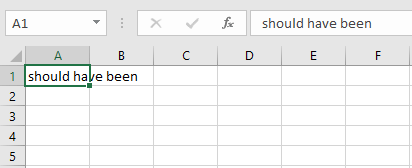
This is the doing of AutoCorrect but how does it know what to correct? AutoCorrect works based on the entries made in the AutoCorrect settings where, let’s say, text2 replaces text1. That means we can change, add and delete AutoCorrect entries.
Recommended Reading: How to Spell Check in Excel
Uses of AutoCorrect
- Correct Text Strings: As noted earlier, AutoCorrect makes for an automatic text correction and replacement tool.
- Replace Short Text String with Long Text String: AutoCorrect can also be used to enter a short text string to be replaced by a larger text string. E.g. an abbreviation or acronym can be typed to return the full form like “ABG” can be set to return “Alpha Beta Gamma”.
- Replace Short Text String with Long Formulas: Here is a really cool trick. If you came up with a formula that was your dear brainchild and are afraid of losing it or find it a drag to copy it from another file every time, you can enter a short code and have AutoCorrect return the formula for you. To find out how to do this, keep reading.
- Add Symbols and Characters: Not only that; AutoCorrect doesn’t just replace letters and words, it can be used to add symbols and other characters to your worksheets too! We’ll show you how to get that done but first let’s explore the AutoCorrect options and how they can be used.
Note: The AutoCorrect feature applies to all Microsoft Office applications.
Excel, get your correcting pen out!
AutoCorrect Options
Let’s have a look at the prime AutoCorrect options. In the steps below we highlight the path that leads to the AutoCorrect options:
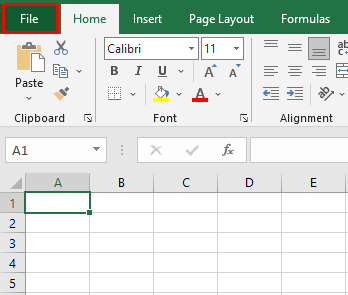
- Select the File
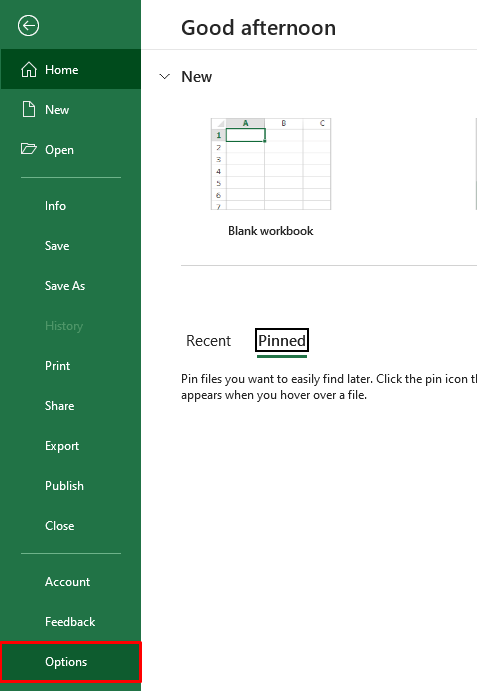
- In the File menu, select Options from the left pane.
- This will launch the Excel Options window.
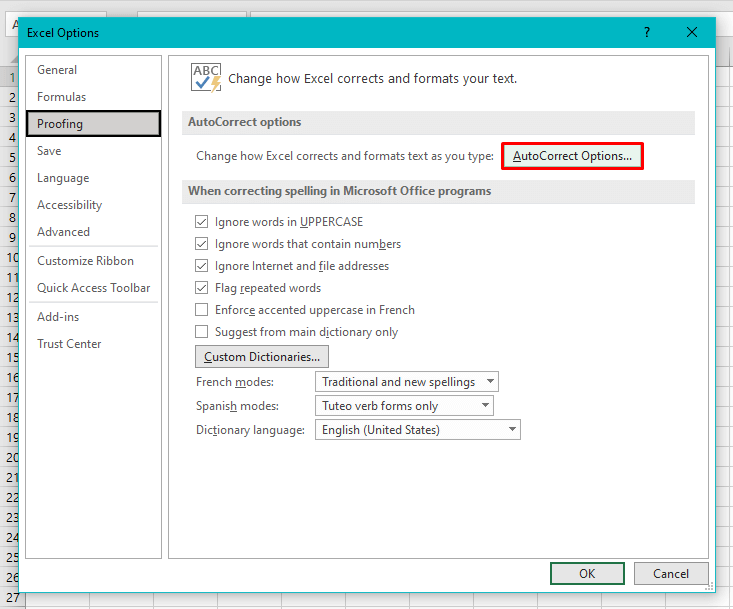
- From the left panel in the Excel Options window, click on Proofing and then select the AutoCorrect Options
- Now the AutoCorrect window will open:
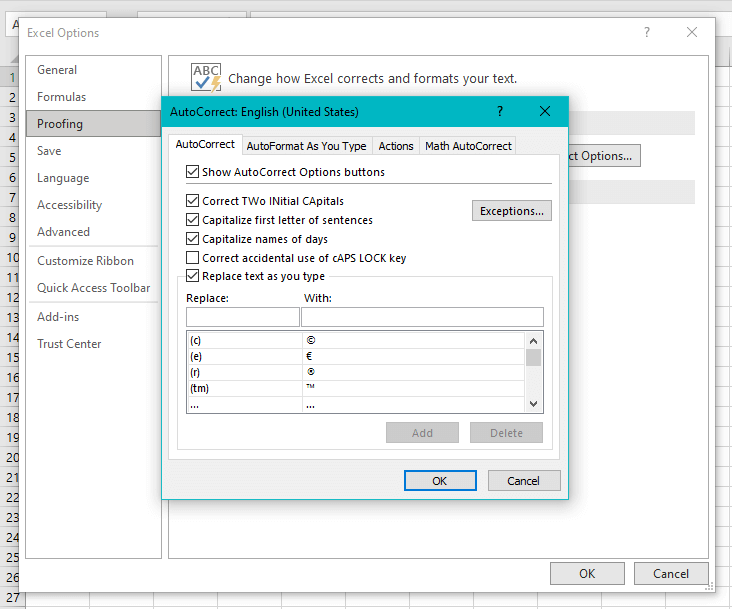
From this window, you will have access to all the AutoCorrect options in Excel. In this section, we will explore the tabs in the AutoCorrect window. Let’s start with the first one.
AutoCorrect Options Tab
This is the main tab with all the key functions of autocorrecting. Have a look at the items in the AutoCorrect tab below and we’ll explain the function of each one:
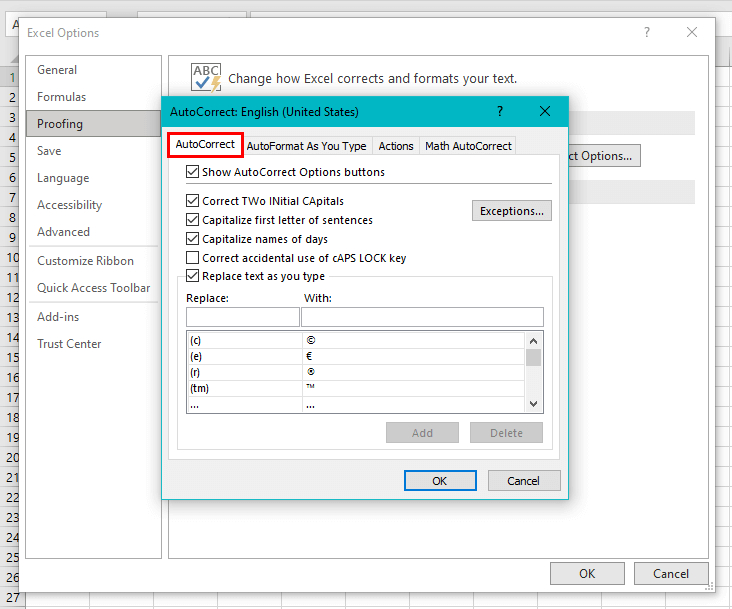
Correct Two Initial Capitals
If the first two letters of a word are entered in uppercase, checking this item will correct it so that only the initial letter is capital.
For example, note the first two letters in the first instance:
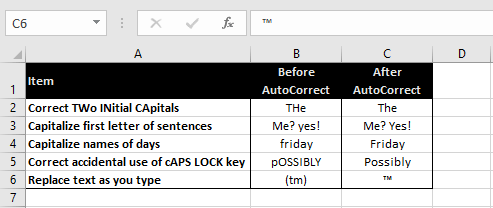
If visual learning is your thing, this example shows the effect of using the AutoCorrect items in Excel. More descriptions of the items are below.
Capitalize First Letter of Sentences
With this item checked, the first letter of sentences after a sentence-closing punctuation mark (period, question mark, exclamation mark) will be corrected to an uppercase letter even if it is typed in lowercase.
Capitalize Names of Days
If the name of a day has been typed without the initial letter being capital, checking this item will automatically make the initial a capital letter.
Correct Accidental Use of CAPS-LOCK Key
When typing a word with the initial as a capital letter, you might hit the Caps Lock key for the initial and then turn it off for the rest of the word. If you end up doing the opposite, your word will end up looking like tHIS.
Keeping this item checked will correct the letter case, swapping the initial as a capital and the remaining letters in the word will take on lowercase letters. Also, the Caps Lock key will automatically be turned off. This change applies once the space bar or the Enter key is pressed.
Replace text as you type
While the other 4 items above are capitalization corrections, this one is about word replacement. Checking this item replaces a typed text string with another text string or symbol as per the entries in the AutoCorrect tab. E.g. according to a preset entry in Excel, if you type ™, the trademark symbol ™ will be returned (bear in mind that this is not case sensitive).
AutoCorrect Exceptions Tab
The Exceptions settings pertain to the first two items in the AutoCorrect tab; Correct Two Initial Capitals and Capitalize First Letter of Sentences. If these two items are checked, you can use the Exceptions tab to feed your own exceptions (other than the ones already fed) so that AutoCorrect doesn’t correct them.
To access the Exceptions tab, click on the Exceptions button in the AutoCorrect tab.
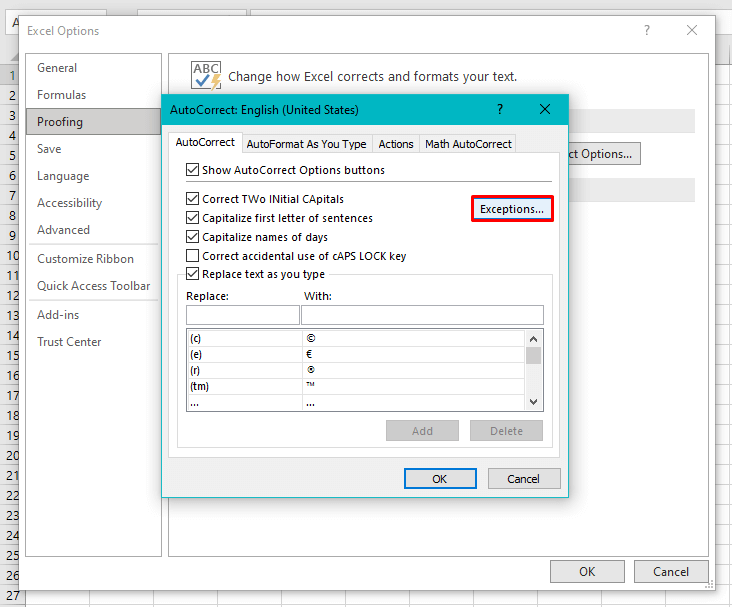
The two types of entries the Exceptions settings apply to are mentioned below.
First Letter
Since the first letter of a sentence proceeding a sentence-closing punctuation mark will be capitalized, by that rule, AutoCorrect will be capitalizing the initials of the words after the period at the end of abbreviations. Excel already has a list of the text strings (mainly you will find abbreviations here) for which the initial of the next word will not be autocorrected:
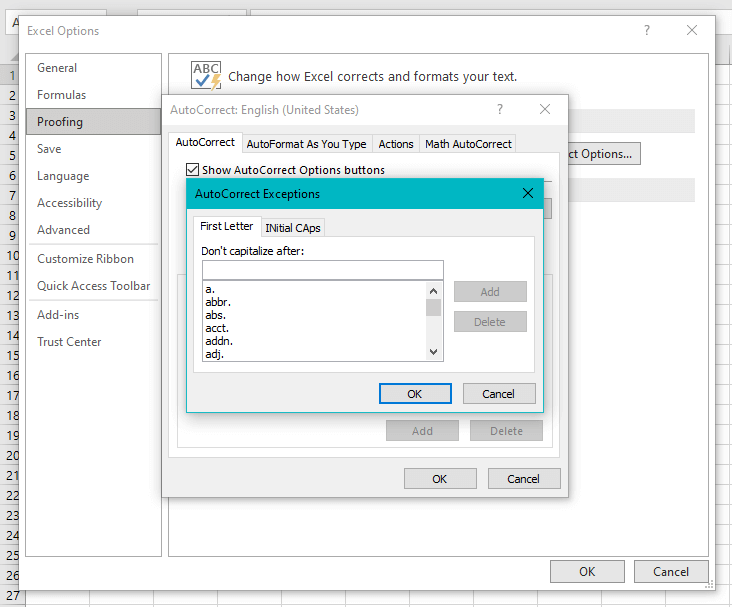
Note that whatever entry you make, it will be added with a trailing period so this setting is majorly for abbreviation type words. This would also be helpful e.g., if you have a brand name that ends in a period. Let’s say the brand name is “Dot.”. You will need to make an entry in the Don’t capitalize after section and click on the Add button.
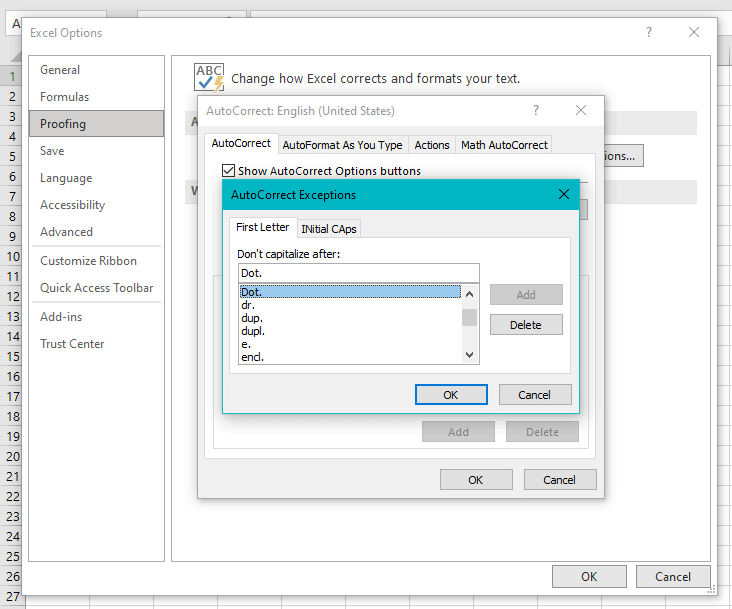
When Dot. is used as part of a phrase or sentence, the next word's initial will not be capitalized.

Initial Caps
While AutoCorrect will rectify two initial capital letters, this tab in the Exceptions settings can be used to excuse the entered words. By default, there is only one entry in this tab which is apt since AutoCorrect does not correct plurals of most abbreviations and acronyms anyway.
If there is such a word (with the first two letters in uppercase and the rest in lowercase) that you'd rather AutoCorrect wouldn’t correct the initial two capitals of, make an entry in this tab.
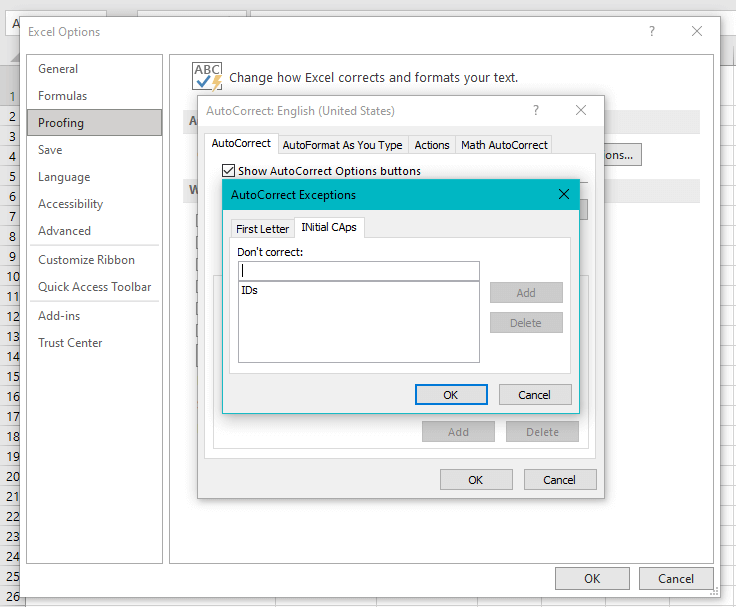
You may want to add words that have mixed case letters like RCed.
Autoformat As You Type Tab
The second tab in the AutoCorrect window is the Autoformat As You Type tab. Excel automatically formats certain actions e.g. if Excel picks up that you are trying to type a date, it will autoformat it to a date with forward slashes even if you have used other separators. This autoformatting is a part of AutoCorrect.
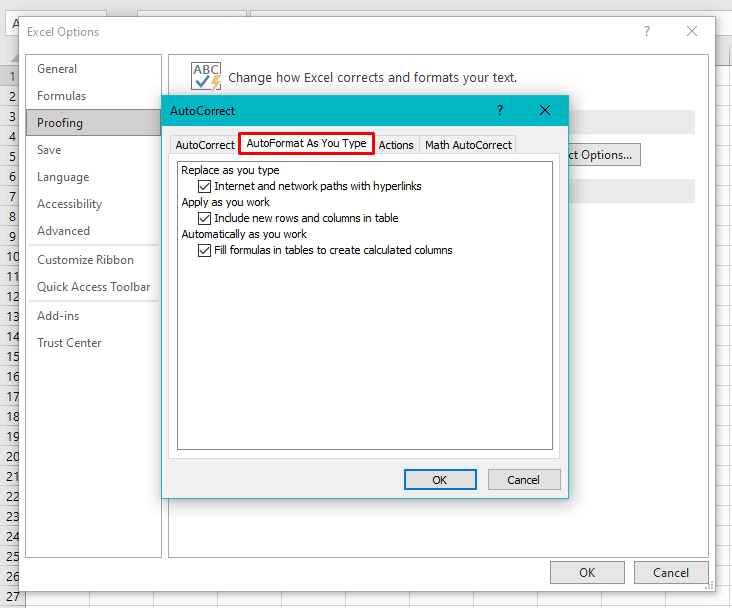
Internet and Network Paths with Hyperlinks
With this option enabled, when an internet or network path (e.g. URL) is entered in Excel, it is autoformatted to a hyperlink. It may be convenient to disable this option in the case that the created hyperlinks are accidentally clicked on.
Include New Rows and Columns in Table
Typing in a cell in a row or column adjacent to a table will include that row or column in the table. Basically, the adjoining row or column with the target cell is autoformatted as a part of the table. Unchecking this option will stop Excel from automatically extending the table to include the new adjacent cell.
Fill Formulas in Tables to Create Calculated Columns
Working in an Excel Table, when a formula is entered in any cell of a new column, the formula is copied to the entire column of the Table to create a calculated column. To prevent this action and keep the formula only to the target cell, uncheck this option.
Actions Tab
In the Actions tab, there is currently only one feature available to Excel and that is the date feature. By default, this feature is disabled. To enable this additional action, check the Enable additional actions in the right-click menu checkbox in the Actions tab.
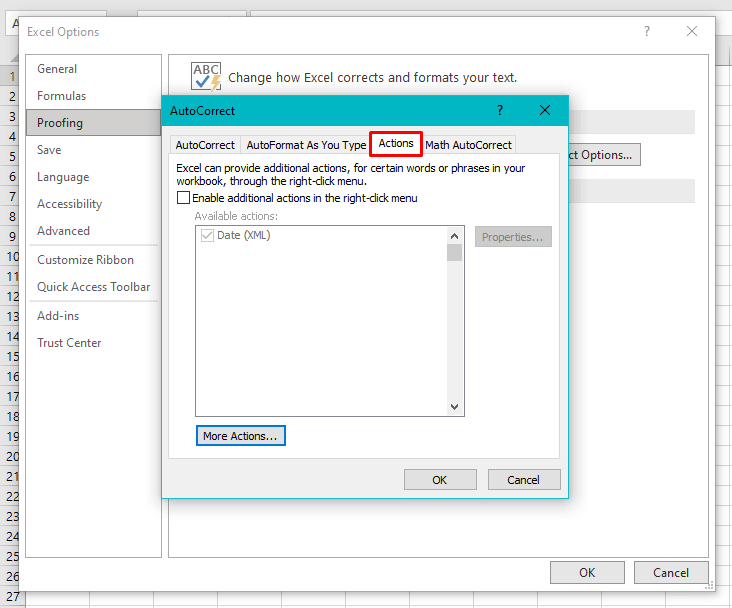
Marking this checkbox also gives access to select the Date action and adds date options in the right-click menu.
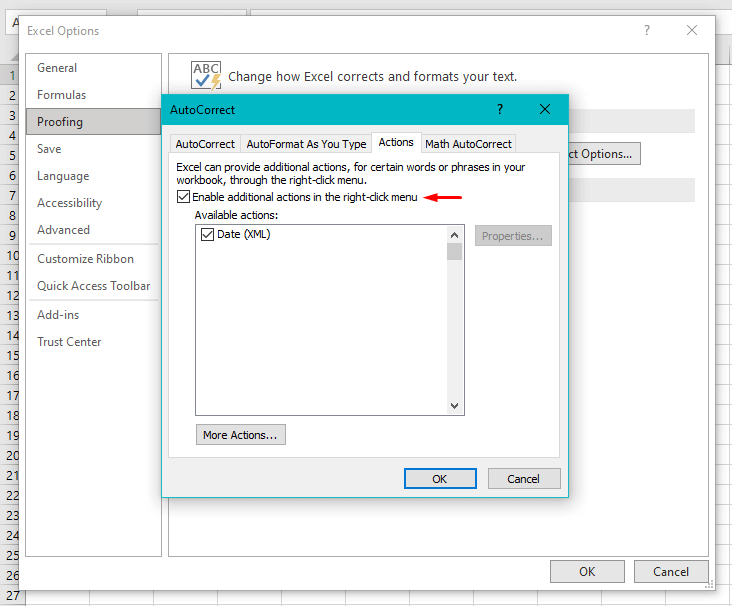
If you are curious about the More Actions button, it only leads to the Microsoft website and confirms that there are no further actions available for the document.
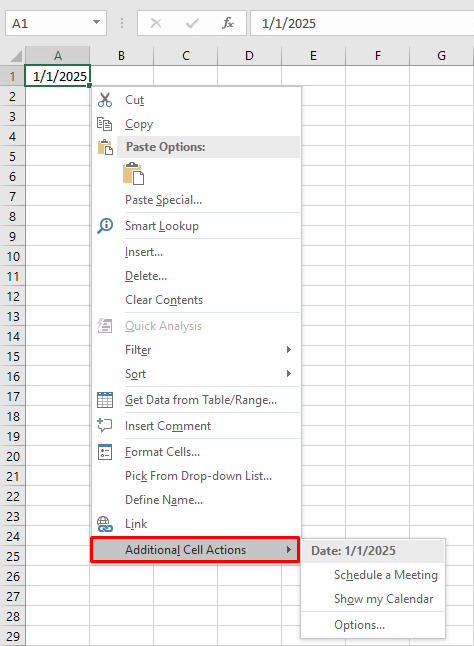
Now to apply the action, click on the OK button in the AutoCorrect and Excel Options windows. When a date will be entered in the worksheet and right-clicked, the context menu will have an added option of Additional Cell Actions.
Further in this option, you’ll have Schedule a meeting and Show my Calendar both of which redirect you to your Outlook calendar to complete the actions. The third item is Options which goes back to the Actions tab in the AutoCorrect window.
Math AutoCorrect Tab
And finally the Math AutoCorrect tab. The tab enlists the shortcuts you can use to add mathematical characters and symbols. Using the Add and Delete buttons, you can make, edit or delete entries. To disable Math AutoCorrect, uncheck the Replace text as you type box which you will find is checked by default.
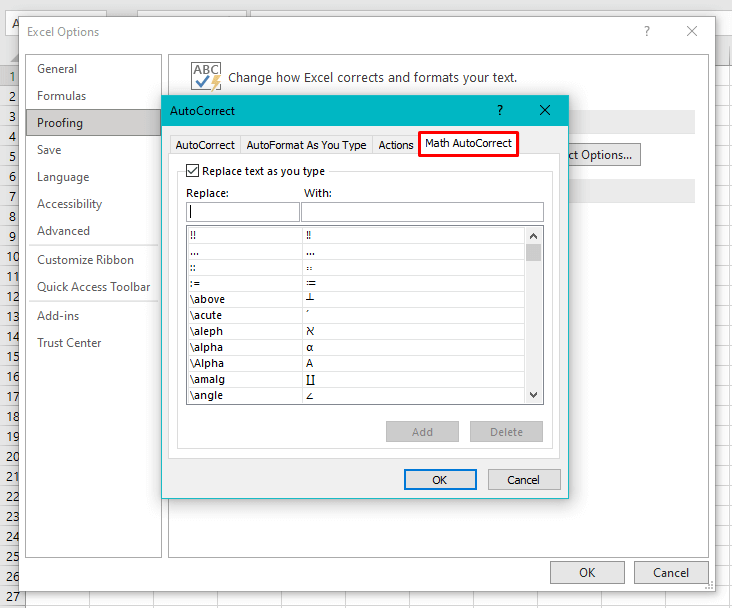
If you’ve headed to your Excel file to test entering mathematical symbols, have been unsuccessful, and are starting to doubt your command on Excel, let us tell you there’s nothing to worry about there. These symbols cannot be used in cells, only in equations. To enter an equation, go to the Insert tab > Symbols group > Equations icon.
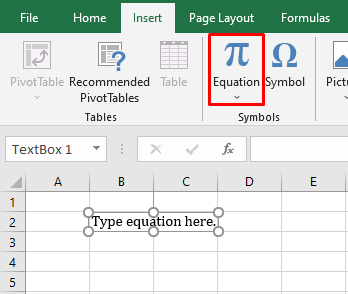
This will insert a text box to enter mathematical equations that will accept Math AutoCorrect to replace text with mathematical symbols and characters.
So let’s test an entry from Math AutoCorrect. We’ll give entering the theta symbol a go. According to the entries in the Math AutoCorrect tab, to enter the theta symbol, we need to use the code theta:
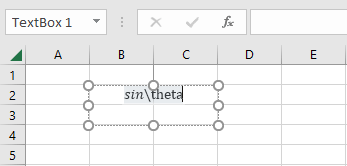
Now let’s add a space character to see if it works. Testing 1, 2, 3……
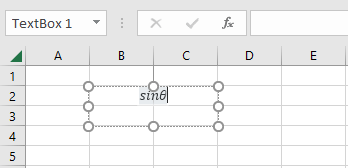
It works!
Note: Be mindful of keeping the equation in the color fill of the text box otherwise Excel won’t count the text as an equation and the math autocorrecting won’t work and you’ll start questioning your Excel abilities again.
How to Disable or Enable AutoCorrect
As per Excel’s default settings, AutoCorrect will be enabled and you may choose to change this. Apply the steps below to disable/reenable AutoCorrect in Excel.
- Click on the File tab above the Ribbon.
- From the pane on the left, select Options.
- In the Excel Options window, click on the Proofing tab and then select the AutoCorrect Options
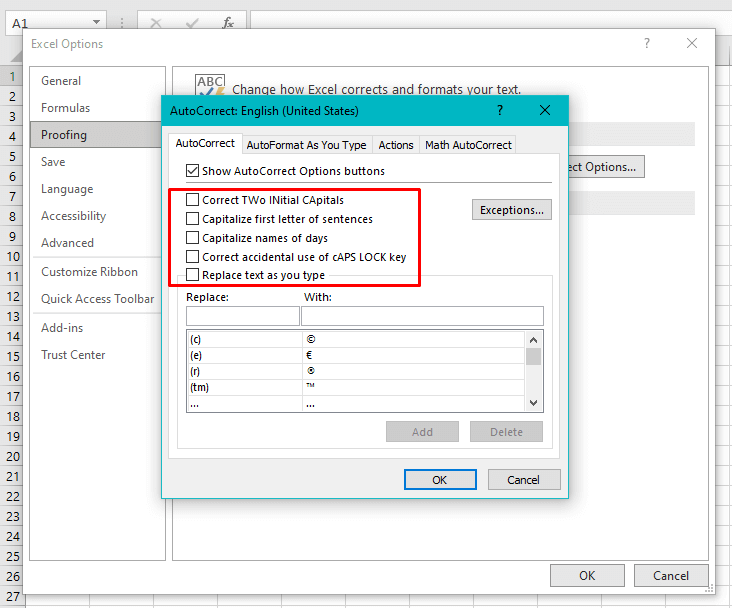
- In the AutoCorrect tab, uncheck all the 5 AutoCorrect actions clubbed as seen below:
- Then select the OK command button on both windows to close the windows and apply the deactivation of AutoCorrect.
Now AutoCorrect will be disabled for Excel which is not limited to the opened file but applied to the whole application.
To enable AutoCorrect again, use the same path to check all the 5 checkboxes and reactivate AutoCorrect for your Excel files.
How to Add, Delete and Edit Entries in AutoCorrect
While AutoCorrect is a pretty cool feature and can help one save face in many situations, it is not all-inclusive and can do with additions that are best suited to your work.
E.g. it would be helpful to add certain symbols and proper nouns that make part of your regular Excel usage to ensure that the pronoun’s initial is capitalized without fail every time or so that there’s quick-keying to a symbol at the ready.
See how to add entries to AutoCorrect in the steps below:
- From the File tab, select Options at the bottom-left of the window.
- In the launched Excel Options window, go to the Proofing tab and select the AutoCorrect Options button, and head to the AutoCorrect
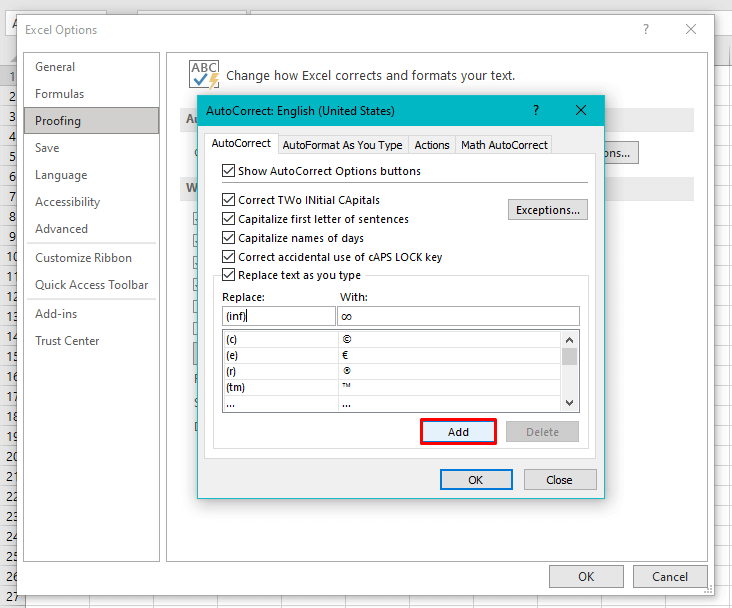
- In the Replace text box, enter the word(s) or character(s) that will be replaced.
- In the With text box, enter the word(s), character(s), or symbol that will take place of the text string in the Replace box.
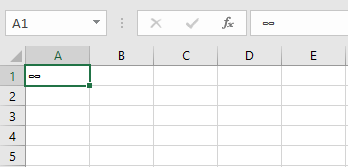
- E.g. in the With box, we have copy-pasted the infinity symbol and the code to enter the infinity symbol assigned by us is (inf), put down in the Replace box.
- When done, click on the Add command button to make the entry.
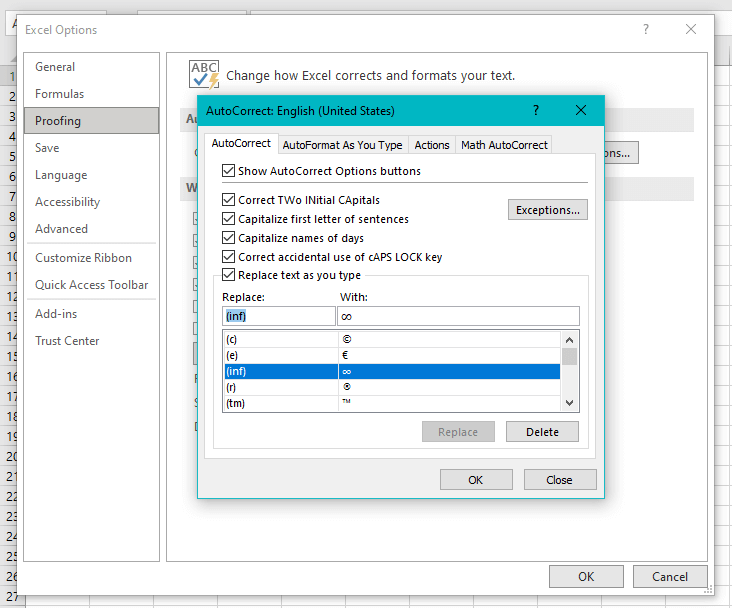
- The new entry will be added to the list:
- To make this entry applicable, click on OK in both windows, which will also return you to the worksheet.
Now, to have the infinity symbol on our sheet, we will enter the relevant code:
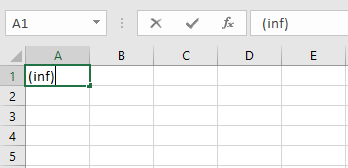
Once the code is in place and another character is entered or Enter is pressed, the code will be AutoCorrected to the set text string or symbol. In our case, the code (inf) will be replaced by the infinity symbol.
Notes:
While you’re setting up the code, make sure it is unique and isn’t used for anything else in other MS Office applications as the AutoCorrect settings apply to all Office apps.
If you need a source to copy the intended symbol of character from, you can find it on the internet or use the Excel’s Symbol feature from the Insert tab > Symbols group > Symbol icon. This path will open a Symbol window where you can choose from an array of various symbols and characters.
Editing and Deleting Entries
To edit an entry, select the entry you want to change and edit the details in the Replace and/or With text box. And then select the Add or Replace button, whichever is enabled.
For deleting entries, read the next section.
Note: The AutoCorrect list is pretty impressive and if you feel your entry of choice is that little bit harder to find, you can start typing it in the Replace text box which will work as a quick search bar and pinpoint the entry for you.
How to Disable AutoCorrect for Certain Words
AutoCorrect can be disabled for some words. Well, to tell you the truth, there’s no on and off button for only some words and not the others. It’s more like removing AutoCorrect for some words.
The way to do that is to delete the entries from the AutoCorrect options. To reactivate AutoCorrect for those words, new entries will have to be made again in the AutoCorrect options.
For now, let’s see how to disable AutoCorrect for an entry:
- Go to File tab > Options > Proofing > AutoCorrect Options button > AutoCorrect
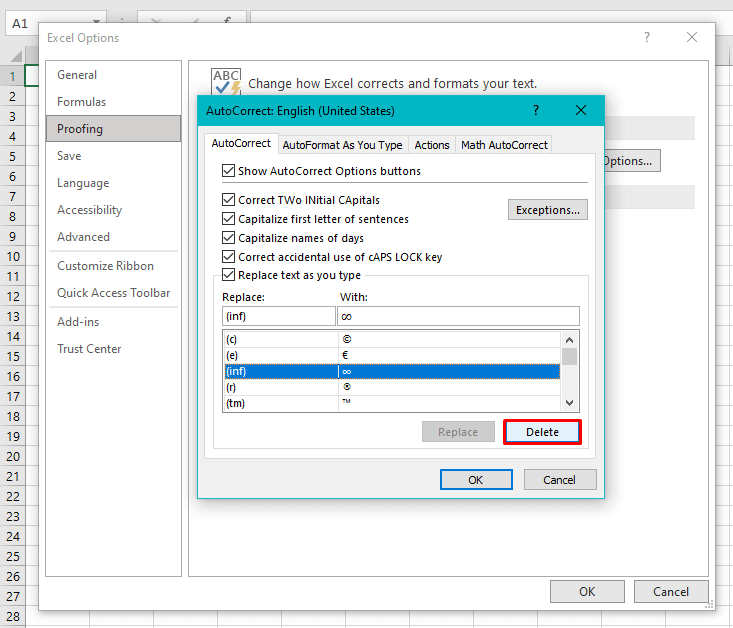
- Select the entry that you want to disable/remove.
- The Delete button will be enabled at this point for the selected entry.
- Click on the Delete button to remove the selected entry from the list.
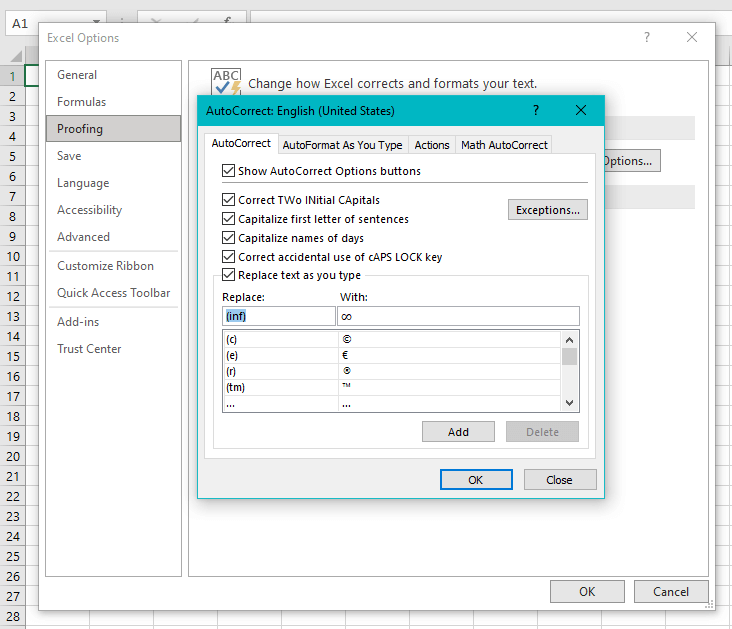
- The entry in selection will be removed from the list:
- Hit the OK button on both windows.
AutoCorrect will be disabled for the deleted entry. In the same way, you can select whichever entry you want to delete. However, if you want to remove multiple entries, it has to be done one by one.
How to Undo AutoCorrect Changes
This one’s simple. We all know that undoing anything is synonymous with Ctrl + Z. There are two aspects of undoing AutoCorrect changes. One is to enter the code, allow it to be autocorrected by pressing the Enter key, and then press the Ctrl + Z keys to undo the action.
What this will do is erase the contents of the cell and disable AutoCorrect temporarily for that particular cell. This is considering that nothing is entered in the cell other than the AutoCorrect content.
You don’t have to exit the cell to undo AutoCorrect and have a small window to undo the changes after you have typed the code. The steps for this are shown ahead:
- In a cell, enter the characters you want to.
- While typing the characters, if there’s an AutoCorrect entry for any of the grouped characters, the AutoCorrect content will replace the typed characters.
- As with our example, when we type (inf) and a space character, it changes to an infinity symbol and a space character. Even if it was any character other than a space, AutoCorrect will still work. E.g. if we type (inf)s, when we type the S key, AutoCorrect will change it to ∞s
- This implies that the additional character entered will be retained along with the AutoCorrect content.
- After the surplus character is typed and AutoCorrect applies to the other characters, at this point you can press Ctrl + Z to undo the changes.
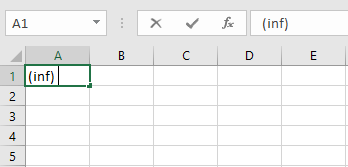
After pressing Ctrl + Z, the changes will be reverted and the cell contents will be (inf) and a space character.
You reckon you’ve seen everything about the feature today? Correct! That was AutoCorrect turned inside out for you and we hope you picked up on how you can utilize the feature for your work at hand.
It might have been a discovery for you that AutoCorrect can operate as not only a text correcting tool but also for entering symbols and other characters. Let’s leave you to tinker with this discovery while we prepare to entrap you in another Excel discovery.
