A quick look at an Excel sheet can tell you that the regular size of a cell is a decent fit for numbers but for this tutorial, we are more concerned about a cell's fit for text. With an acceptable font size, fitting 7-8 characters in a cell is no problem. For fitting more than one word in, there is no need to resort to a different column or row or keep adjusting with Alt + Enter. You have Word Wrap at your service.
Type all the text in a cell. Hit Enter. You will notice the text sprawled all the way to the cells on the right. If the cells on the right are preoccupied, the text will seem to hide behind the preoccupied cells. If you don't mind expanding the column width to accommodate all the text, adjust the column width or double click the column width in the column header and Bob's your uncle.
But if we don't want Bob as our uncle and want to compact the text to be displayed completely in one cell without compromising on column width, we wrap the text. When we say "we wrap the text", we don't really do anything strenuous; Excel is more than willing to do it for us. The options are simple, one of which requires a single click.

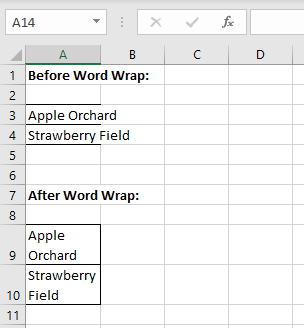
What happens when the text is wrapped? The text compacts into the cell it was originally written in with no impact on the column width but increased row height.
See how the text looks before and after wrapping:
Let's find out how to do this.
Method #1 – Apply Wrap Text from Ribbon
Step 1, click on the Wrap Text button. The end. Really!
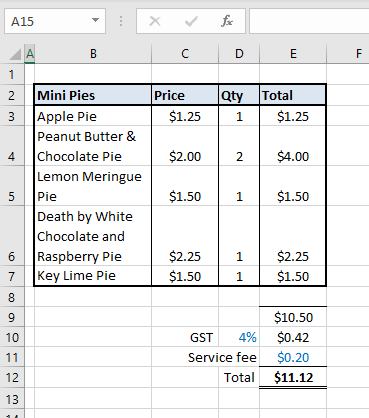
See if you can figure out the problem here:
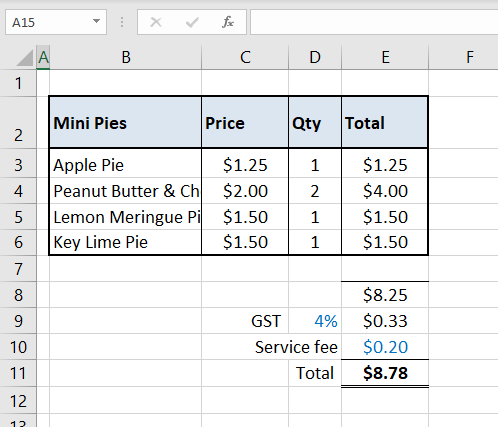
That is one delicious receipt but the longer item names are hiding behind the next column. Being a receipt, we'd like to keep it this compact. Hence, instead of extending the column width, we will wrap the text like this:
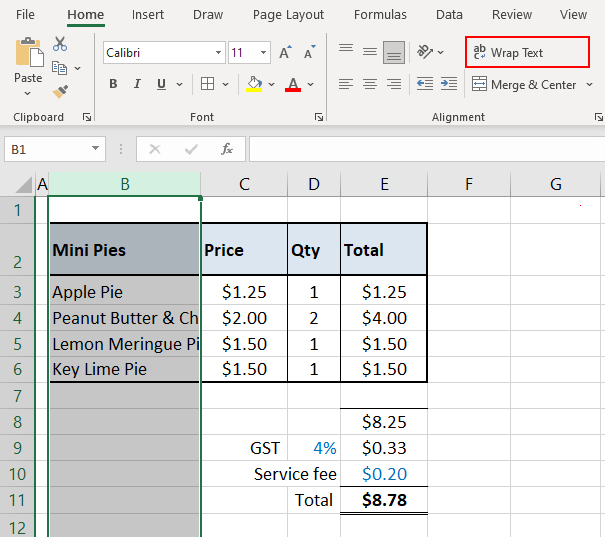
- Select the cell(s) for word wrapping. We will select column B.
- From the Home tab, in the Alignment group, click on the Wrap Text command button.
Consider the text wrapped! Once Wrap Text is applied, any text entered in the text-wrapped cells will automatically be wrapped. E.g. since we have applied Wrap Text to column B. Any text added later to column B will be wrapped.
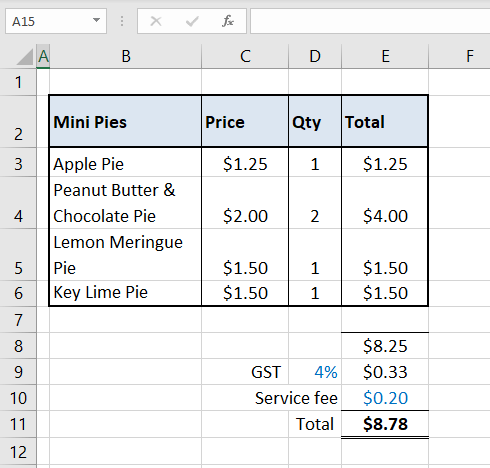
Sometimes Wrap Text may break the words while wrapping (Some letters of the word in the top line and the rest in the bottom line), in which case you will need to adjust the column width or adjust the words. To manually shift text to the next line, position the blinking cursor at the start of the text to be shifted and press Alt + Enter.
Method #2 – Using Format Cells Dialog Box
Any cell formatting option is incomplete without a nod to the Format Cells dialog window. Text can be wrapped using the Format Cells dialog box which is a few more clicks than the previous method but simple nonetheless. This option is useful especially if you're already using the Format Cells dialog box; might as well wrap some text while you're at it. Here are the steps:
- Select the cell(s) for word wrapping. We will select column B.
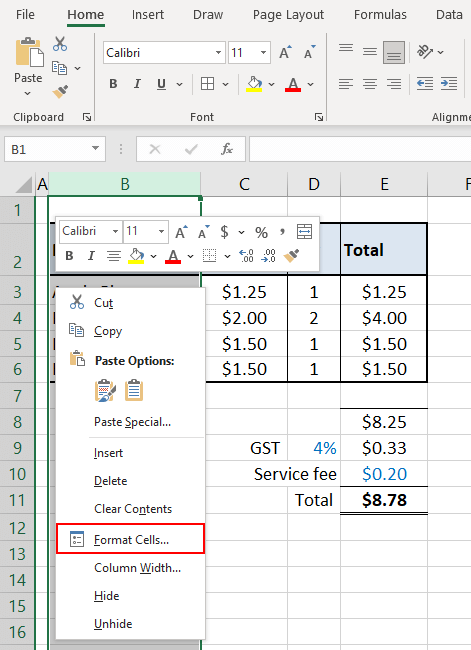
- Right-click the selected cells. Select Format Cells from the context menu to launch the Format Cells dialog box (or use the keyboard shortcut Ctrl + 1 or click the dialog launcher arrow in the Alignment group under the Home).
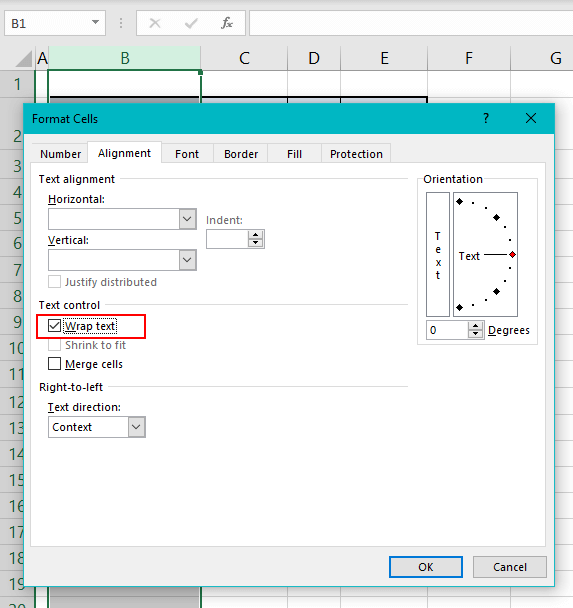
- In the Format Cells dialog box, select the Alignment In the Text control group, check the Wrap Text tick box.
- Click OK.
Text is wrapped! Once Wrap Text is applied, any text entered in the text-wrapped cells will automatically be wrapped. E.g. since we have applied Wrap Text to column B. Any text added later to column B will be wrapped.

Method #3 – Using Keyboard Shortcut
Press the keys one after the other to apply the shortcut keys for Wrap Text:
Alt H W
- Pressing Alt will display the shortcut key for each tab on the sheet.
- H selects the Home tab and further displays other shortcut keys for the commands on the ribbon menu.
- W will select the Wrap Text
Recommended Reading: How To Indent In Excel
Wrap Text Not Working
There are a few settings that may hinder wrapping text the right way. We have listed them below with ways to tackle them.
Fixed Row Height
Although Wrap Text is mostly about keeping the column width while expanding the row height to accommodate all the text in a cell, you may notice that sometimes the wrapped text is still being obstructed by insufficiently expanded row height. The reason for this is that the row height is preset to a certain height already and therefore will not expand further to display the complete text despite the Wrap Text feature applied.
Let's suppose we have preset the row height to 40 pixels (which in our case is almost equivalent to the height of two lines) but we enter an item that will require three lines.
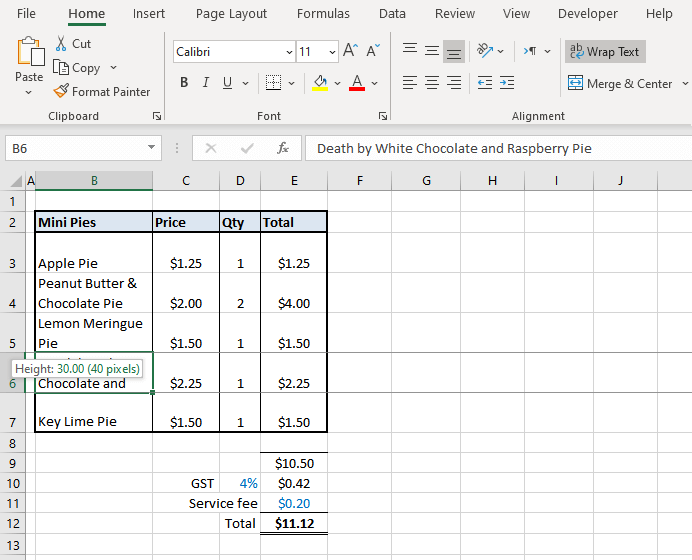
As you can spot in the Home tab's Alignment group, Wrap Text has already been applied but hasn't solved our problem of completely wrapping B6's text into the cell. This is because we have preset the row height to 40 pixels, therefore the row height is not extending to the required 60 pixels.
We can double-click row 6's row header but that would be a solution only for the text in row 6. For a sheet-wide solution, we can activate the AutoFit Row Height option. For our example, we only require this convenience for column B so we will only apply AutoFit Row Height to it instead of the whole sheet.
- Select the target text cells. We will select column B.
- Go to Home tab > Cells group > Format command button. Click the AutoFit Row Height
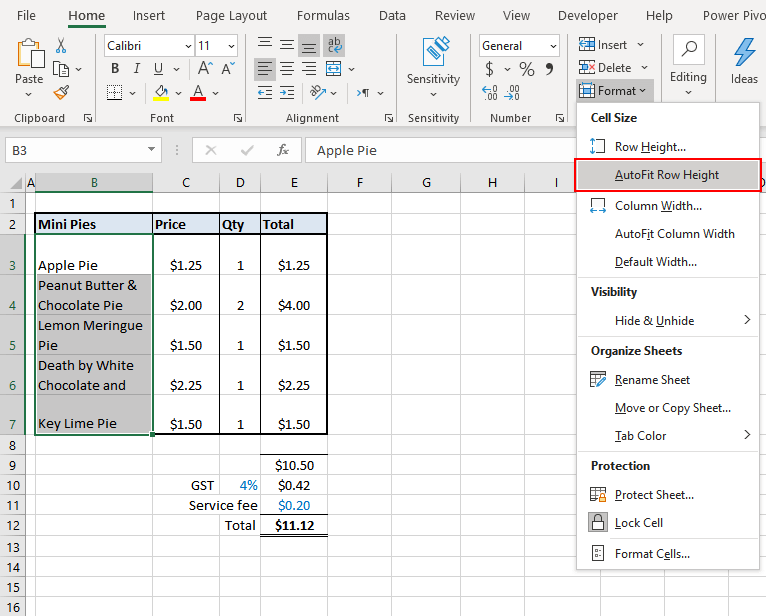
- This option will fit the row heights of all selected cells to display the complete text.
Do note that the AutoFit Row Height option will only apply with Wrap Text enabled. The beauty of AutoFit Row Height is that you wouldn't have to keep a preset row height for the complete text to be displayed; the row height will autofit according to the height required for each cell's text. Whereas with a preset row height, cells with lesser text will unnecessarily have more height too, needlessly expanding the size of the dataset.
Merged Cells
Wrap text will not apply to merged cells. Evidence below:
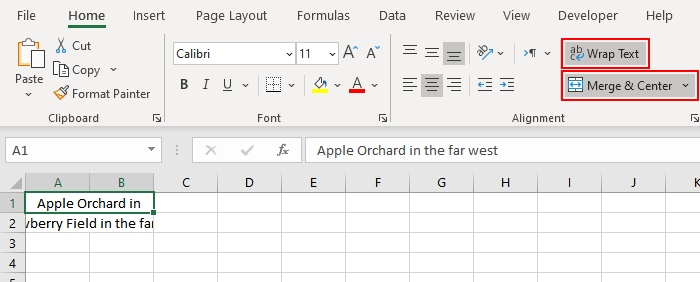
Until Excel finds a solution for this one, you'll have to decide whether merged cells are a keeper or goner.
With merged cells: either adjust the column width or row height to display the complete text.
Without merged cells: Unmerge the cells from the Home tab, Alignment group, Merge & Center command button, Unmerge Cells option. Then adjust the column width or row height to display the complete text.
Horizontal Alignment is Set to Fill
The horizontal alignment of the text of a cell may be set to Fill to prevent it from spilling to the next cell(s). In this case, Wrap Text will not work. There would be no change in such cells when Wrap Text is applied. Here is what text wrapping would look like applied to General Horizontal Alignment and Fill Horizontal Alignment:
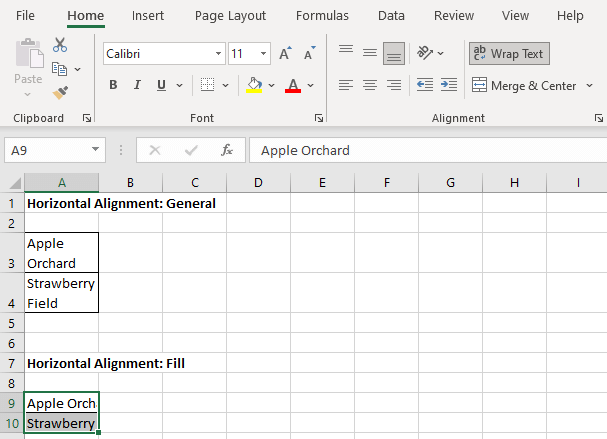
The solution is to remove the culprit; change the Horizontal Alignment of the text from Fill back to General. Here's the way:
- Select the target text cells.
- Press Ctrl + 1 to open the Format Cells dialog box. You can also open the Format Cells dialog box from the right-click context menu or the dialog launcher arrow from the Alignment group in the Home
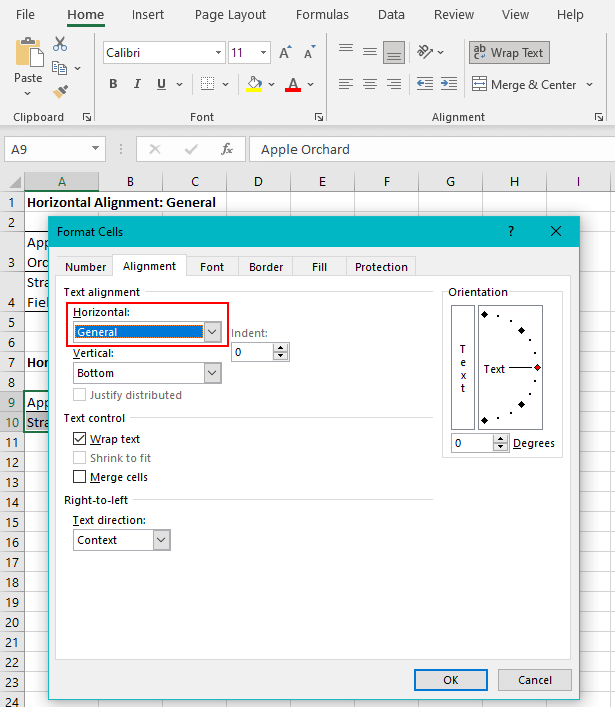
- In the Alignment tab, in the Text alignment section, change the Horizontal alignment from Fill to General.
- Click OK.
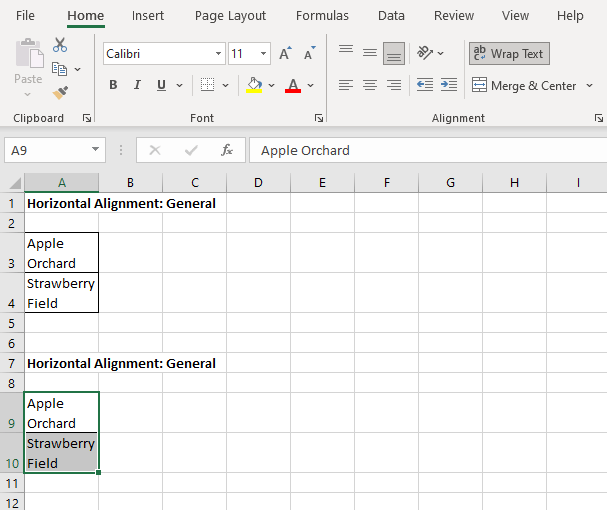
General Horizontal Alignment is the default setting and it quickly fixes this matter.
Recommended Reading: How to Rotate Text In Excel
Remove Wrap Text
The steps for removing Wrap Text are the same as the steps we used to apply it.
Removing Wrap Text Using Ribbon Menu
Select the desired cell or range of cells. Navigate to Home tab > Alignment group. The Wrap Text command button should be already highlighted denoting that it is already enabled.
Click the Wrap Text command button and the wrap text is disabled.
Removing Wrap Text Using Format Cells dialog box
Select the desired cell or range of cells. Launch the Format Cells dialog box (Ctrl + 1). Uncheck Wrap Text from the Alignment tab, Text control section, and click OK.
Removing Wrap Text Using Keyboard Shortcut
Press Alt H W one after the other.
All three ways above will remove Wrap Text from the cell(s).
It's a wrap, everyone! We wrap up this guide with the hope that we made text wrapping and unwrapping easier for you to understand and apply. We'd like to see you around with another slither of Excel. Until then, keep Excel-erating!

