Your dataset may be lacking in the wholesome feel of a loaded date, complete with its ammunition of the month and day name. It’s not a nosy preference; while short dates work fine for calculations and all, it’s helpful if once-overs are more meaningful when looking at the month or day.
Let’s say a delivery system might want to quickly see if any orders are falling close to the weekend, or you might want to see what items are clogging your Mondays.
We know you’re sold on the concept already because well, convenience is the taste for all and why should you even limit Excel that way? Today’s tutorial is about breaking the Excel boundaries on dates; in other words, on using the Long Date format.
Find out what the face of a Long Date looks like, what a Long Date can be used for, and how to get a Long Date in Excel.
We have 3 simple ways on this but why are we doing this and what is a Long Date?
What is Long Date Format in Excel
When you enter a date in Excel, the default format is that of a short date i.e. m/d/yyyy. Hence, a date entered as 5-20-25 will be displayed as 5/20/2025 automatically. If you value-paste a date, you will get a serial number because that is how Excel stores dates.
The Long Date Format has the month element in full form and may include the addition of the day name and even the time. The date entry of 5-20-25 will be shown as Tuesday, May 20, 2025. These formats are default in the regional format set to English (United States).
This form can be custom edited as per the requirement to a shorter day name and year & month number. The default format of dates, both short and long can also be set in custom or as per a different region. How you ask? We’re all about it today.
Ahead you will get to know simple methods of applying the Long Date format and you will also find how to switch the elements around, make them shorter if you please, and also how to add time. We’ve got our work cut out for us so…..
Let’s get formatting!
Applying Long Date Format In Excel
We have 3 quick and easy methods here to apply the Long Date format comprising using the Number Format Bar in the Ribbon, the Format Cells dialog box, and the TEXT function. Although the Number Format Bar has a straight-away option for formatting the date, a bit of insight into the formatting codes is really helpful if you want to be able to set a custom format using the other two methods.
This is not the eye-boggling black screen, green code. Nobody's talking about that. Okay, maybe someone is talking about that somewhere but these formatting codes are nothing complicated so do have a look!
A date is made up of the day, month, year, and, in the Long Date format, also the day name. Use the following codes to piece together a date format:
- d – returns the day in the date in a single digit (5 for the 5th, 20 for the 20th).
- dd – returns the day in the date in double digits (05 for the 5th, 20 for the 20th).
- ddd – returns a 3-letter abbreviation of the day name from the date (Mon for Monday).
- dddd – returns the day name in full from the date (Monday for Monday).
- m – returns the month in the date in a single-digit (2 for February, 10 for October).
- mm – returns the month in the date in double-digits (02 for February, 10 for October).
- mmm – returns a 3-letter abbreviation of the month name from the date (Feb for February).
- mmmm – returns the month name in full from the date (February for February).
- yy – returns the year from the date in double digits (00 for 2000).
- yyyy – returns the year from the date in full (2000 for 2000).
Now on how to put this together. Ahead in the methods and examples, you’ll be clear on how to put a date format together and you can do this using different separators such as the default forward slash (/), hyphen (-), period (.), and comma (,).
As a small example, the format code:
dddd - dd.mm.yyyyApplied to 1/31/2025 will return the date in the Long Date format as:
Friday - 31.01.2025We'll dig into the methods now that you have an idea of how format codes work with dates.
Method #1 – Using Number Format in Ribbon
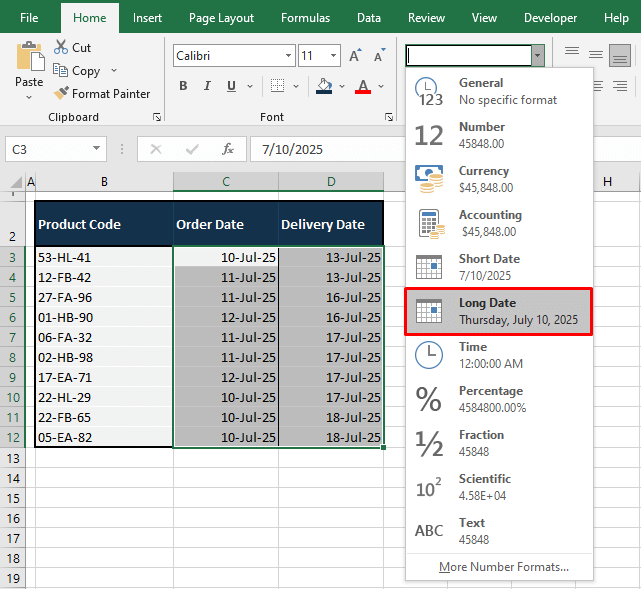
The first method is on using the Ribbon in a couple of clicks involving the Number Format Bar. The couple of clicks should tell you that this is a super quick way of applying the Long Date format. Although this can be tweaked later with Format Cells, the Number Format Bar presents one format for the Long Date which is:
dddd, mmmm d, yyyyUse the following steps to apply this Long Date format to the dates on your worksheet with the Number Format Bar:
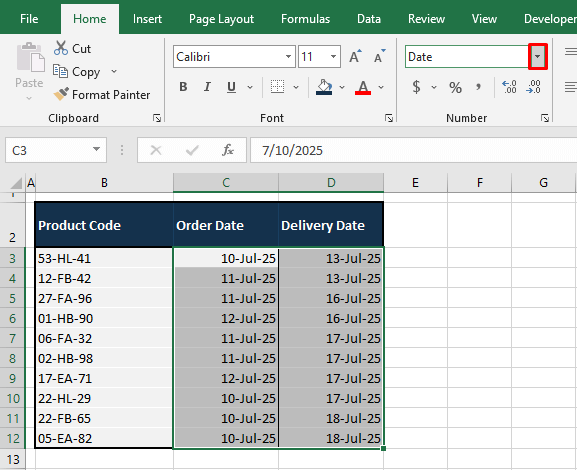
- Select the cells containing the dates in your dataset.
- In the Number group on the Home tab, click on the small arrow of the Number Format Bar.
- Select the Long Date option from the menu.
- You will see a sample text along with the format options.
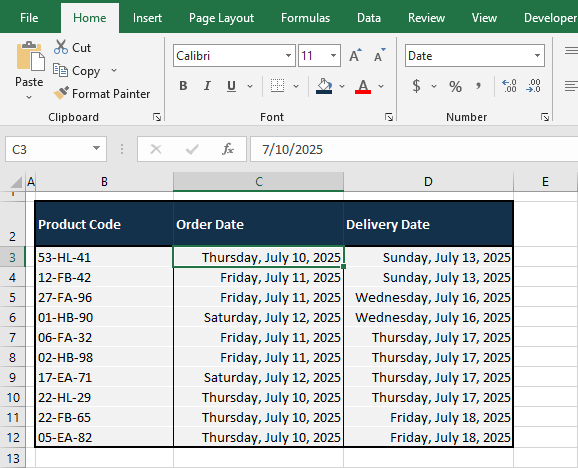
- That’s all really. You should have your selected dates in the Long Date format now:
Notes:
Note from the selected cell that the date still appears in the short form in the Formula Bar. This implies that the underlying cell value hasn’t changed and the format applied is only a display of the date. The right alignment also shows that it is a number value. Since the date value is intact, the cell value is a number and can therefore be further used in calculations and formulas as a date.
Formatting the cells changes the display of the original dates. So for some reason, if you want to keep the original format of the dates too, first copy and paste the dates in their original format and then change the format of the copied dates.
If you apply a Long Date format and see a string of hash signs (###), they indicate insufficient column width. Expand the column to fit the full contents of the date and your Long Date should appear.
Method #2 – Using Format Cells Option
Here’s another way of maintaining the cell value as a simple date and only changing the format; the Format Cells option. Format Cells can be used to format the date cells to Long Date and can also be used to further edit the Long Date format applied from the Number Format Bar. Now your formatting codes can come in handy. It must be said though, there are quite some exhaustive options in Format Cells itself.
Follow the steps ahead to utilize Format Cells to apply the Long Date format to dates in Excel:
- Select the date cells on the worksheet that you want to format.
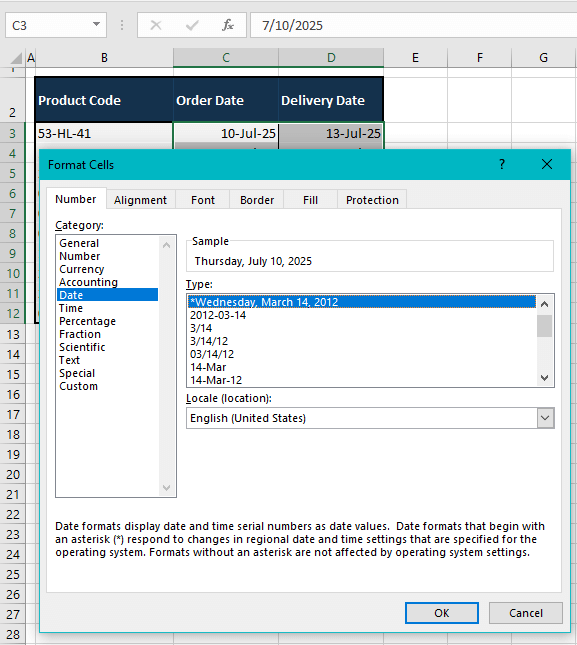
- Click on the dialog launcher arrow of the Number group in the Home
- This will directly open the Format Cells dialog box in the Number tab.
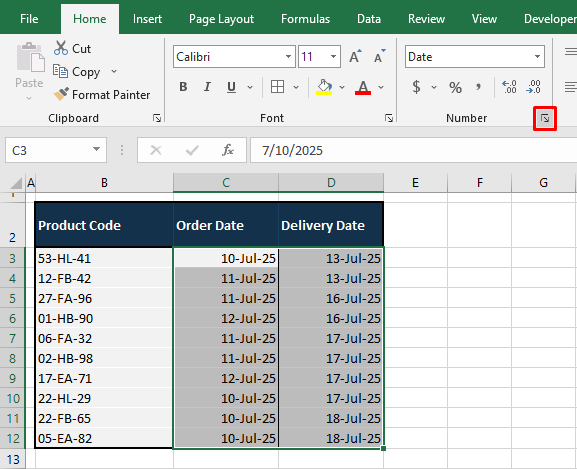
In the Number tab, the Format Cells dialog box will display the current format of the selected date cells (if the format of all the selected cells is identical).
Our selected cells all have the same date format d-mmm-yy which is an option we had selected earlier from Format Cells itself.
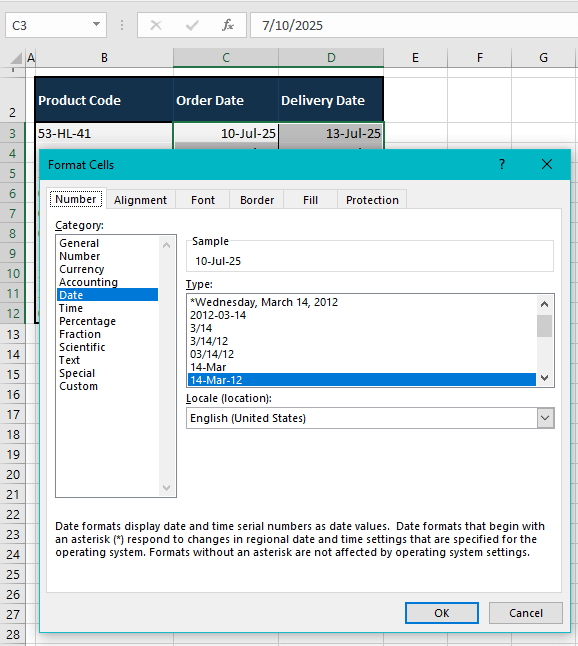
Looking at the Locale option given below the type of formats, you can change the location and the format types will change accordingly. We’ll try changing it to Latin and see the difference:
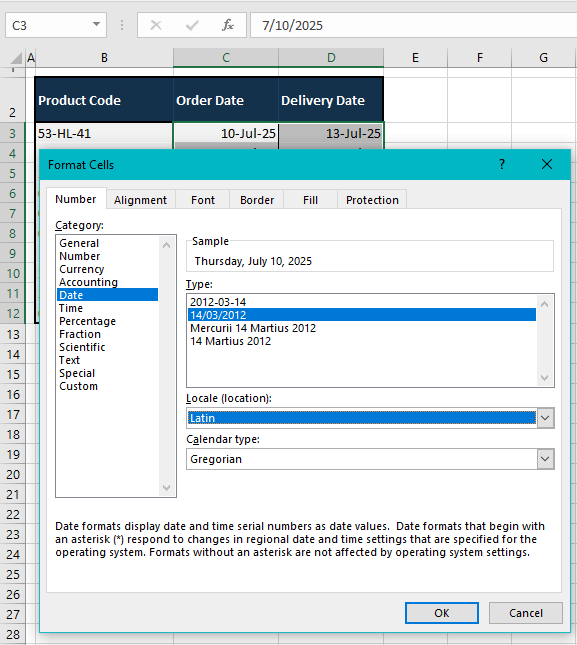
The difference will be seen in the formats sporting the asterisk (also mentioned in the dialog box) which is essentially just the two default Short and Long Date formats.
So that’s a quick way to explore date formats according to different locations. We’ll hop back to English (United States). The Type section holds several Short and shorter date formats and a few Long Date formats with the day name and 12-hour and 24-hour time. With the locale unchanged, here is what we’re doing ahead:
- Select the format for a Long Date from the Type
- A preview should be available in the Sample box.
- We can apply this format and roll ahead but we could have done that from the Number Format Bar too. So let’s tweak this format a little. We could have also just fed our choice of format in the Custom options but preselecting a format gives us a base format code to edit.
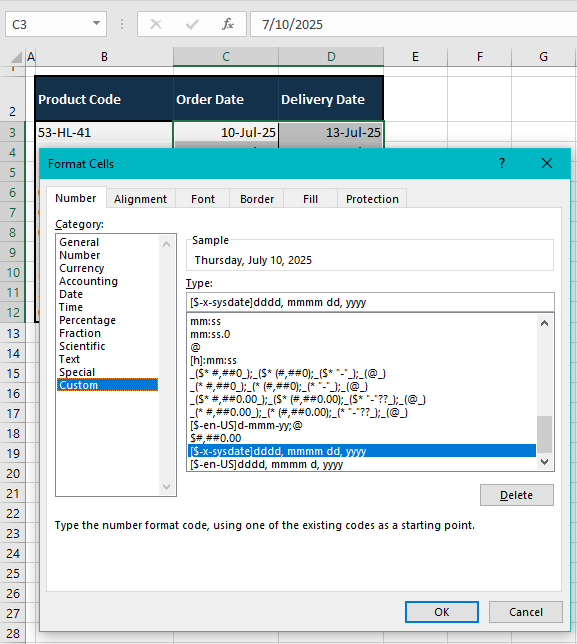
- Select the Custom category from the panel on the left.
- Now you will be able to view and edit the formatting code for the selected Long Date format.
- Edit the formatting code in the Type
We want a Long Date but want it in the shortest form possible so we're shortening the day & month names and the year which has thinned the code down to:
ddd, mmm dd, yy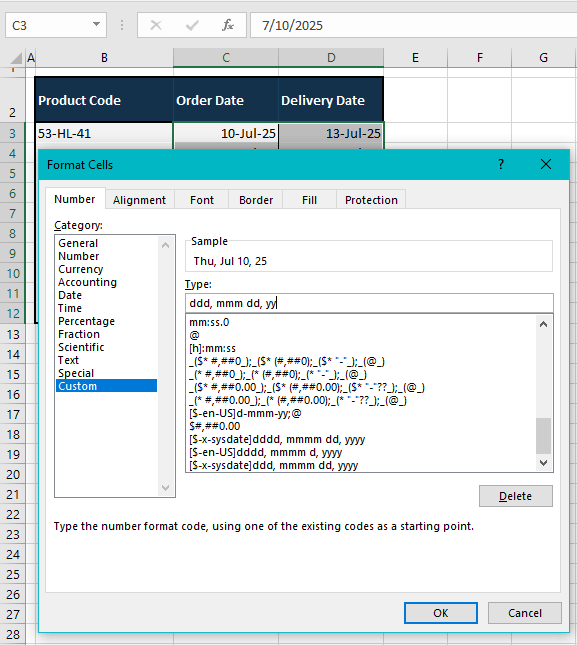
This is how our custom Long Date format has worked out for us:
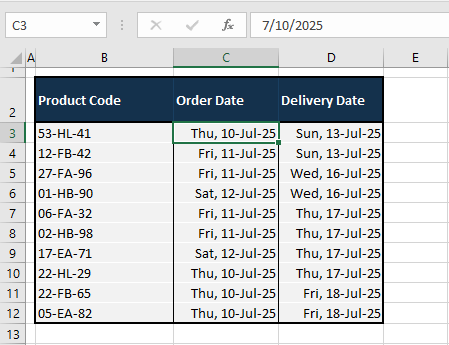
Note: If you also want the time as part of the Long Date, the easy way again is to select a format including the time from the Date category, then head to the Custom category and add the day name format in the code.
Method #3 – Using TEXT Function
This is the last method on our list of quick fixes and we’re bringing in the TEXT function. The TEXT function changes the provided value to a text value using the given format. The format that goes into the function is the formatting code as seen earlier.
Let’s make no mistakes here; the TEXT function converts the output from a number to a text and while the resulting date cannot be used in calculations, it can be used in text formulas, say, if you want to add the date as part of other text to go in an email or on a leaflet.
And again, since we can, we will switch the format around, adding the day name at the end of the date. Piece your date format together and enter it into a formula like the one below to use the TEXT function to get a Long Date format in Excel:
=TEXT(C3,"dd-mm-yy dddd")The TEXT function takes a date (in C3 in our example case) and a format to convert the value into a Long Date format and text. Our format of choice is dd-mm-yy dddd enclosed in double quotes and the following are the resultant text values in Long Date format:
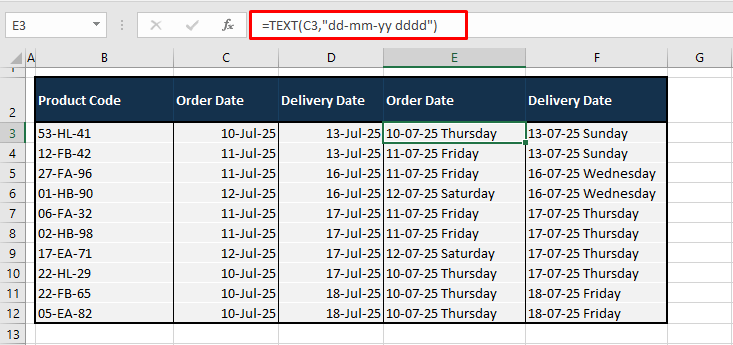
The date has gone from being right-aligned to left-aligned as it is now a text value.
Also note that the TEXT function doesn’t overwrite the original values. If you want to do away with the original dates, you can hide the columns or value-paste the Long Dates and delete the original dates.
How to Change Default Long Date Format
At your first go in the Number Format Bar, you see a Short Date and Long Date format. The base of these default formats is the Regional Format of your computer. In the case that you find yourself changing this format every time in Excel, you can switch up the Region settings by setting the default formats of your preference.
We’ll show you how to change the default Long Date format by changing your local Region settings with these steps:
- Click on the Settings icon in the Start Menu of your computer.
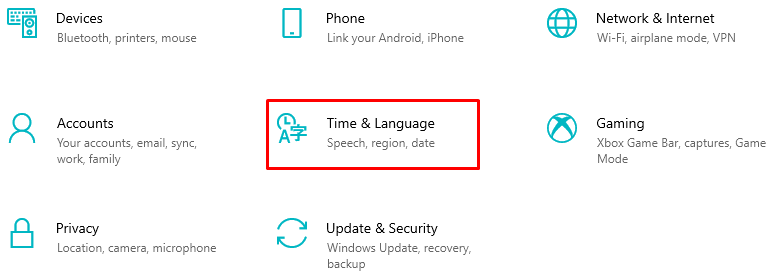
- On the interface, select the Time and Language
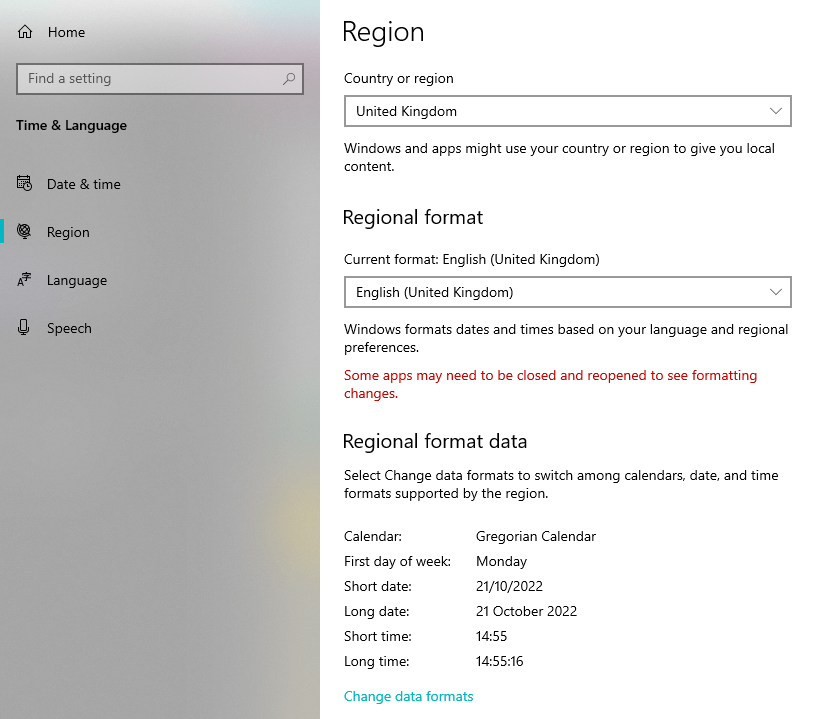
- Click on the Region tab in the left pane.
- Change the region in the Regional format section if you want to change the regional format overall on your computer.
- As you can see, the Long Date format is different for English (United Kingdom).
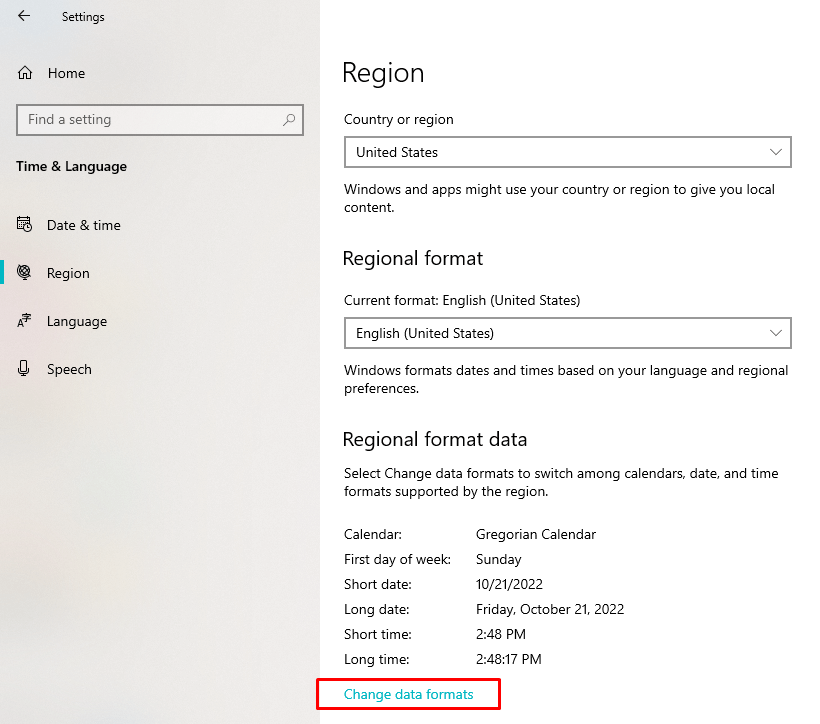
- If you wish to keep your current region, leave the region in the Regional format unchanged and tweak the format data instead. Follow these steps:
- Click on the Change data formats option at the foot of the Regional format data
- Use the drop-down menu to set the default format for the Long Date.
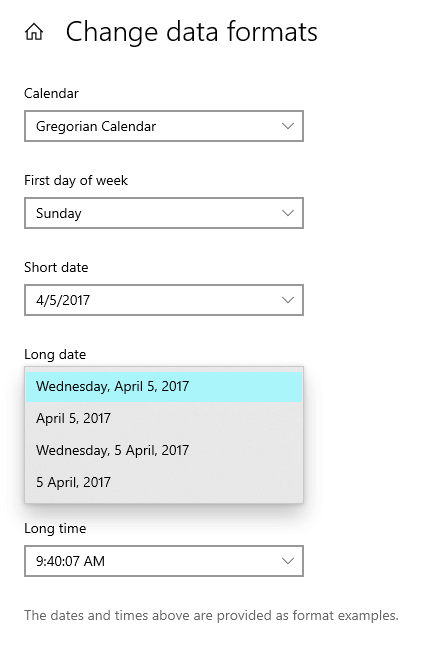
Now the format data relating to the Long Date will have changed as per the changes made by you.
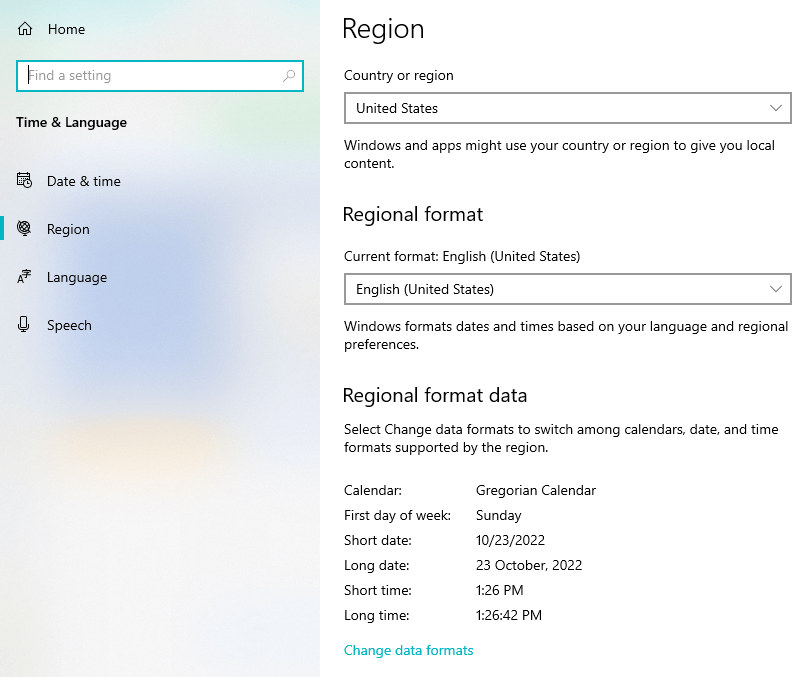
Let’s see how this change applies to the default Long Date format in Excel.
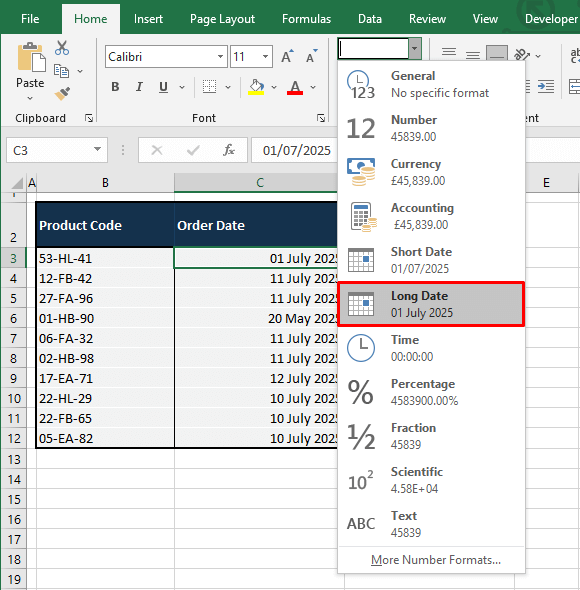
The default format of a Long Date has changed from
dddd, mmmm dd, yyyyto
dd mmmm yyyyNow you wouldn’t have to change the format after making a date entry.
Long Date Format vs Short Date Format
Characteristic of a Short Date is the combined day, month, and year divided by a separator. The separator will have two occurrences (e.g. if the separator is a hyphen, it will be used twice; after the first and second elements in the date such as 01-12-25.
The month name will not be in full form and at most will be a 3-letter abbreviation. A Short Date value can be used in calculations and formulas.
A Long Date has the full month name and can go up to including the day name and time. A separator is not necessary in a Long Date but can include any of the separators like those in a Short Date.
A Long Date value can sometimes be a text and cannot be used in calculations. They can be treated as text and used in text formulas.
Consider that all the prep you need to be comfortable with using Long Dates in your Excel routine. Remember that Long Dates can hold their own or can be Short Dates with a Long disguise. Hopefully your calendar problems date back to the 20th century. We’ll be kicking more Excel nuisances backward in the calendar and while we set that up, so long!
