Inserting a checkbox in Excel is an easy task. The checkbox control is available in the Excel developer tools option. Checkbox and other controls like dropdowns can be quite helpful while designing forms in Excel.
These controls prevent users from entering some unwanted data in your forms, and hence they are preferred.
In this post, we will understand how to insert a checkbox in Excel. After that, we will also see an example of how checkboxes can ease data analysis tasks.
How to Insert Checkbox in Excel
Excel checkbox control is present in the "Developer Tools" menu item. And by default "Developer Tools" menu item is hidden in Excel. So first of all, we need to make this option available in the Excel top ribbon, and after that, we can use the checkbox control. Below is a step by step procedure for adding a checkbox to Excel:
- Navigate to Excel Options > Customize Ribbon: With the Excel sheet opened, navigate to "File"> "Options"> "Customize Ribbon" tab. You can also press the keys "ALT + F + T" to open the excel options and then navigate to the "Customize Ribbon" tab.
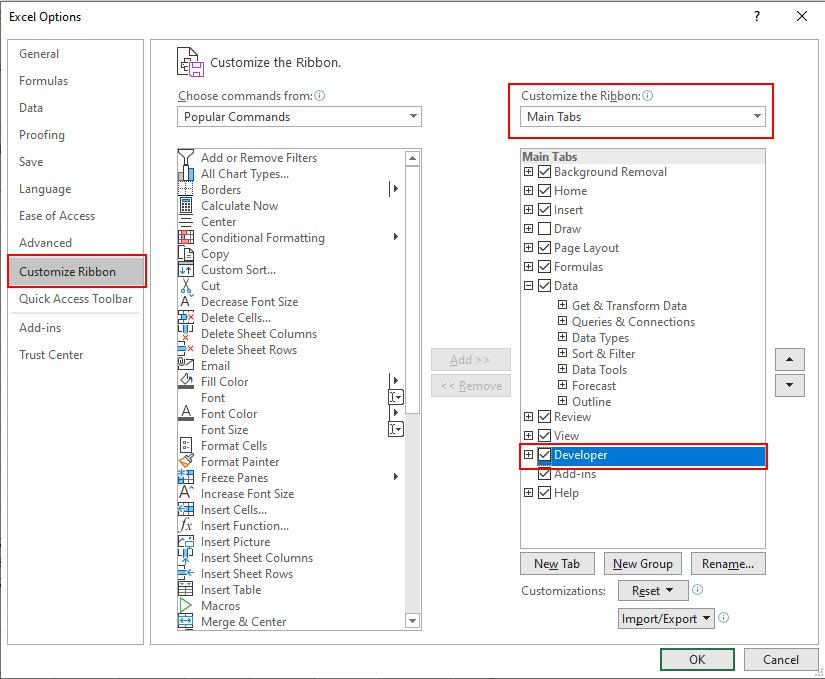
- Enable Developer Tools Tab: By default, "Developer" option would be unchecked in the "Main Tabs". Check the "Developer" option and click the "OK" button.
- Go to Developer Tab > Insert Option > Checkbox Option: After this, you will be able to see a "Developer" tab on your Excel ribbon. Inside the "Developer" tab, click on the "Insert" dropdown and select the form "Checkbox" control as shown.
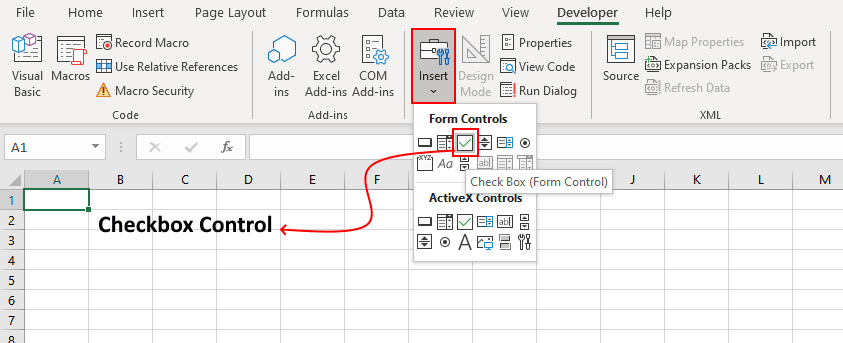
- Click the Checkbox Option: Now, you can draw a checkbox anywhere on your excel sheet.
- Format Checkbox Control: Next, you can customize your checkbox using the "Format Control" option.
How to Capture the Checkbox State
After adding the checkbox to your spreadsheet, you need to capture its state. Checkbox state can tell you if the checkbox is currently checked or not.
For capturing the state of a checkbox, you need to associate it with a cell. After associating the checkbox with a cell, the cell displays 'True' if the checkbox is checked; otherwise, it displays 'False'.
To associate checkbox to a cell, follow the below steps:
- Right-click over the checkbox and select the option 'Format Control' from the context menu as shown.
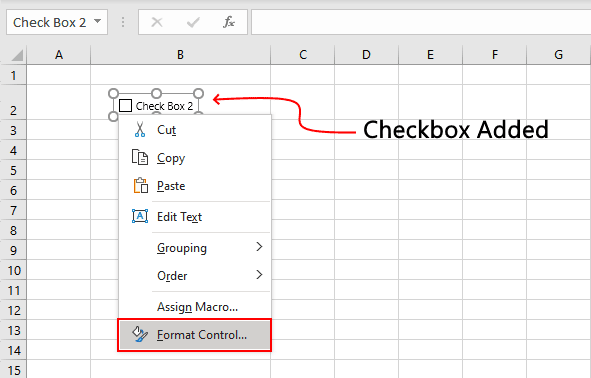
- Clicking on the 'Format Control' option will open a 'Format Control' window. Inside the 'Format Control' window navigate to the 'Control' tab.
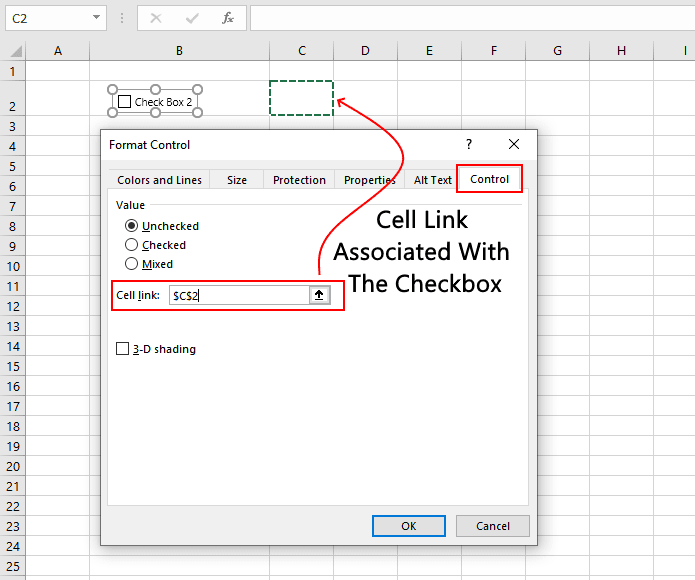
- On the control tab, click on the 'cell link' input box and then select an empty cell on the spreadsheet which you wish to associate with the checkbox.
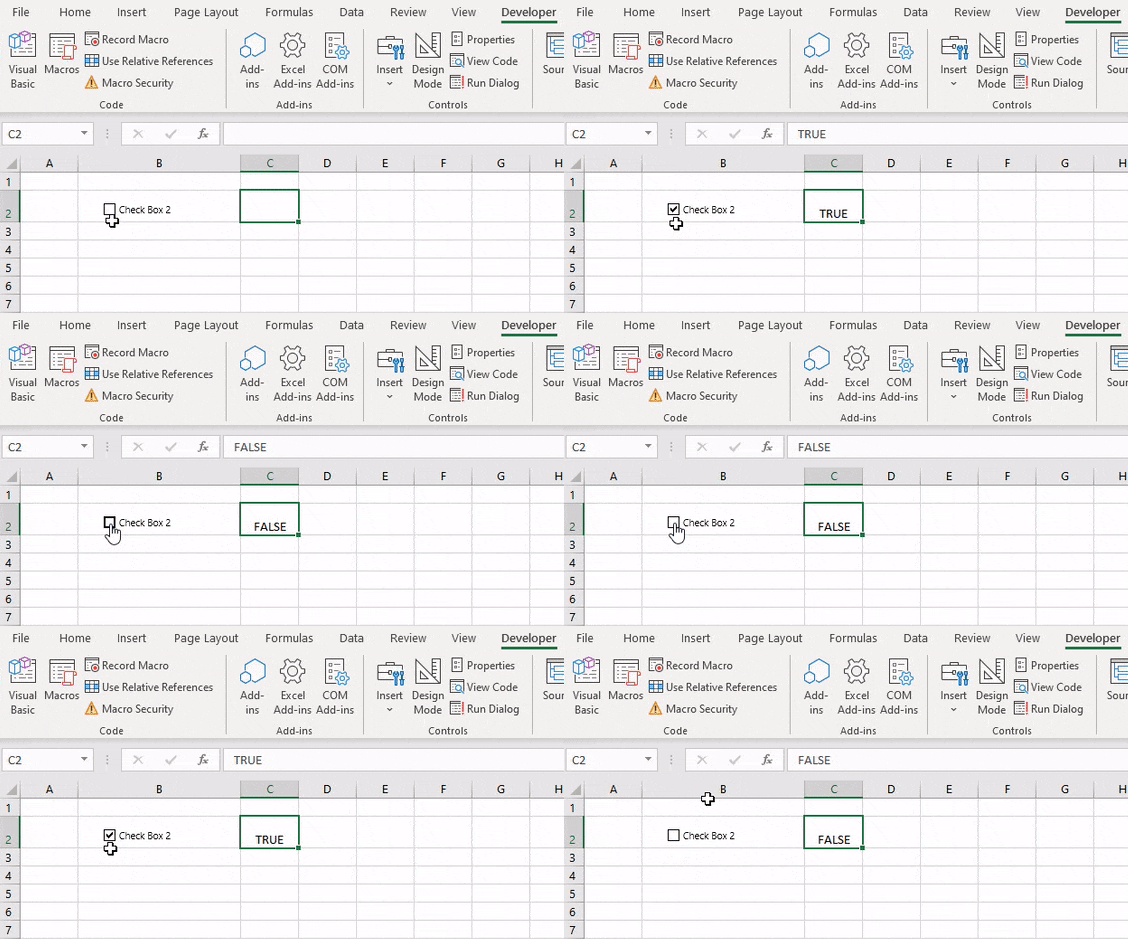
Tip: To keep track of the cell links for corresponding checkboxes, it's always a good idea to set the cell links in a column adjacent to the checkbox. This way, it gets easier to find the cell links associated with the checkboxes whenever you want. Also, you can hide the column containing the cell links so that your spreadsheet is clutter-free.
How To Insert Multiple Checkboxes Fast in Excel
In the above sections, we saw, how to add a single checkbox to excel, but there can be times where you would need to have tens or hundreds of checkboxes in your worksheet. Adding such a huge number of checkboxes on by one is not a feasible option.
So, let's see how can we add multiple checkboxes to excel fast:
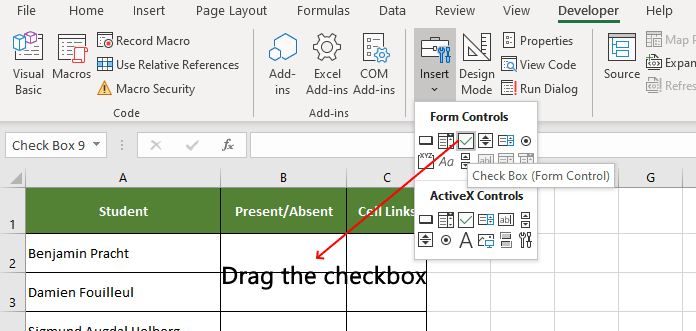
- First of all, add a checkbox manually, by selecting the checkbox option from the Developer tab.
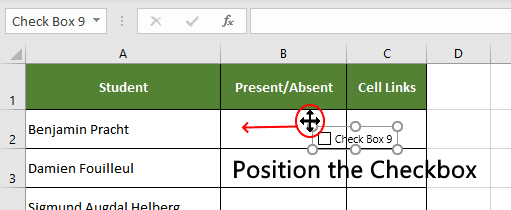
- Next, adjust the position of the checkbox.
- Optional Step: Format the checkbox as required. In this example, we are setting the checkbox text as blank.
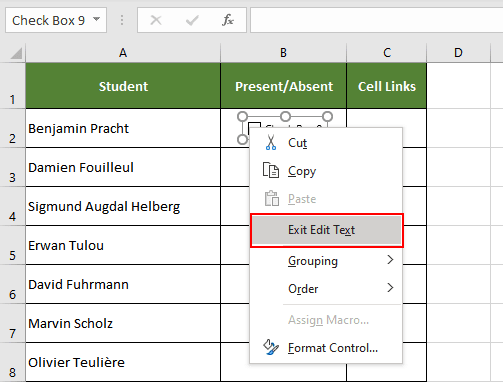
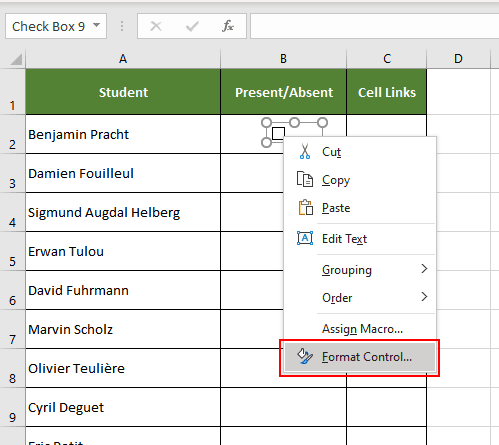
- After this, right-click over the checkbox and select the 'Format Control' option from the context menu.
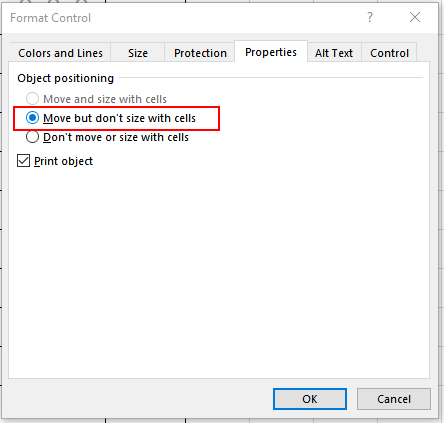
- In the 'Format Control' window, navigate to the 'Properties' tab and check if the option "Move but don't size cells" option is selected. If this option is not selected, select it and click the "OK" button.
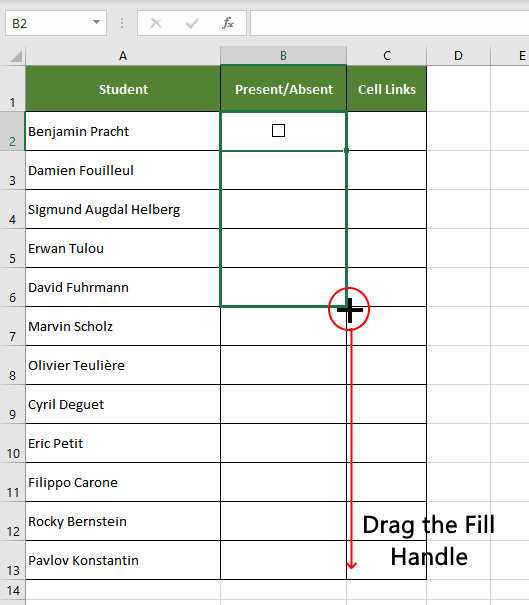
- Finally, when the check box is positioned correctly and formatted correctly. Drag the fill handle to all the rows below.
- And it's done! Now you will see checkboxes copied against all the rows.
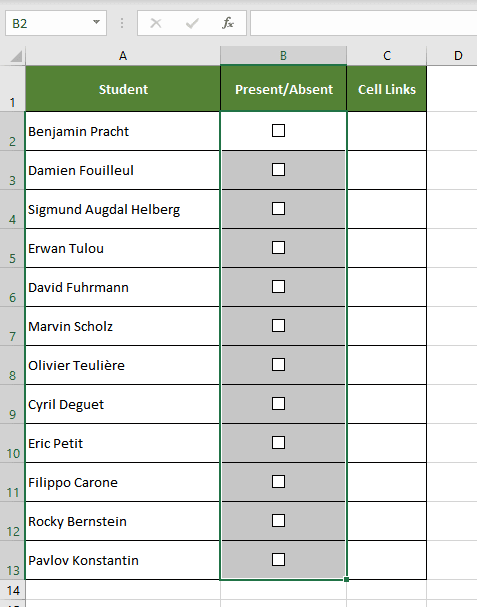
As you can see in the screenshot above, we have inserted checkboxes for all the rows in our list. But the list cannot be used as such, because we still haven't set the cell links for all those checkboxes. Now let's see how to add cell links for multiple checkboxes.
Setting the Cell Link for Multiple Checkboxes
Setting cell links for multiple checkboxes manually can become very tedious. So, we can use a VBA code that can set checkbox cell links for multiple checkboxes in excel.
Follow the following steps to use this VBA code:
- With your Excel workbook opened, Press "Alt + F11" to open Visual Basic Editor (VBE).
- Right-click on the workbook name in the "Project-VBAProject" pane and select Insert -> Module from the context menu.
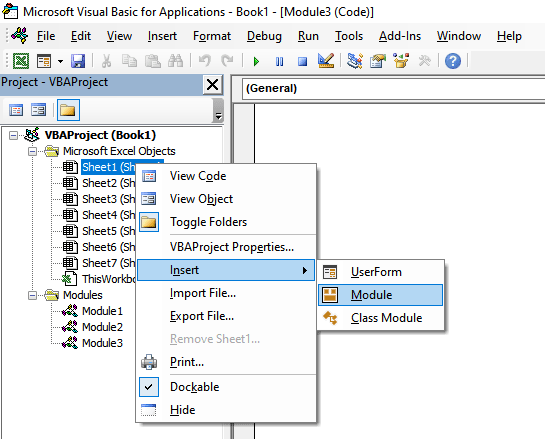
- Copy the following VBA code:
Sub LinkCheckBoxes()
Dim chk As CheckBox
Dim lCol As Long
lCol = 1 'number of columns to the right for link

For Each chk In ActiveSheet.CheckBoxes
 chk.LinkedCell = chk.TopLeftCell.Cells.Offset(0, lCol).Address
Next chk
End Sub
Note: Depending on the offset between the checkbox and the column where you wish to set the cell links set the value of 'lcol' column. In this example, we have set it to 1, which means, the cell links will be generated in the column next to the checkboxes.
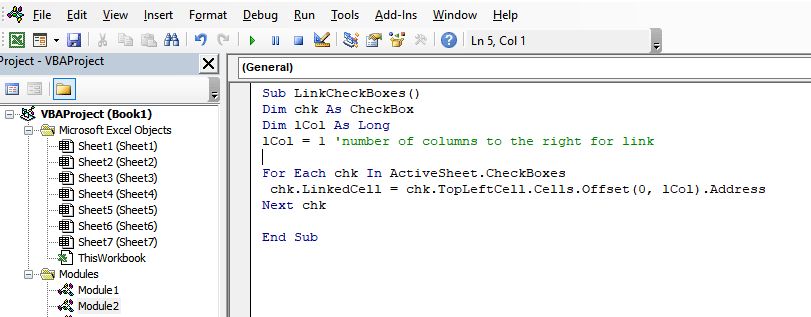
- After doing the changes, run the code using 'F5' key.
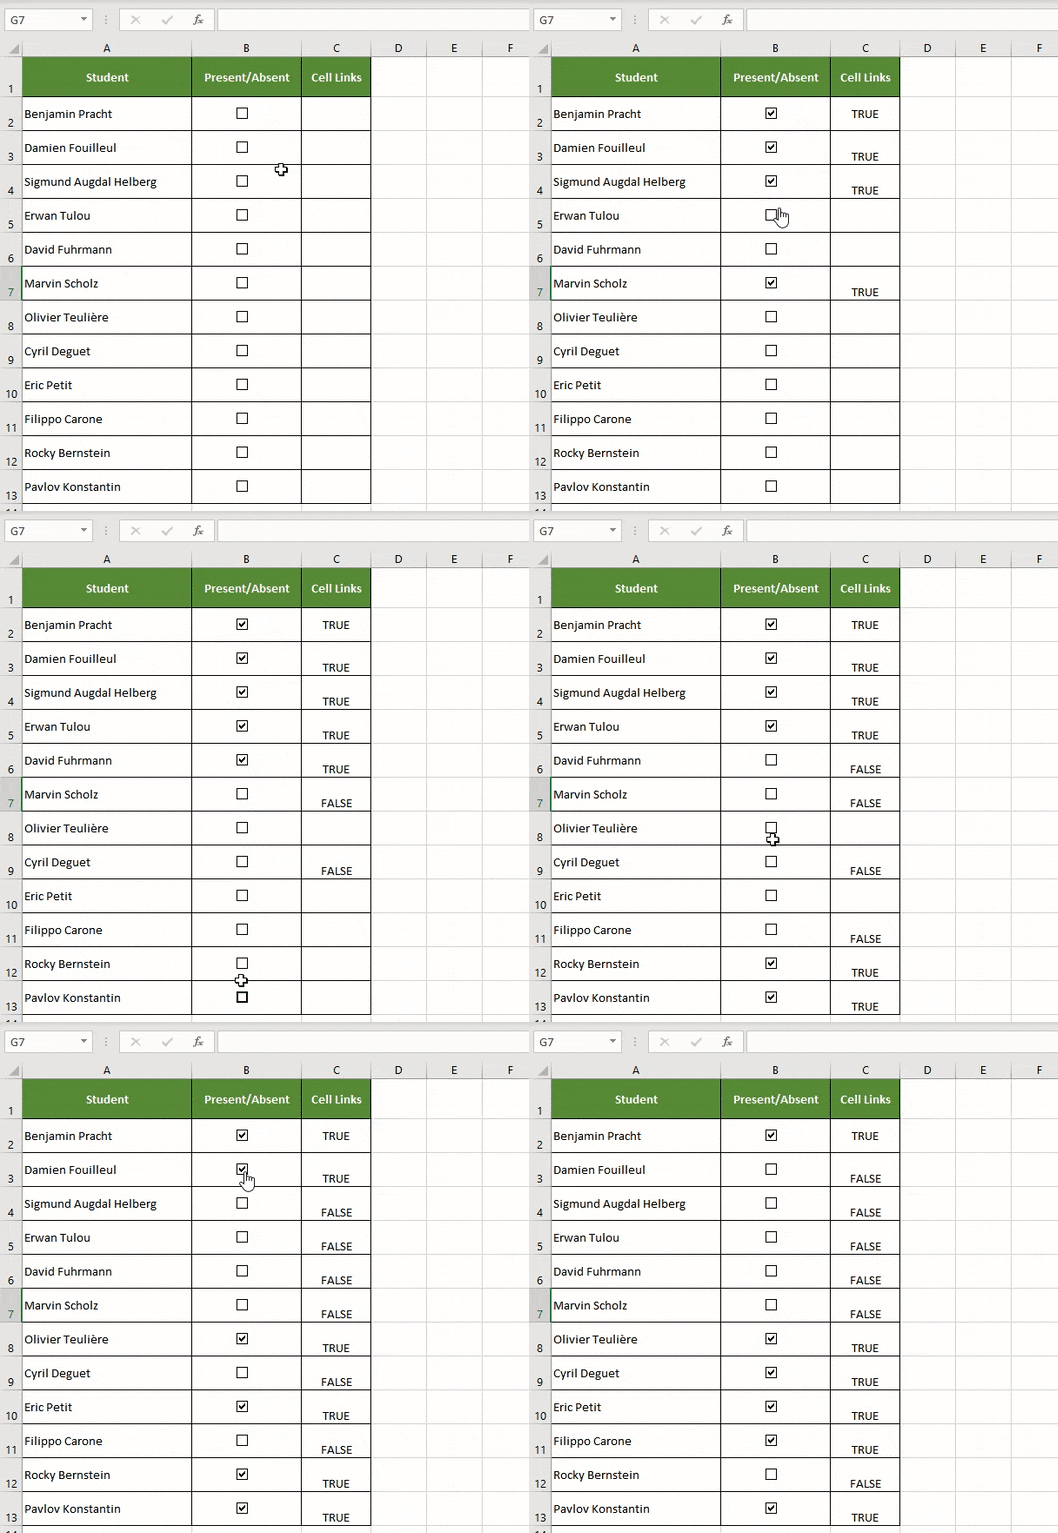
- Close the VBA editor, and you would see the cell links for all the checkboxes are generated.
How to Add Multiple Checkboxes Without Developer Tab
In the above sections, we have seen how to add checkboxes from the developer tab. In this section, we will see how you can add multiple checkboxes to excel without using the developer tab.
For this, we can use a VBA script, that accepts the range where the checkbox needs to be included and the cell link offset as user inputs, and based on these inputs the VBA script creates the checkboxes in the specified range.
Let's see how to use this VBA script:
- With your Excel workbook opened, Press "Alt + F11" to open Visual Basic Editor (VBE).
- Right-click on the workbook name in the "Project-VBAProject" pane and select Insert -> Module from the context menu.

- Copy the following VBA code:
Sub CreateCheckBoxes()
'Declare variables
Dim c As Range
Dim chkBox As CheckBox
Dim chkBoxRange As Range
Dim cellLinkOffsetCol As Double
'Ingore errors if user clicks Cancel or X
On Error Resume Next
'Input Box to select cell Range
Set chkBoxRange = Application.InputBox(Prompt:="Select cell range", Title:="Create checkboxes", Type:=8)
'Input Box to enter the celllink offset
cellLinkOffsetCol = Application.InputBox("Set the offset column for cell links", "Cell Link OffSet")
'Exit the code if user clicks Cancel or X
If Err.Number <> 0 Then Exit Sub
'Turn error checking back on
On Error GoTo 0
'Loop through each cell in the selected cells
For Each c In chkBoxRange 'Add the checkbox
 Set chkBox = chkBoxRange.Parent.CheckBoxes.Add(0, 1, 1, 0)
 With chkBox
 'Set the checkbox position
 .Top = c.Top + c.Height / 2 - chkBox.Height / 2
 .Left = c.Left + c.Width / 2 - chkBox.Width / 2
 'Set the linked cell to the cell with the checkbox
 .LinkedCell = c.Offset(0, cellLinkOffsetCol).Address(external:=True)
 'Enable the checkBox to be used when worksheet protection applied
 .Locked = False
 'Set the name and caption
 .Caption = ""
 .Name = c.Address
 End With
Next c
End Sub
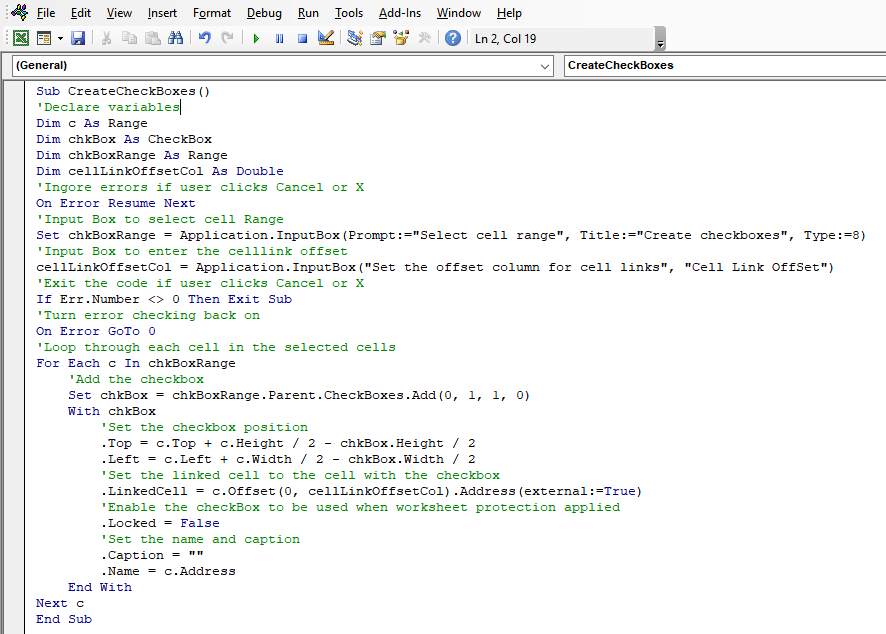
- After doing the changes, run the code using 'F5' key.
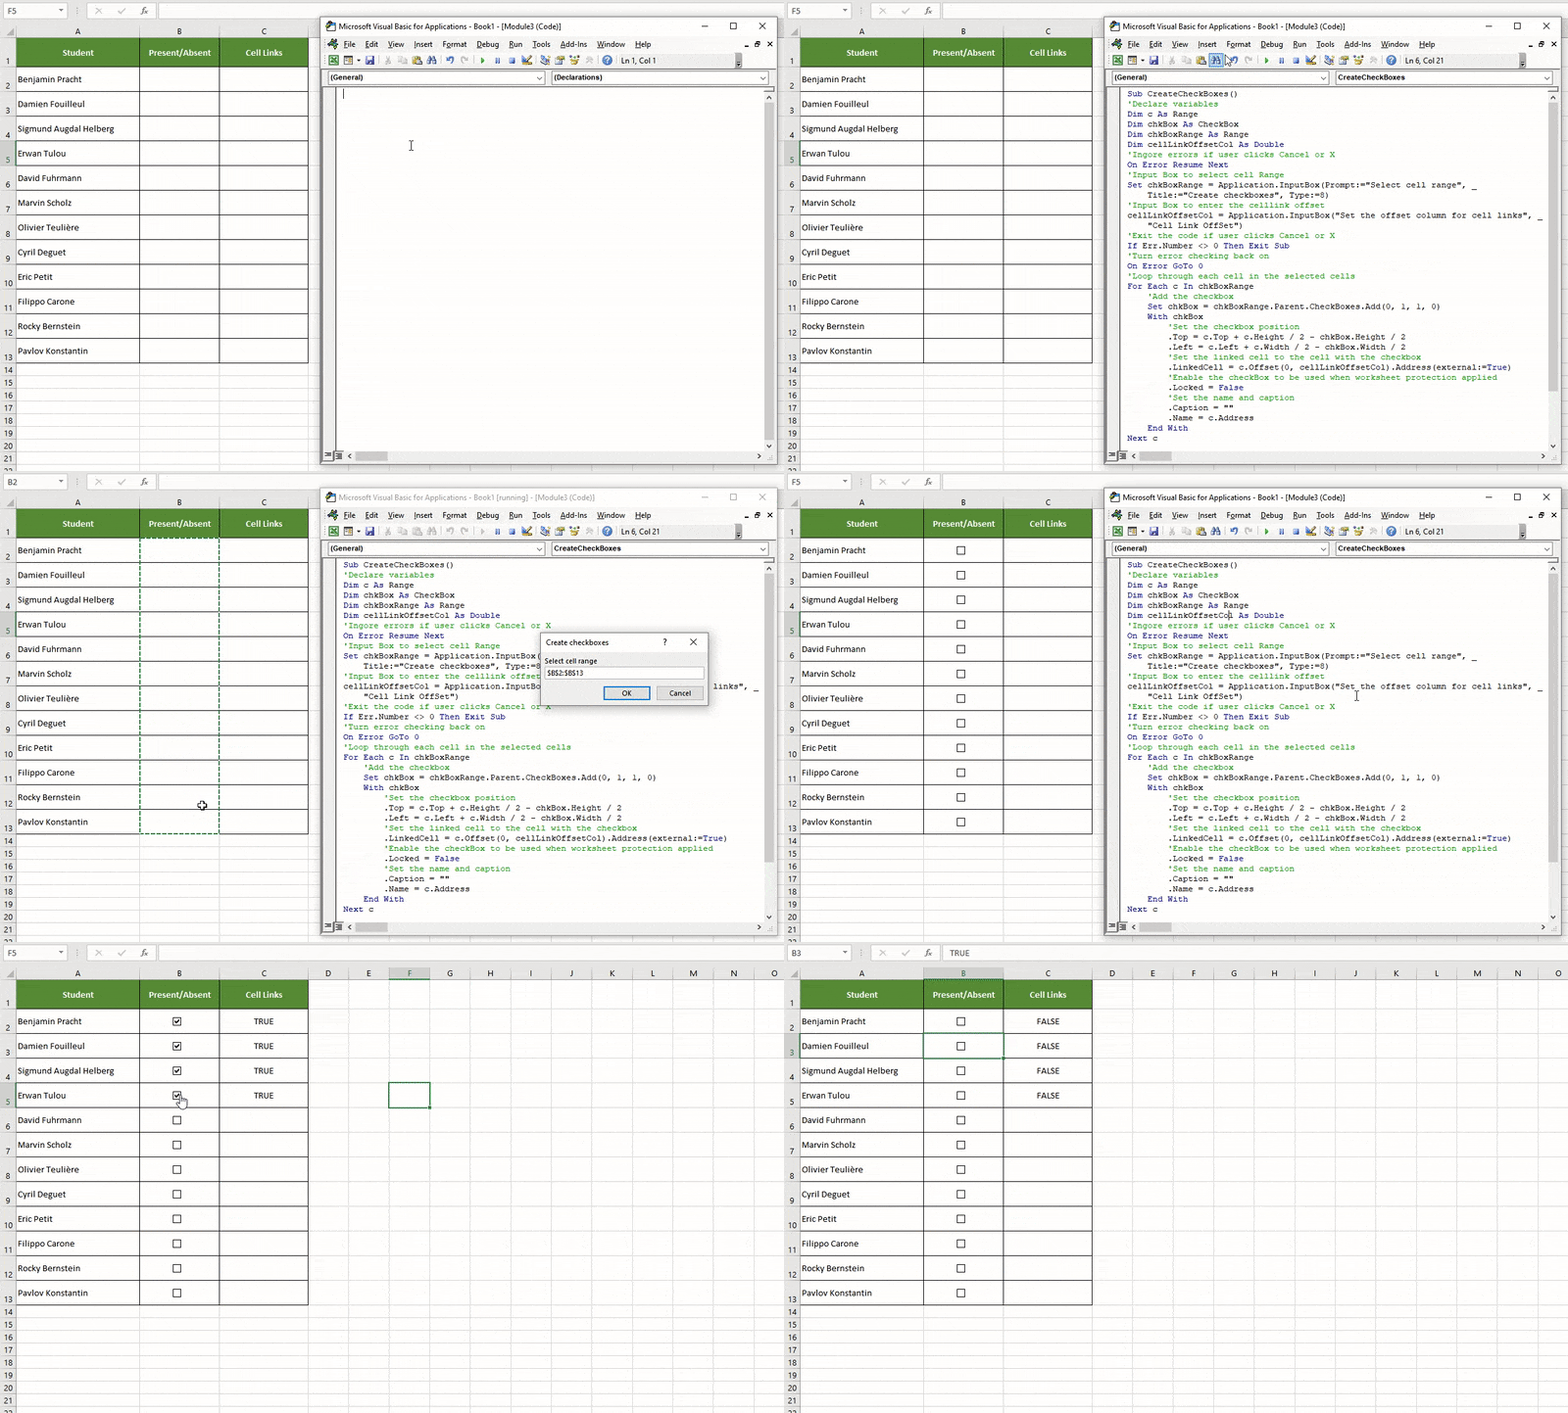
- Select the checkbox range and enter the desired cell link offset, and the checkboxes would be created.
How to Delete a Checkbox in Excel
Deleting a single checkbox is relatively straightforward – select the checkbox and press the delete button on your keyboard.
Option 1: Using 'Ctrl' key to delete multiple checkboxes
If you want to delete multiple checkboxes from your spreadsheet, follow the below steps to delete them:
- 1. Press the 'ctrl' key on the keyboard and click on checkboxes you wish to delete. Doing this will select the clicked checkboxes, as shown.
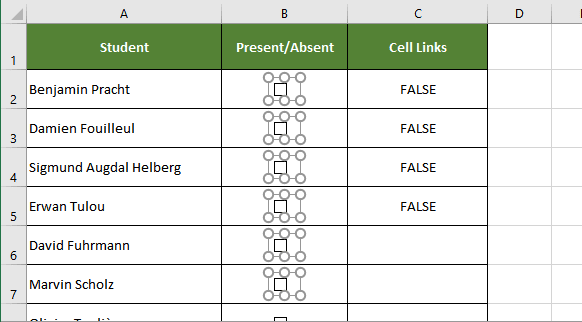
- 2. Next, press the delete key on the keyboard and all the selected checkboxes will be deleted.
Option 2: Using 'Selection Pane' to delete multiple checkboxes
Another way to delete multiple checkboxes in excel is by using the selection pane. Follow the below steps:
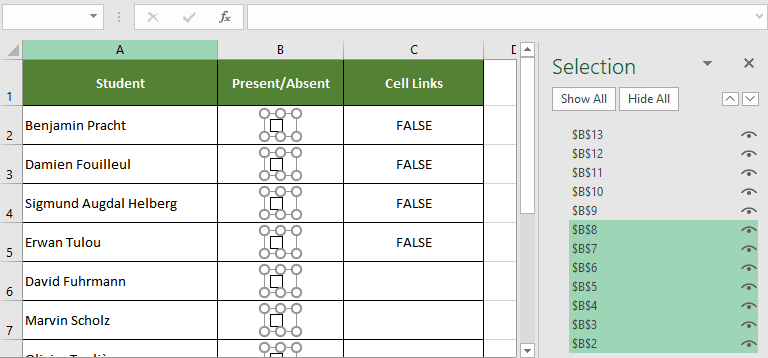
- On the spreadsheet, in the "Home" tab > "Editing" section. Click the "Find and Select" option in the ribbon and select the "Selection Pane" option from the context menu.
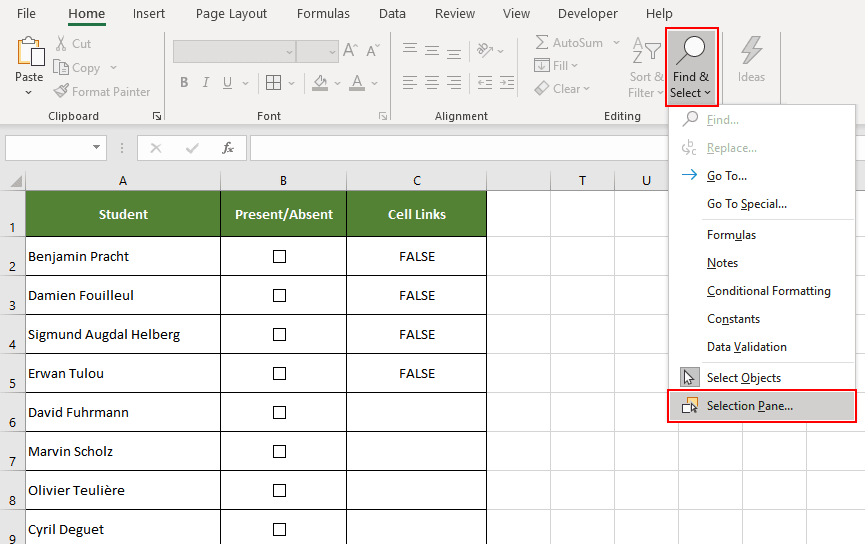
- From the selection pane, select all the checkboxes that you wish to delete and press the 'Delete' key.
Option 3: Using 'Go To Special' to delete multiple objects
If you wish to delete all the excel checkboxes from a sheet, then you can make use of the select all objects option. But another point that you should note is – this approach would delete all the other objects like shapes, dropdowns, charts, dropdowns, etc. present in the active sheet.
Follow the below steps:
- On the spreadsheet, in the "Home" tab > "Editing" section. Click the "Find and Select" option in the ribbon and select the option "Go To Special"
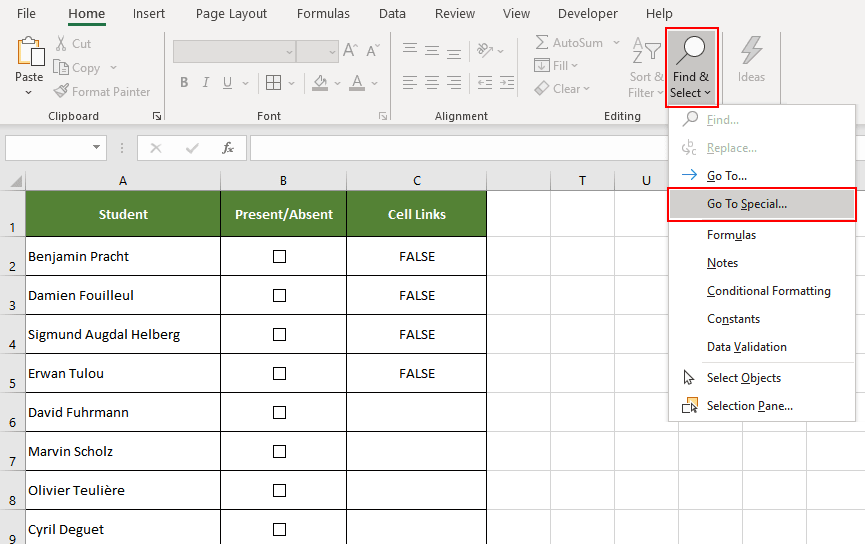
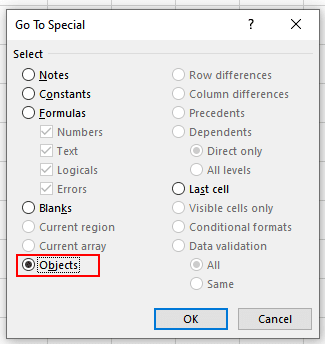
- On the "Go To Special" window, select the option "objects" and check the "OK" button. Doing this will select all the objects present in the active sheet.
- Finally, press the delete key from the keyboard, and all the objects will be deleted.
Option 4: Using VBA Macro to Delete Multiple Checkboxes
If you have a lot of checkboxes in your spreadsheet and only want to delete the checkboxes (not all the objects), then this is the option for you. Below is a script that will delete all the checkboxes from your active sheet.
Follow the below steps:
- With your Excel workbook opened, Press "Alt + F11" to open Visual Basic Editor (VBE).
- Right-click on the workbook name in the "Project-VBAProject" pane and select Insert -> Module from the context menu.

- Copy the following VBA code:
Sub DeleteCheckbox()
For Each vShape In ActiveSheet.Shapes
 If vShape.FormControlType = xlCheckBox Then
 vShape.DeleteEnd If
Next vShape
End Sub
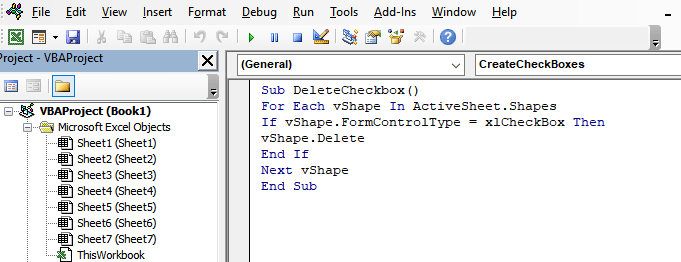
- After doing the changes, run the code using 'F5' key and all the checkboxes present in the active sheet will get deleted.
How to Edit Checkbox Text
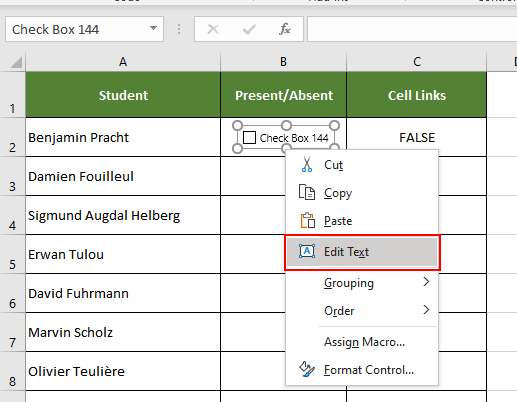
Editing checkbox text or checkbox caption is straightforward. To edit checkbox text, you need to right-click over the textbox and select the option "Edit Text."
Doing this will move the cursor at the beginning of the checkbox caption and allow you to edit it as follows.
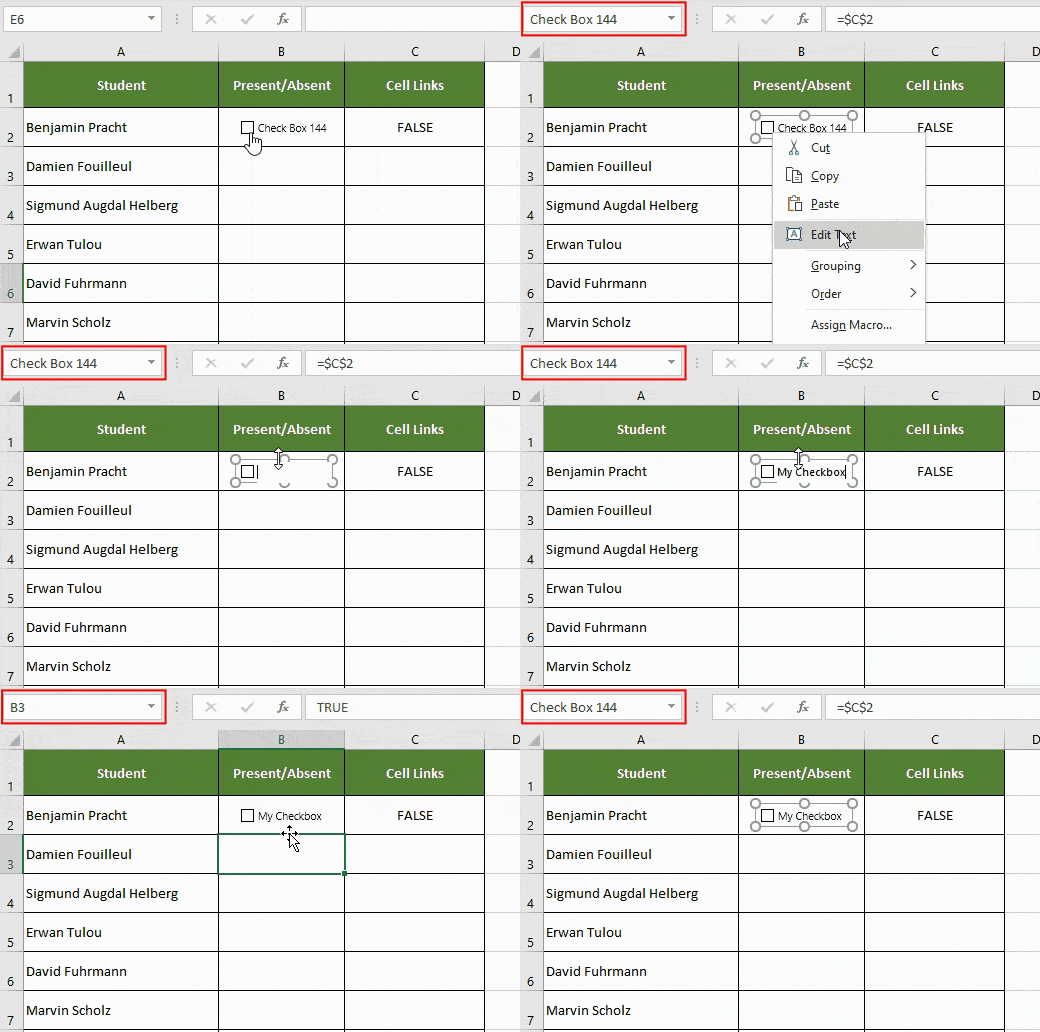
Perfect!
But wait! Notice how the text displayed in Name Box is still the same, even though the checkbox text is changed.
Difference Between Checkbox Caption and Checkbox Name
The text in front of the checkbox is called checkbox 'caption', whereas the name that you see in the Name Box is the backend 'name' of the checkbox.
When you click the "Edit Text" option by right-clicking over the checkbox control, it only changes the caption of the checkbox.
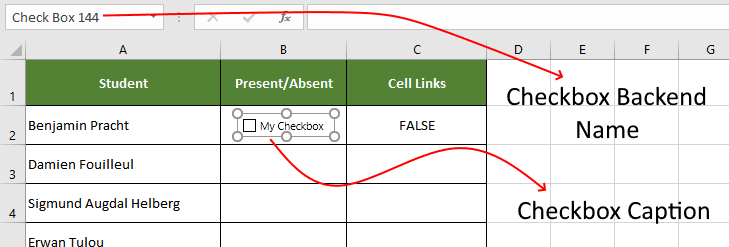
However, if you want to change the backend name of the checkbox, you need to right-click over the checkbox and then type a suitable name in the Name Box.
Formatting a Checkbox Control in Excel
Although there are not many things that you can do to make your checkboxes stand out, still there are a few customizations that can be done. Following a list of customizations that excel allows with checkbox controls:
Selecting Background Color and Transparency for Checkbox Control
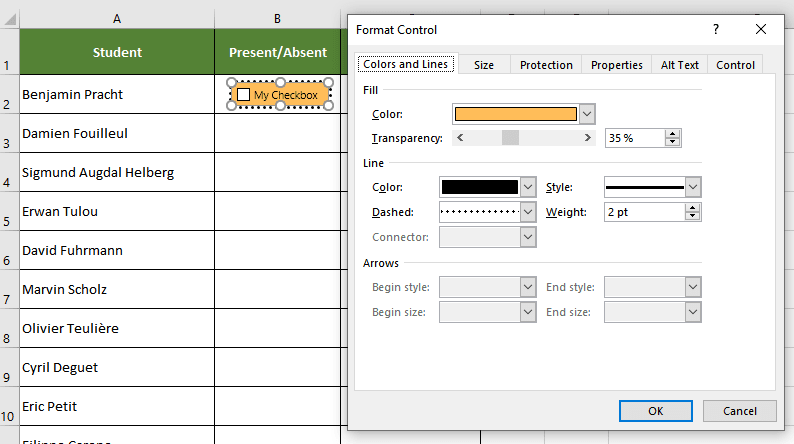
To choose a background color for your checkbox – right-click over the checkbox and click on the option "Format Control". Inside the "Format Control" window > "Color and Lines" tab > "Fill" section, you can choose a background color and desired transparency for your checkbox.
Selecting Border Color for the Checkbox Control
To create a checkbox border – Inside the "Format Control" window > "Color and Lines" tab > "Lines" section you can choose a border for your checkbox.
Choosing a 3D Shade Effect for Checkbox Control
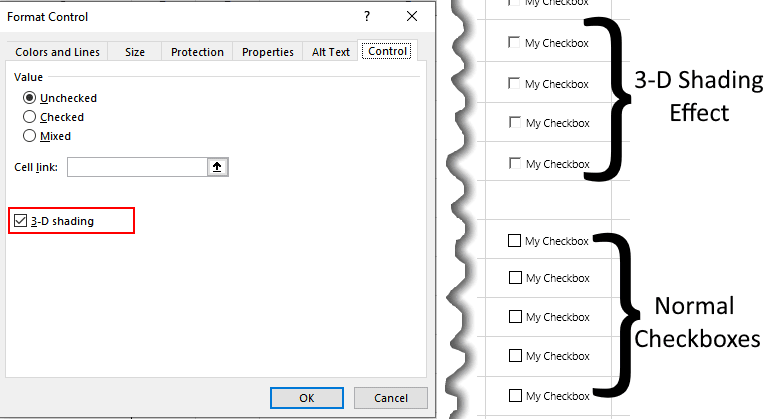
To give your checkboxes a slight 3D effect – Inside the "Format Control" window > "Control" tab > 3-D shading option.
ActiveX Checkboxes In Excel
Until now, in this article, we have only talked about Excel Form Checkbox, but there is another type of checkbox that Microsoft Excel makes available – that is known as ActiveX Checkbox.
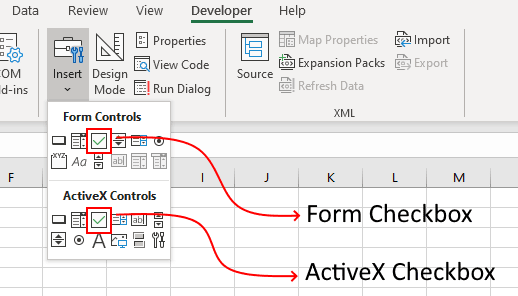
ActiveX checkboxes can also be added from the "Developer" Tab > "Insert" button. Also, in most aspects, an ActiveX checkbox is very similar to a form checkbox, but there are some critical differences between the two:
- ActiveX checkboxes provide more formatting options. In ActiveX checkboxes, you can change the checkbox caption font, have an image as a background, change the mouse pointer while it hovers over the checkbox, etc.
- ActiveX controls are external components and hence are loaded separately this sometimes causes them to freeze or become unresponsive. On the other hand, Form controls are built into Excel, and therefore they do not have any such issues.
- ActiveX is a Microsoft-based technology and is not supported by other operating systems like Mac.
- Also, many computers don't trust ActiveX by default, and ActiveX controls are disabled unless you add them to the Trust Center.
- Another essential difference between the Form controls and ActiveX controls is that – ActiveX controls can be directly accessed as objects in the VBA Code (faster) whereas to access form controls you need to find the form controls on the active sheet (slower).
How to Assign a Macro to a Checkbox
We have already seen how to associate cell links with checkboxes in excel and perform actions based on the checkbox value. Now, let's understand how to assign macros with checkboxes and execute the macros when the checkbox is clicked.
To associate a macro with the checkbox, follow these steps:
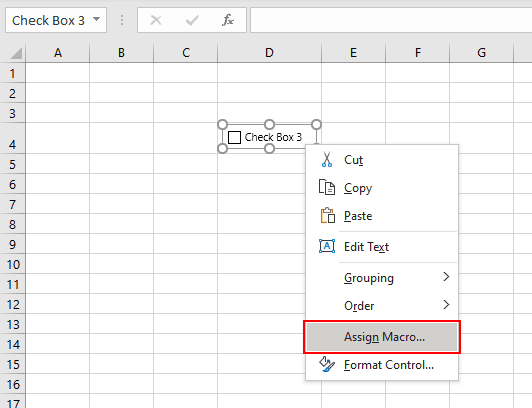
- Right-click over the checkbox and click the option "Assign Macro"
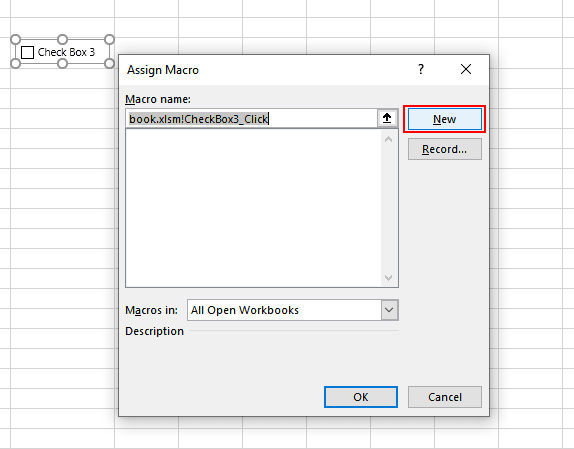
- On the "Assign Macro" window, give a meaningful name to the macro and click the "New" button, this will open the VBA editor.
- On the VBA editor, you can write the macro. For the sake of this example, we will be writing a macro that toggles the visibility of A Column. If the column is visible clicking the checkbox will hide it else if the column is hidden clicking the checkbox will unhide it.

- The VBA code is as follows:
Sub ToggleAColumnVisibility()
If ActiveSheet.Columns("A").Hidden = True Then
 Columns("A").Hidden = False
Else
 Columns("A").Hidden = True
End If
End Sub
- Save the macro and close the VBA editor.
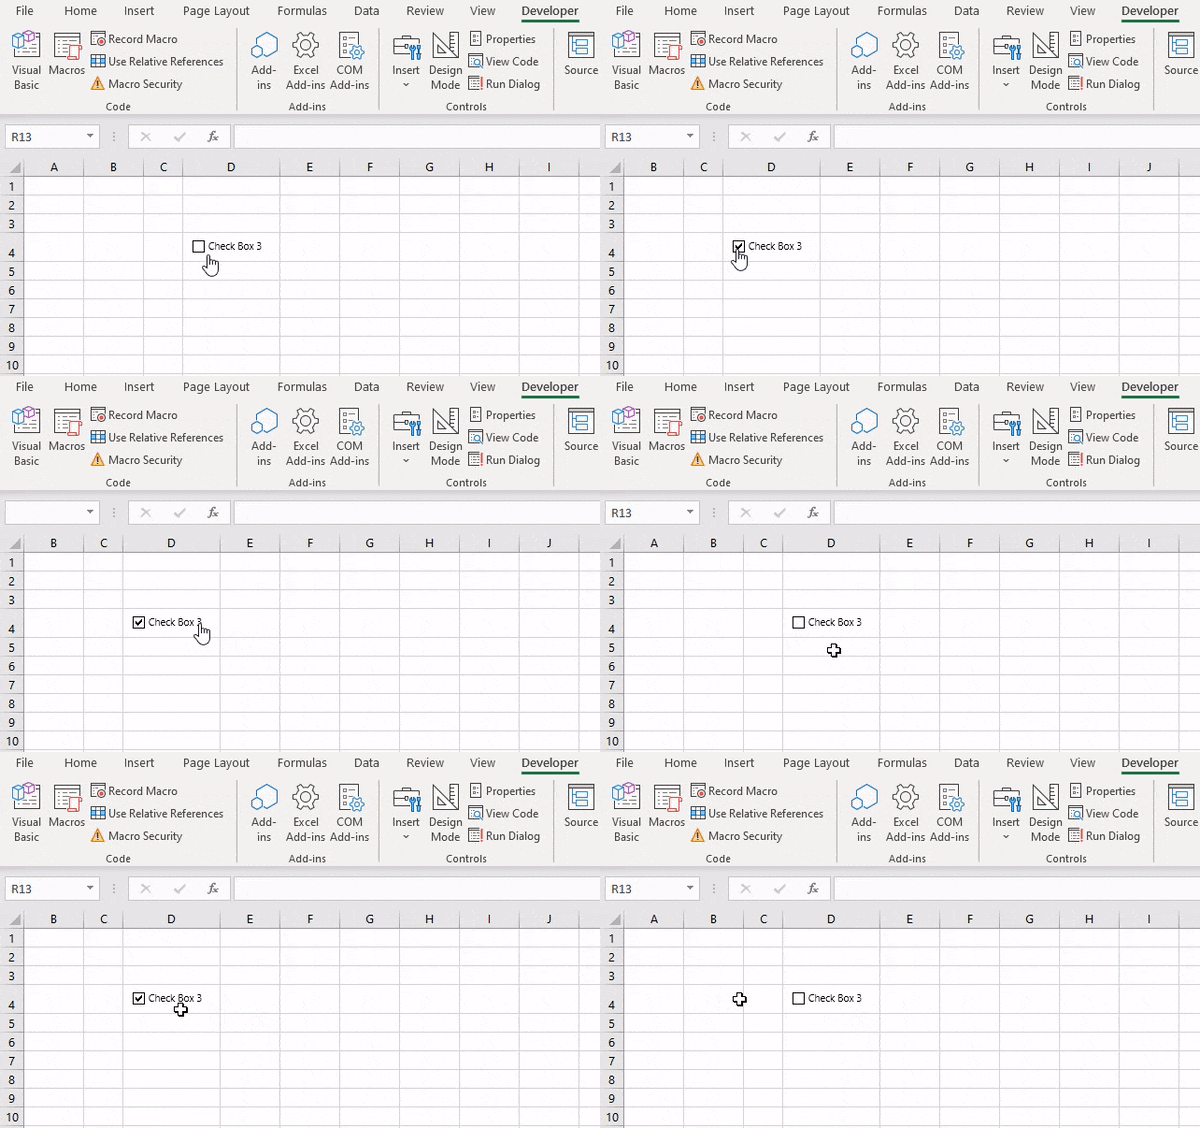
- Now, try clicking on the checkbox and see how to toggles the visibility Column A.
Another example of using macro with excel checkbox: Selecting All Checkboxes using a Single Checkbox in Excel
Practical Examples of Using Checkboxes in Excel
Now let's see some of the practical examples of excel checkboxes:
Example 1: Using Excel Checkboxes to Track Stock Availability for a Store
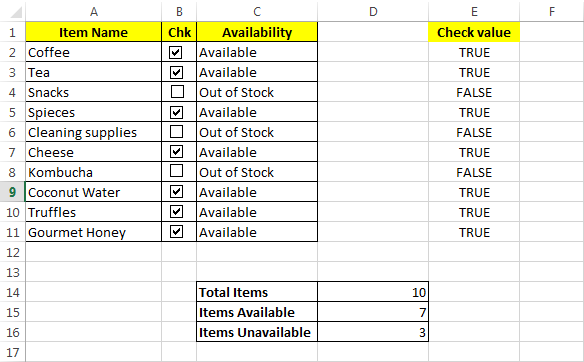
In the above example, we have a list of grocery items, with a checkbox against each one of them. The checkbox indicates the availability status of the item. As soon as the item is checked a label "Available" gets populated in-front of it and for unchecked checkboxes, a title "Out of Stock" is shown.
This is done simply by using built-in checkbox functionality and if statements. To accomplish this first, we have inserted a checkbox in the sheet and then selected its 'cell link' as the corresponding cell in range "E:E".
For instance, the 'Cell link' for checkbox at "B3" cell is "$E$3". And similarly, the 'Cell link' for checkbox at "B9" is "$E$9". This means – when the "B3" checkbox is checked the value at the "E3" cell will change to "True" otherwise the value will be "False".
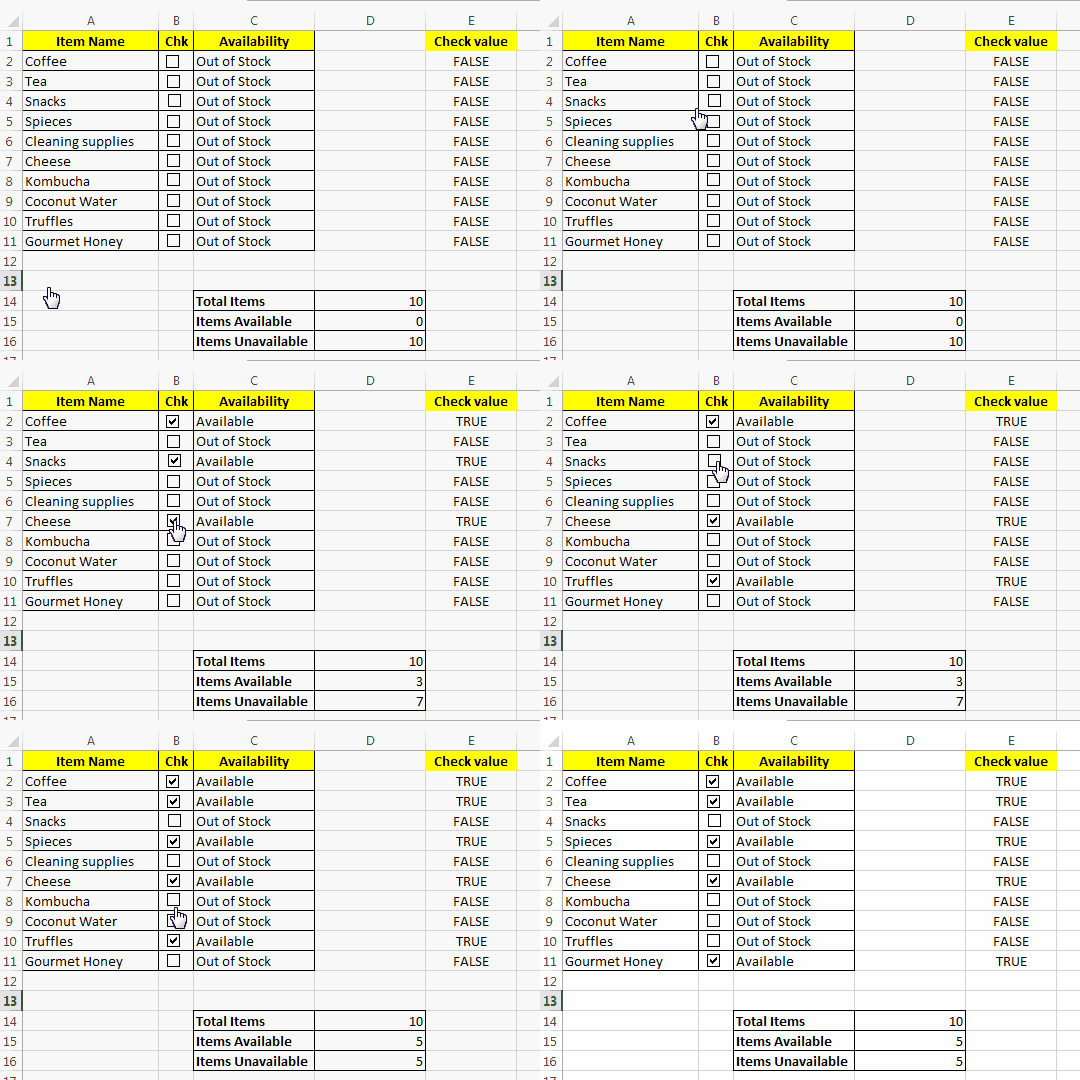
Secondly, we have used an if based formula in front of these cells. The formula is:
=IF(E2=TRUE,"Available","Out of Stock")The job of this IF statement is simply to read the value of the corresponding cell in "E:E" range and if its value is "True" then it displays a message "Available" otherwise the message will be "Out of Stock".
For instance, if the checkbox at 'B6' is checked so the value at 'E6' will be "True" and hence the value at 'C6' will be "Available".
Later, we have used an Excel Countif Function to find the total number of available items.
=COUNTIF(C2:C11,"Available")And a similar COUNTIF Function is used for finding the total number of items unavailable:
=COUNTIF(C2:C11, "Out of Stock")Example 2: Using Excel Checkboxes to create a To-Do List
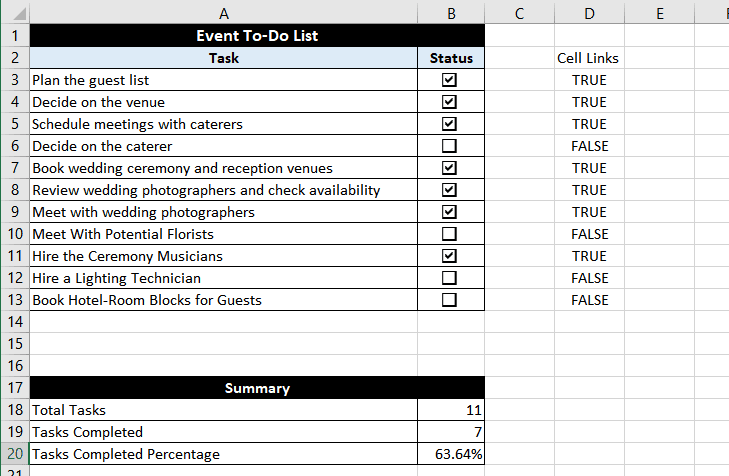
In this example, we have a to-do list with tasks and their corresponding statuses represented by checkboxes. For each checkbox, the related cell link is set in the D-column in front of the checkbox.
Finally, in the summary section, we have counted the total number of tasks using the formula:
=COUNTA(D3:D13)For calculating the completed tasks we have made use of the cell links, all the cell links with a value TRUE are considered to be associated with completed tasks. And based on this we have come up with a formula:
=COUNTIF($D$3:$D$13,TRUE)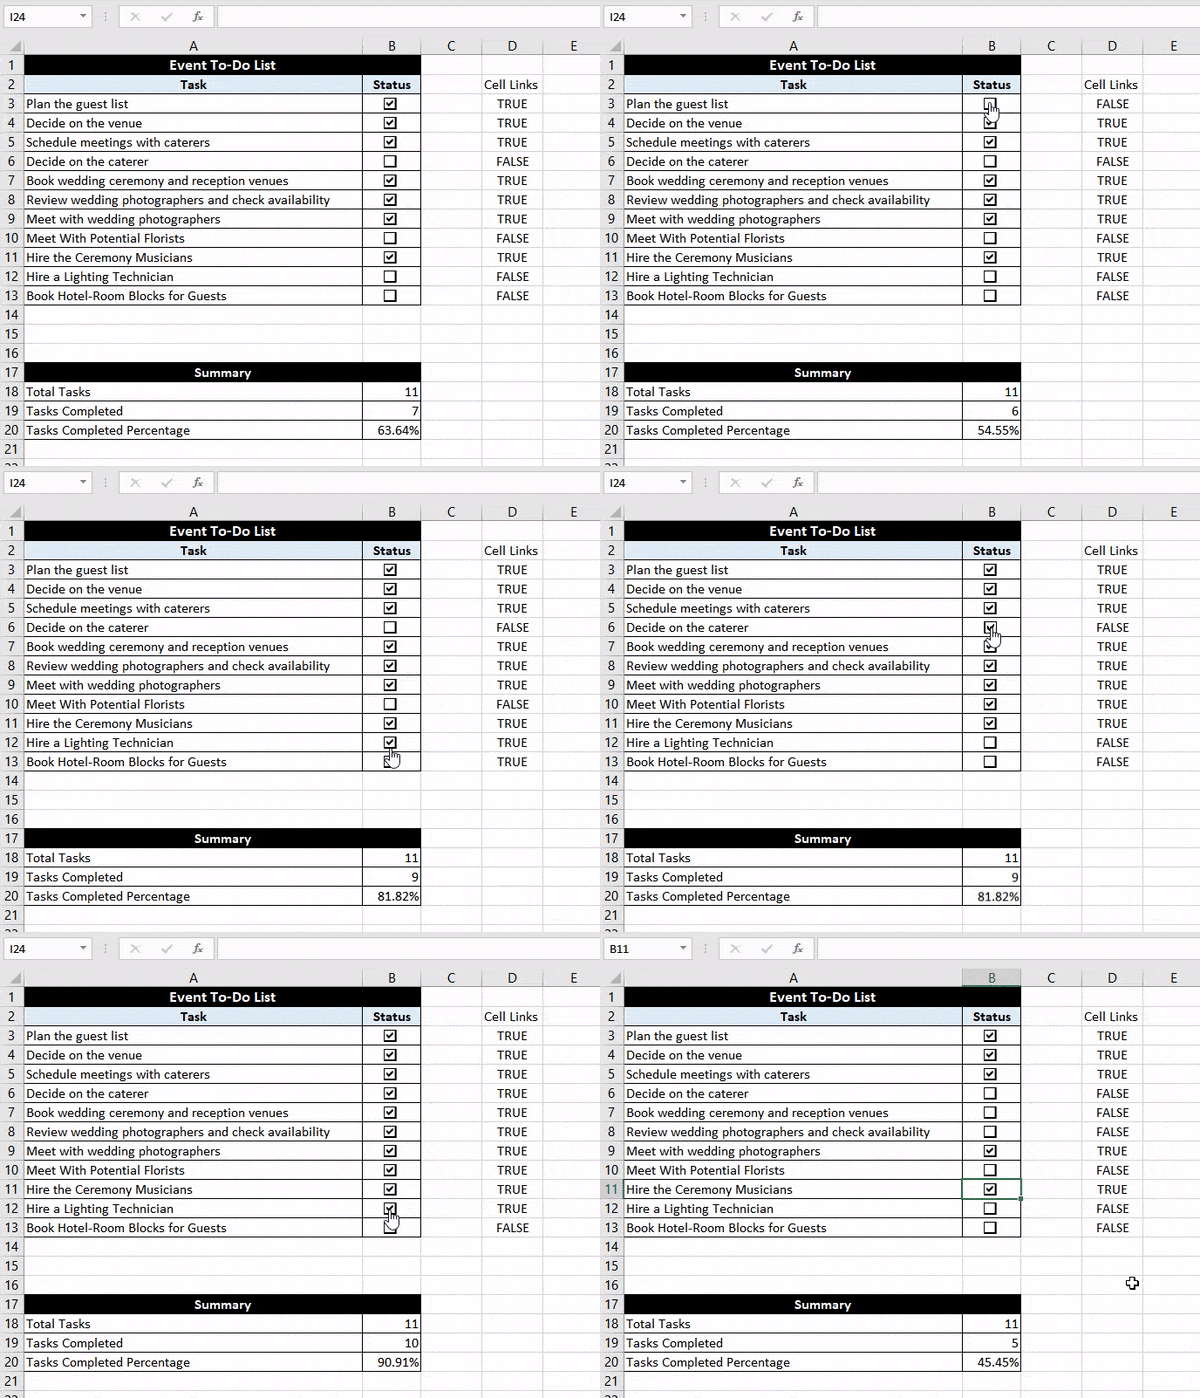
Completed task percentage is calculated by using a simple percentage formula, i.e. (number of completed tasks/number of total tasks)*100 :
=B19/B18%I hope this guide on how to insert checkboxes in Excel has been helpful. If you have any questions or comments, please don't hesitate to share them.
