Data is something very crucial and you may need to keep logs of everything for some very rainy day but sometimes you need to sift the irrelevant material out. Now how do you divide what is relevant from what is not from a sea of data? You filter it, that’s right! Excel filters provide a decent range of preset text and number filters and you can explore it all if you’re interested but today our focus is on one step ahead of filtering.
Once you’ve sifted the redundant data, you might want to delete it. Or maybe you applied a million filters to sift your required data and want to delete the rest. Preparing an extract, dealing with a ceased product or location, analysis, and comparison, specific calculations. For any of these, you may find that you need to filter and delete data.

In this tutorial, we look at deleting filtered rows. On agenda is deleting visible filtered rows using filters and VBA. The flip side of that is deleting hidden filtered rows using a temporary column, the Inspect Document feature, and VBA. But before the big works, we need to get easy with filtering.
Example
Let’s go through an example and see what presets make it usable:
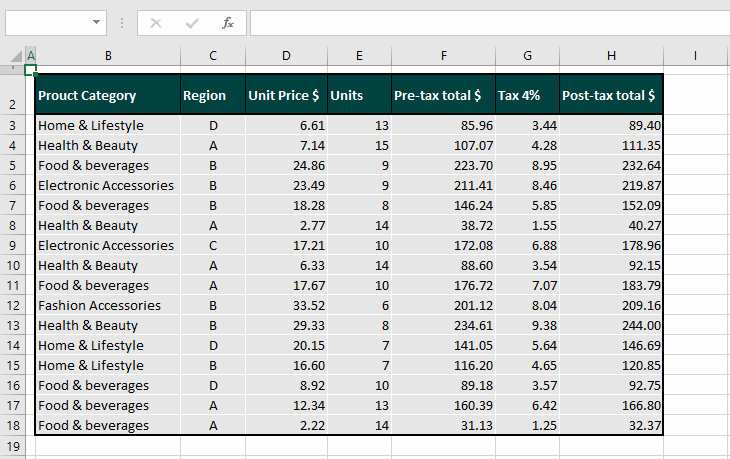
Above we have sample data from a superstore. The data may need to be filtered for analysis. If your dataset is in the form of an Excel Table (can be applied from the Format as Table options in the Styles group from the Home tab), the columns will automatically have filter controls. You can apply any of the methods in this guide for deleting rows whether the data is in an Excel Table or not.
With non-Excel Tables, the filters will have to be added. To apply filters to a range, select the dataset and go to the Home tab > Editing group > Sort and Filter icon > Filter or press the Ctrl + Shift + L keys. See how this will apply the filters to the data:
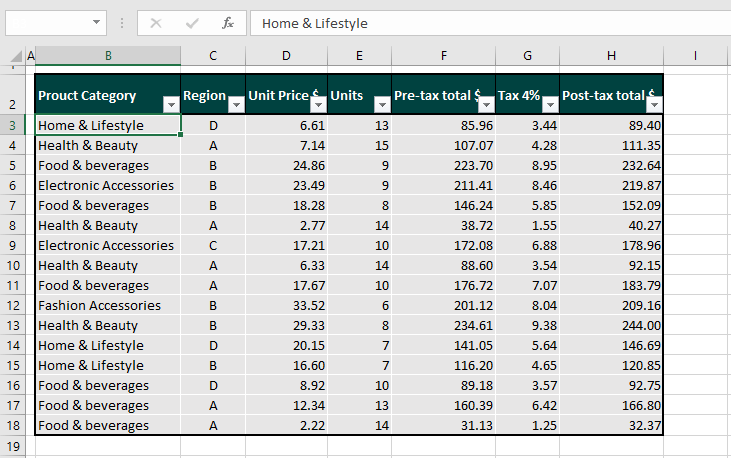
Now the filters can be used to group the data according to a certain category for analysis by clicking on the filter arrows and selecting the required particulars. E.g. if we intend to close the store in region D, for comparative analysis, region D’s data will need to be removed.
We can filter region D’s data and delete it. Did you know you can also “filter out” region D’s data by keeping the other regions and delete that too? Find out how to achieve this and also how to apply more filters for deleting data.
Let’s row the Excel boat!
Method #1 – Deleting Visible Filtered Rows
Let’s start by the simplest means; deleting visible filtered rows. By visible rows, we are referring to the data left after applying the filters. Deleting filtered rows is no different than deleting regular rows and here’s how to do it:
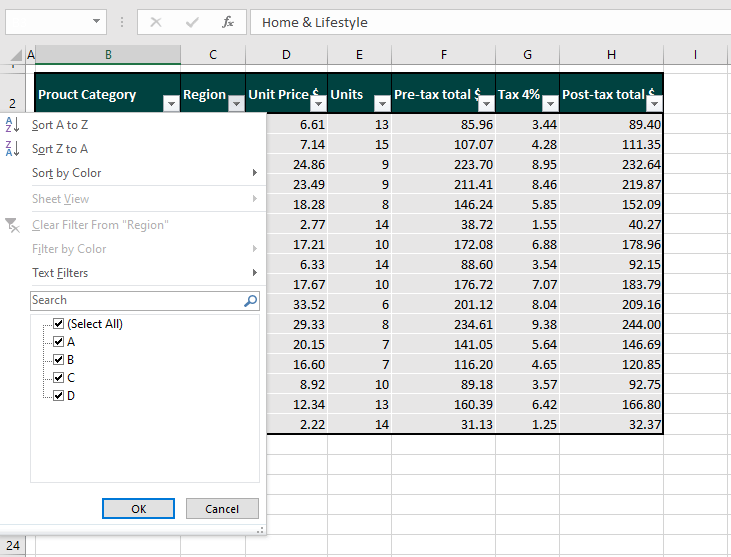
- Click on the column header arrow where you want to apply the filter. As of now, all the data will be selected.
- Select the relevant particulars to apply the filter.
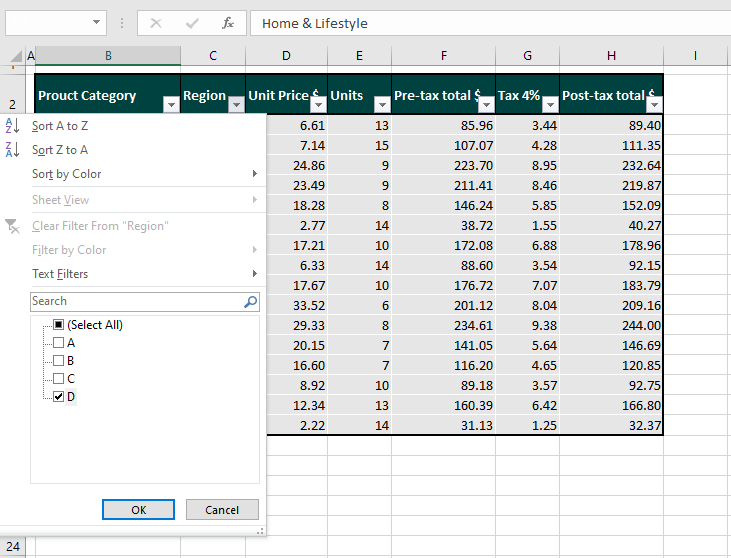
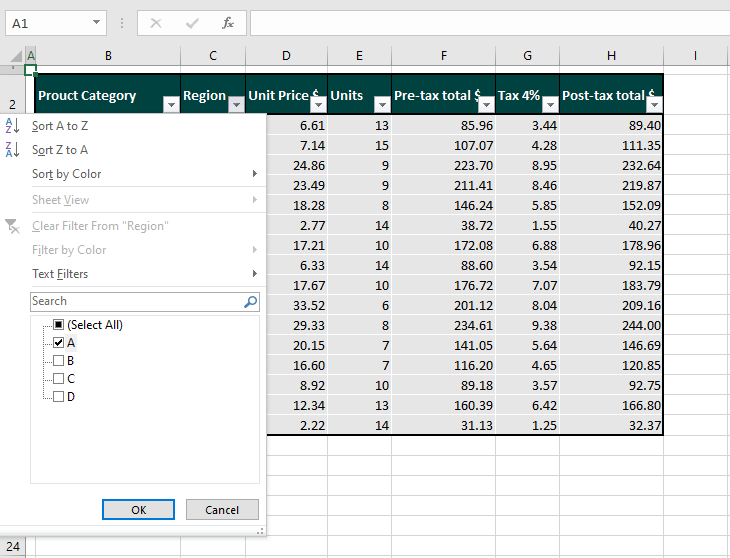
- For our example case, we want to remove region D’s data so we will select “D” to keep region D’s data visible.
- Uncheck Select All and select the checkbox next to D.
- Click on the OK button to apply the filter.
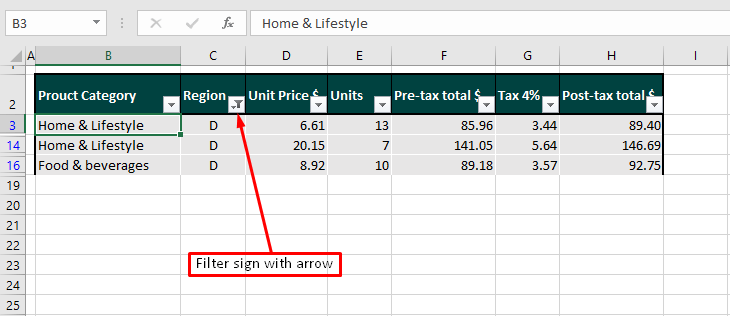
- Now only the rows with data from region D will be visible. There will also be a filter sign with the drop-down arrow indicating that the column has been filtered.
- Select the visible rows of the dataset.
- You can also preselect the data before filtering without selecting the column headers. In that case, you won’t need to select the rows for deleting right now.
- Right-click and select Delete row from the context menu or press the Ctrl and – keys to delete the selected rows.
- Now you can clear the filter to redisplay all the rows by clicking on the filter icon and clicking on Select All.
- Then select the OK
Alternatively, you may want to remove the filters by pressing Ctrl + Shift + L.
The dataset will reappear without the deleted rows:
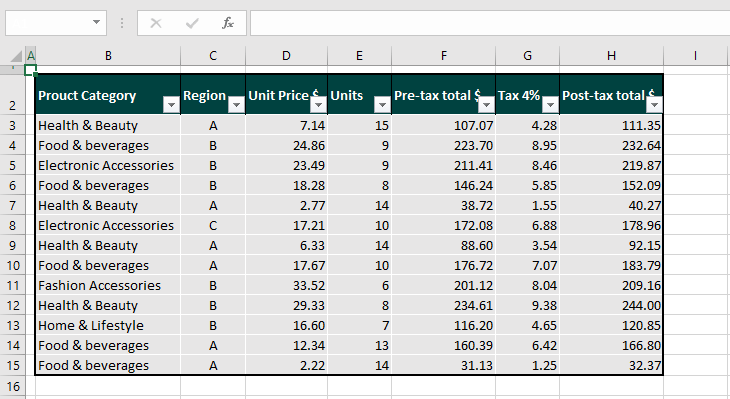
Note: You can choose to sort the data instead of filtering it to delete the irrelevant rows.
Method #2 – Using VBA
Instead of applying a filter, rows can be deleted using a VBA Macro code. VBA is used to automate tasks in Office applications. The code will create a macro defining and labeling the task. Following the steps below, you will be able to delete rows whether they are filtered or not. Let’s show you how to do that using VBA:
- Select the dataset along with the column headers.
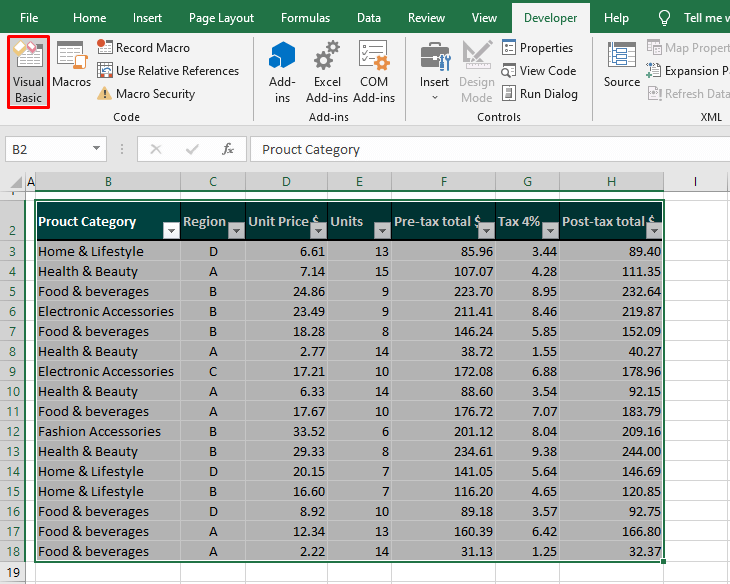
- Go to the Developer The Code group will show the Visual Basic icon. Click on the icon to be redirected to the VB editor.
You can customize the Ribbon to display the Developer tab or you can still access the VB editor with the Alt + F11 keys.
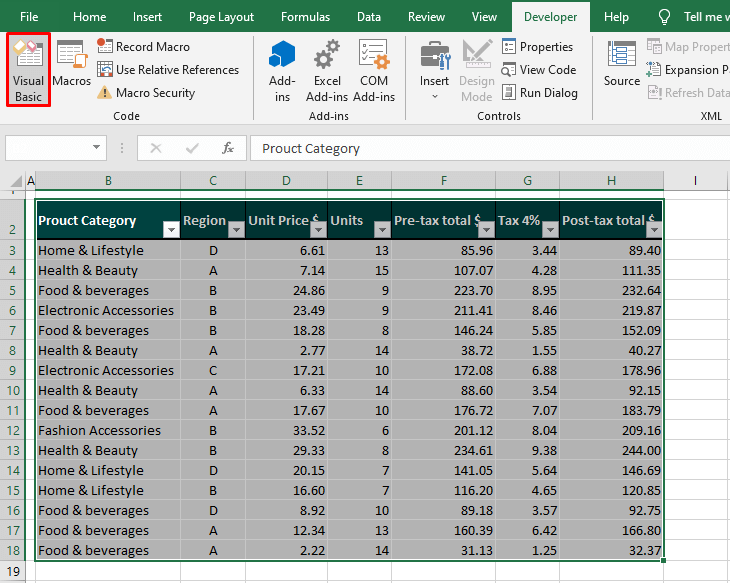
Now the VB editor will open:
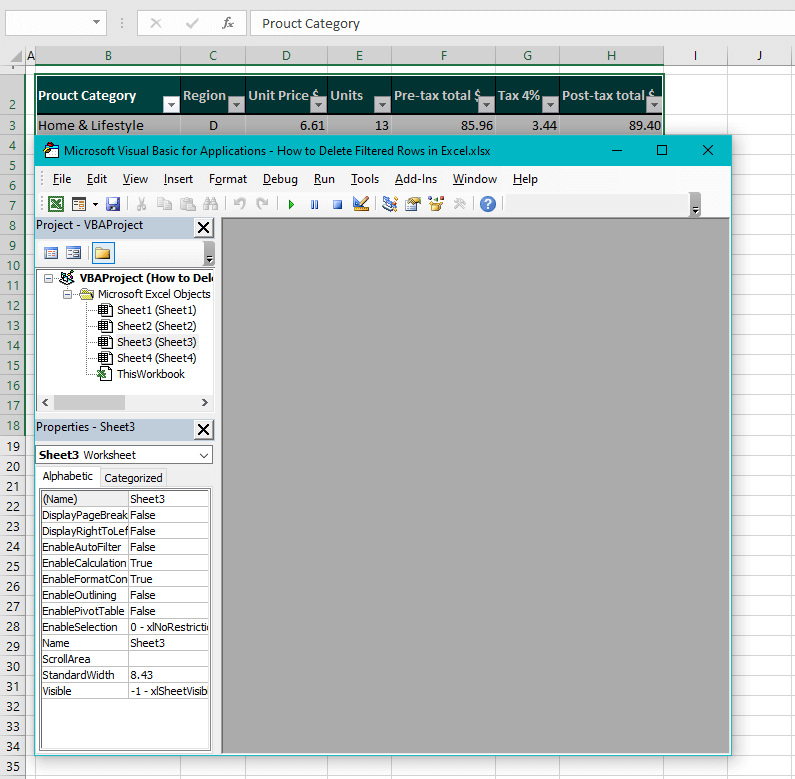
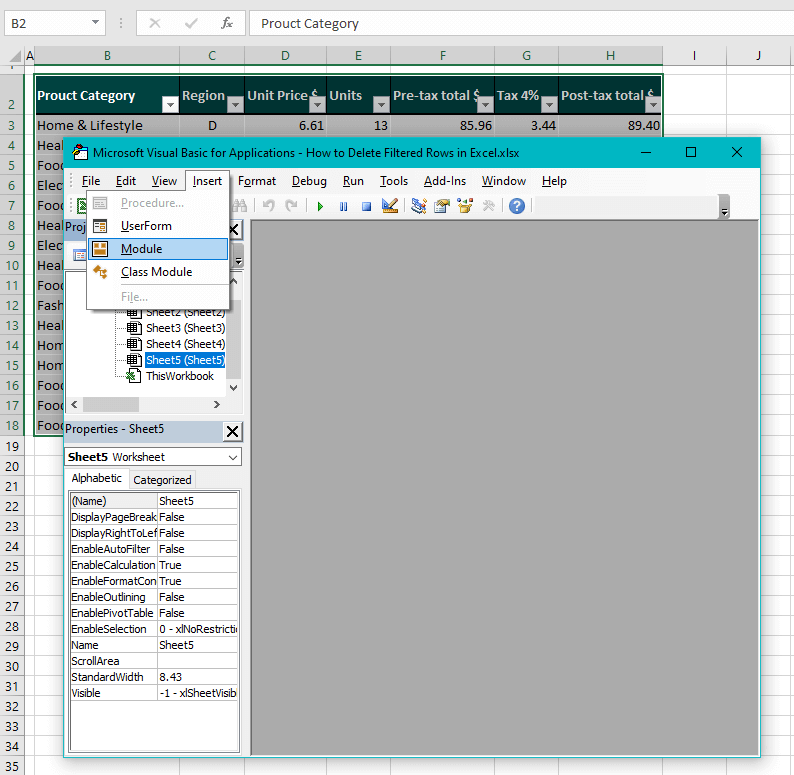
- Select Insert on the toolbar. Then select Module from the menu.
- This will launch a Module window.
- This is the code you need to enter in the Module Copy and paste it to the provided field in the Module window:
Sub DeleteRows()
Dim Rng As Range
Set Rng = Selection
Rng.AutoFilter Field:=2, Criteria1:="D"
Rng.Offset(1, 0).SpecialCells(xlCellTypeVisible).EntireRow.Delete
ActiveSheet.AutoFilterMode = False
End Sub
Alter the particulars in line 4 to adjust the code for your dataset.
Field:=2
2 in this part of the code represents the column where you want to apply the filter.
Criteria1:="D"
D in this part of the code represents the particular of the data we want to delete.
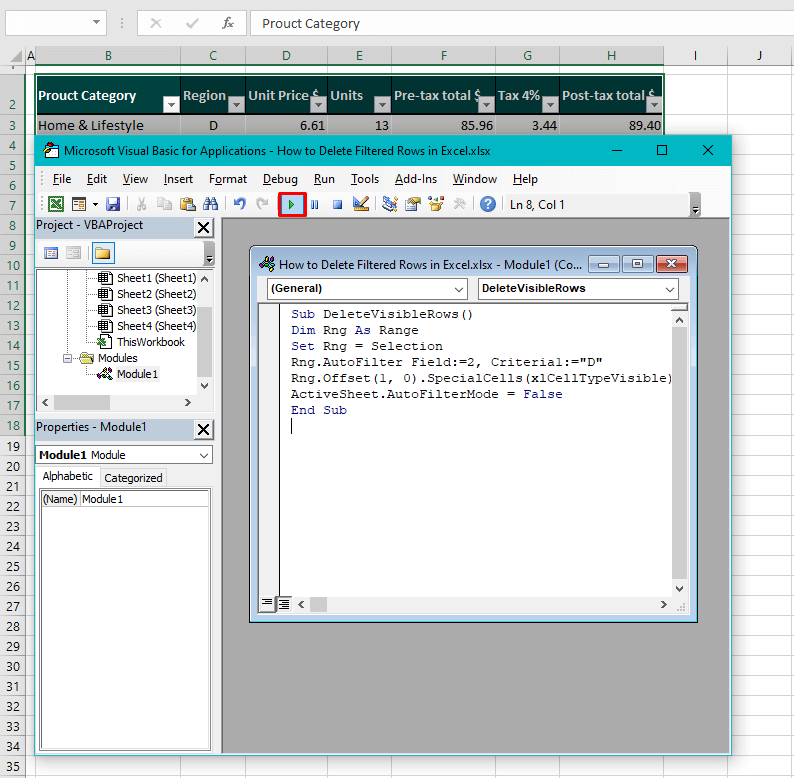
- Press the button highlighted in red above. This is the Run button that will run the code and delete the rows. You can press the F5 key instead of the Run
- Now you can close the VB editor.
When the code is run, it will delete the rows according to the specified particulars:

Note: A VBA-automated task cannot be undone by Ctrl + Z. Your best bet is to save the file before using VBA. If things don’t go your way, you can close the file without saving, reopen it and have another go. You can also create a copy of the file instead.
Recommended Reading: How to Sum Filtered or Visible Rows in Excel
Method #3 – Deleting Hidden Filtered Rows
First, we need to explain what we mean by hidden filtered rows. Earlier when we filtered the data such that only that of region D’s was displayed, those were the visible filtered rows. The rest of the data that was not displayed was of the hidden filtered rows.
Now let’s reverse that situation and throw an extra filter into the mix. Suppose we need to filter only the Food & beverages category for region A. when this data will be displayed, the rest will be the hidden filtered rows. Then we will proceed to delete those rows. That was the explanation; now let’s show you what hidden filtered rows are:
- Select the header arrow of the column where the filter is to be applied.
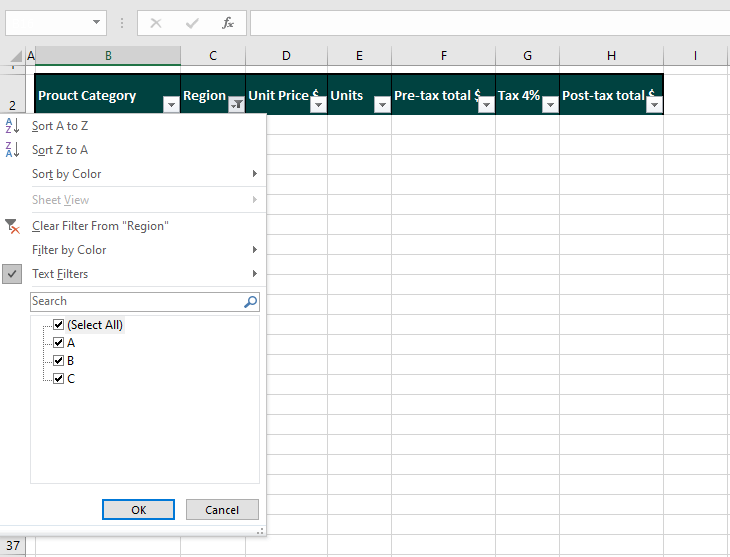
- Uncheck the particulars you want to hide.
- Click OK.
- Repeat the same for another column.
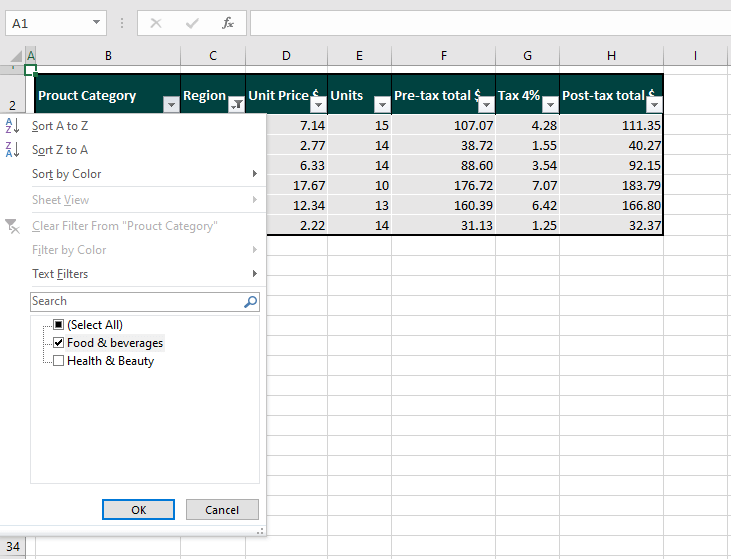
This will filter out or hide the data other than the Food & beverages data of region A:
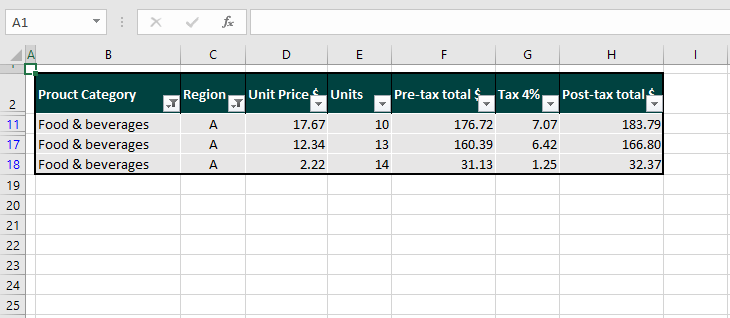
Now that you know what we mean by hidden filtered data, let’s see how to eliminate it. You may choose one of the three ways that delete hidden filtered rows using:
- a temporary column,
- Inspect Document Feature, or
- VBA.
Deleting Hidden Filtered Rows Using a Temporary Column
If you’re more of a conventional stickler, we’ll start with the most conventional one first. Let’s say you’ve applied a few filters and want to keep the visible data and delete the hidden filtered data. The way to proceed from here is with the following steps:
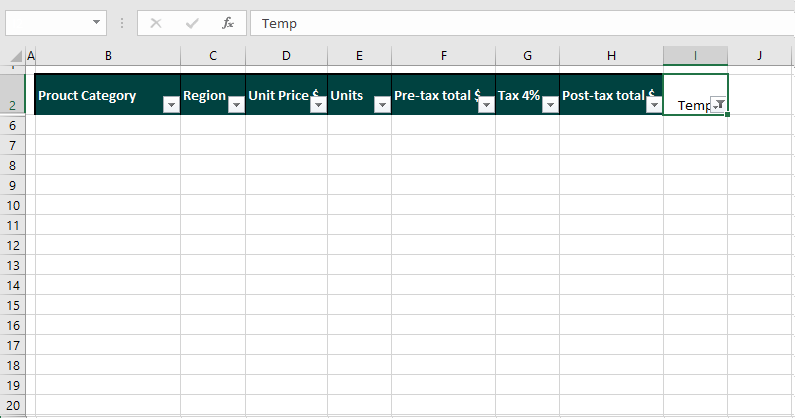
- Along with the filtered dataset, make and name a temporary column.
You don’t have to get very creative; this will be deleted later. Evidently, we didn’t waste any brains here by naming a temporary column “Temp”:

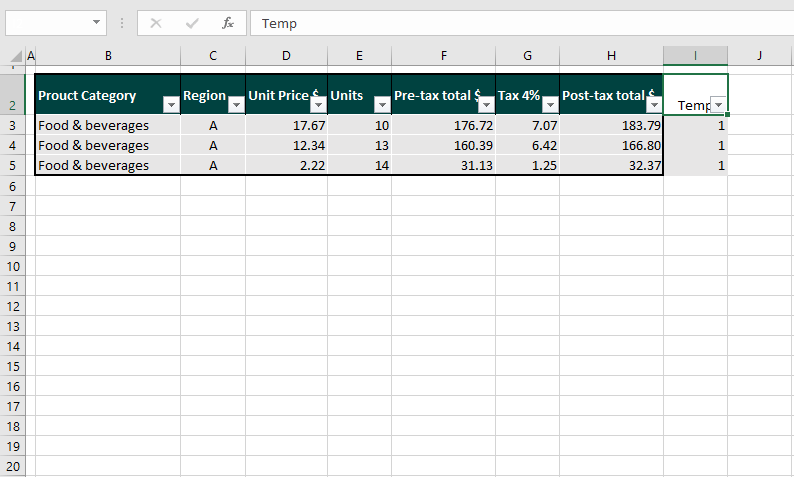
- In the new column, type the number 1 in the first cell and fill the column to the last row of the dataset.
- You can use any number or letter here. This is just a marker for the rows you want to keep when the full dataset will be redisplayed.
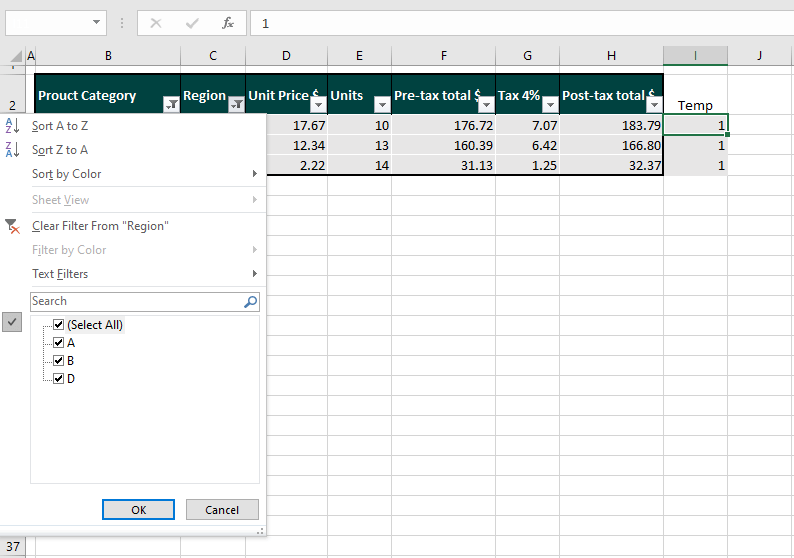
- Now clear all the filters to display the complete dataset.
- You can do this by clicking on the column filter arrows and selecting the Select All checkbox. We have cleared the filters from both columns B and C.
- Select the OK
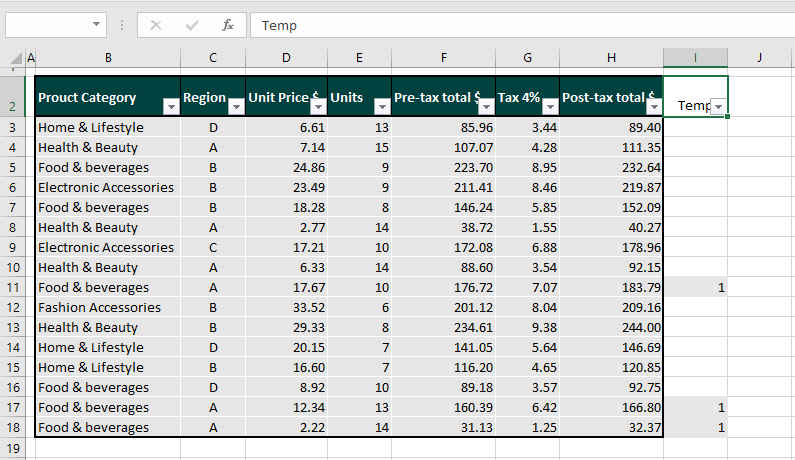
- The dataset will be redisplayed:
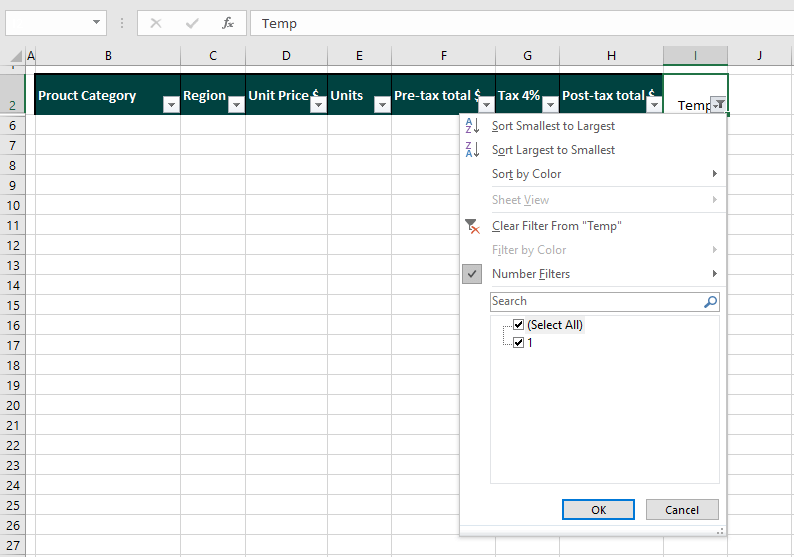
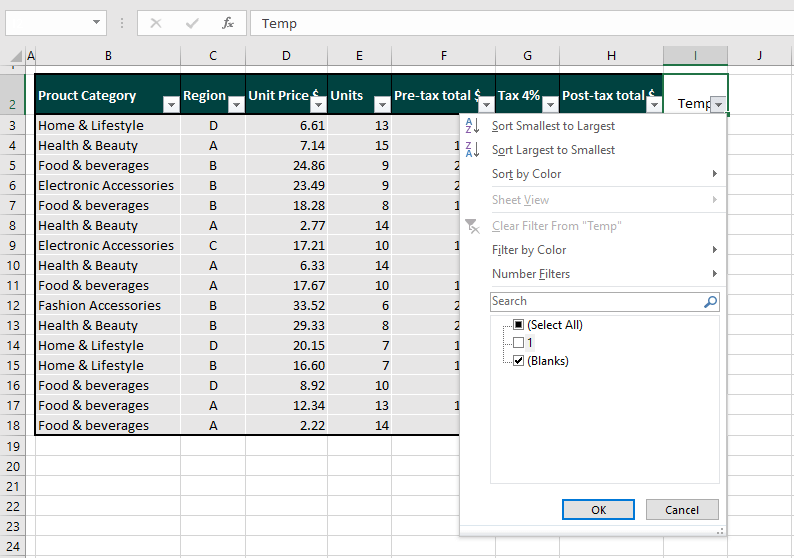
- Now select the column header arrow of the temporary column and unmark the “1” checkbox.
- Doing this will keep only the blank cells from the temporary column and hide the rows marked with "1".
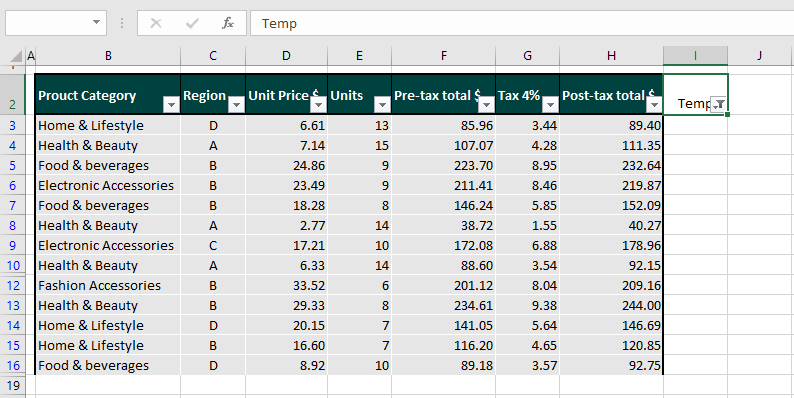
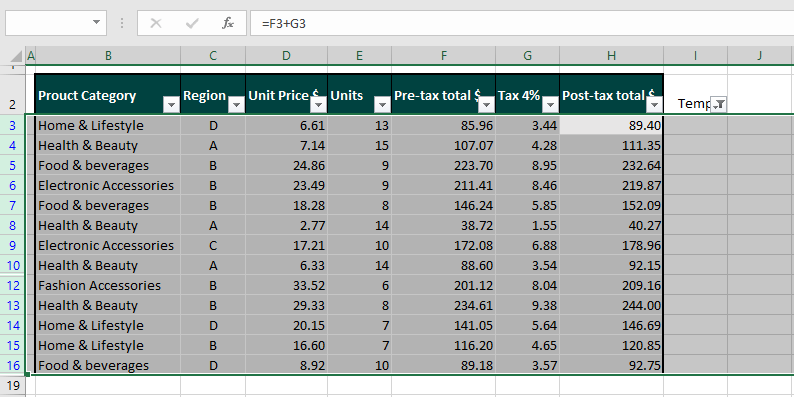
- Select and delete all the present rows.
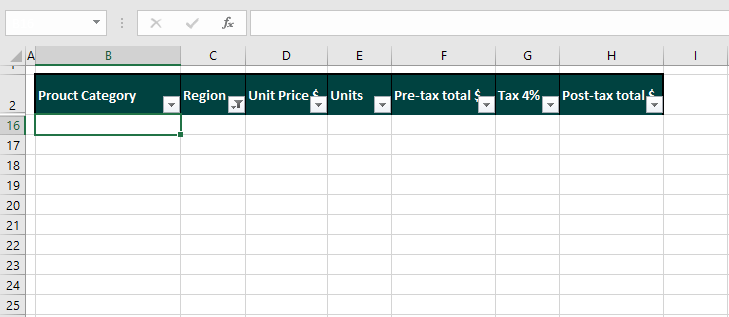
This might leave you a little “blank”:
- Select the temporary column’s filter icon and check the Select All
- Then click on OK to display the marked rows.
- Select the temporary column and delete it.
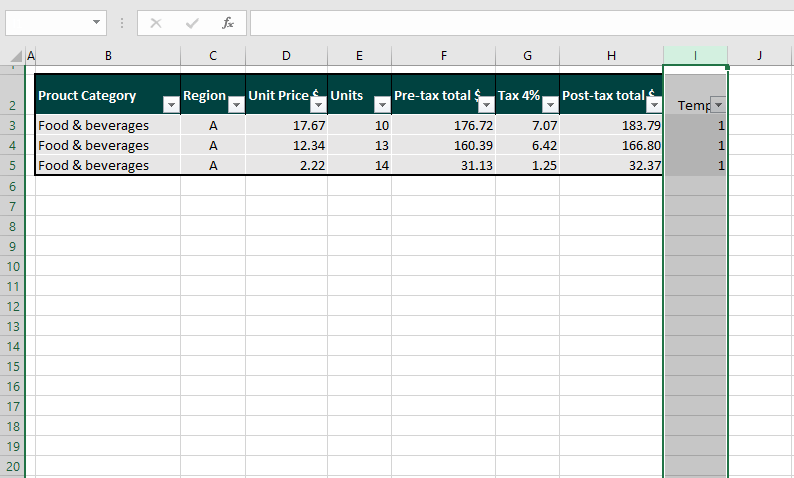
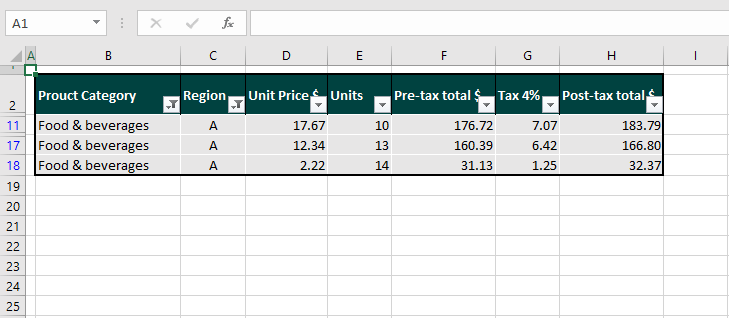
With these steps, the marked columns will remain and the rest will be deleted:
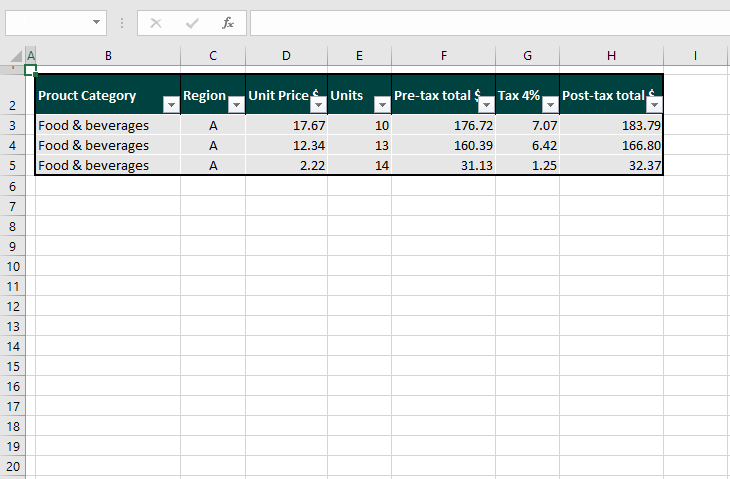
Deleting Hidden Filtered Rows Using Inspect Document
Let’s take the same concept from above and mechanize it with the Inspect Document feature. The Excel Document Inspector searches the file for any personal information or hidden data and offers to delete that data.
We will apply the same filters to arrive at the data that needs to be kept. Using Inspect Document, we will hunt down the hidden rows and delete them. Simple as! Let’s give it a go. Here’s how to use Inspect Document to delete hidden filtered rows:
- Apply the relevant filters to your dataset:
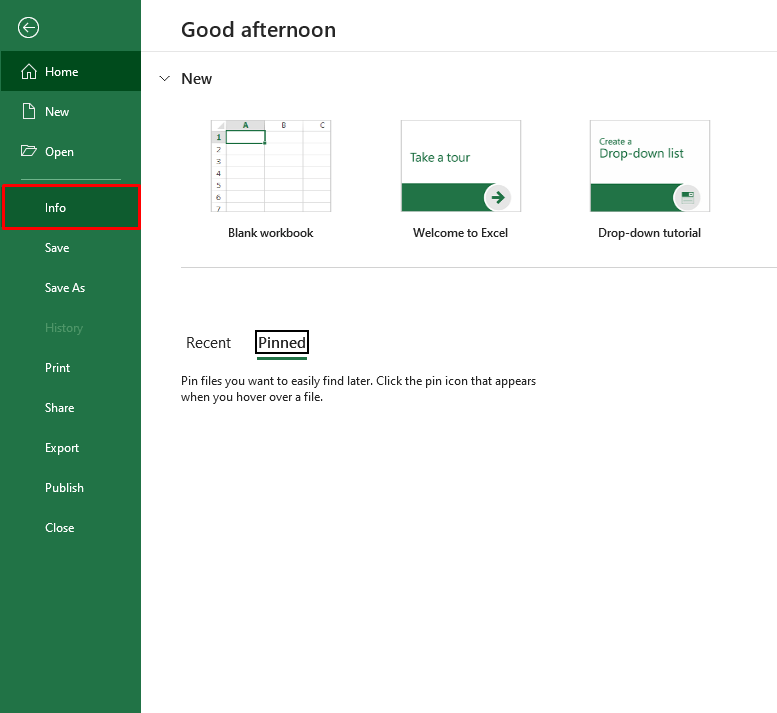
- Select the File tab and click on Info from the left pane.
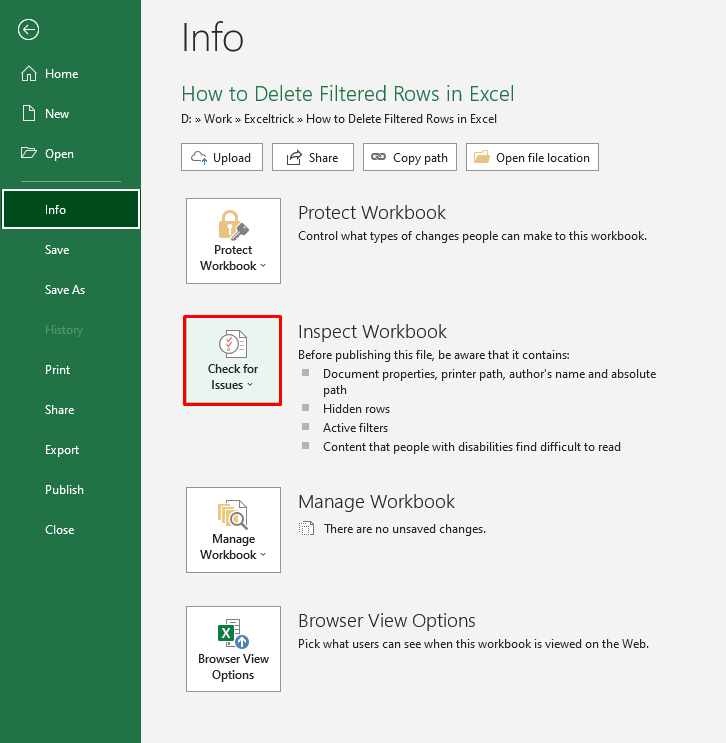
- From the Info options, click on Check for Issues.
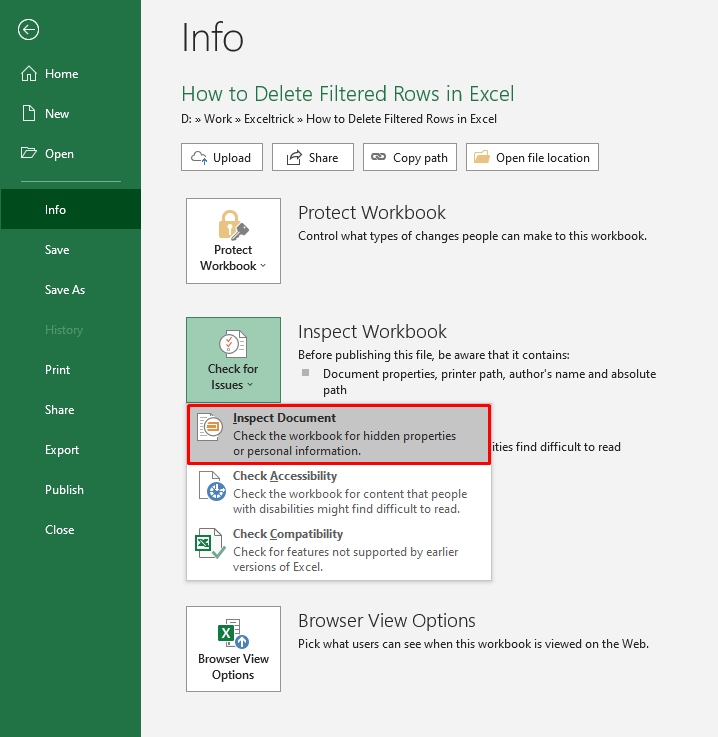
- From the drop-down menu, select Inspect Document.
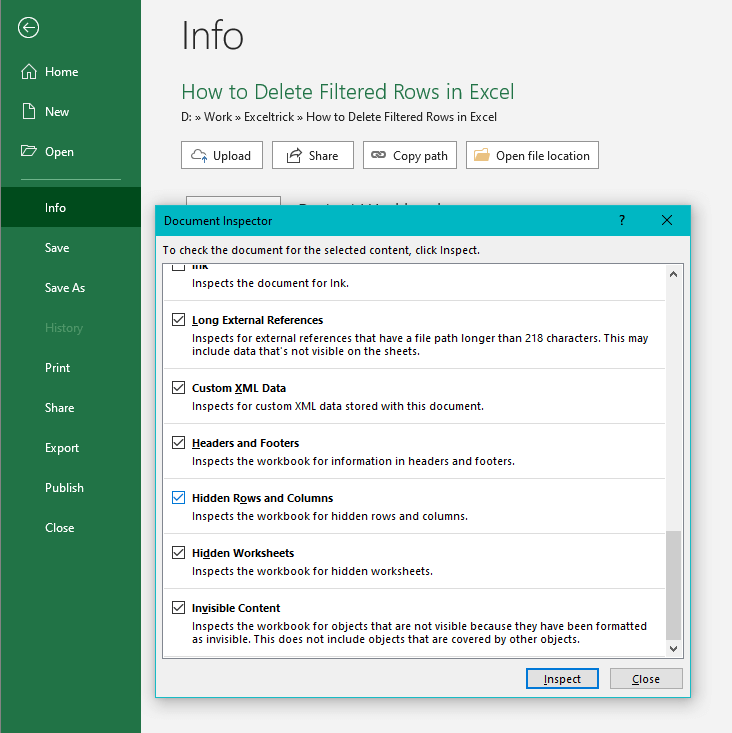
- The Document Inspector wizard will be launched and all the content will be checked.
- Scroll all the way down and make sure the Hidden Rows and Columns checkbox is checked.
- Click on the Inspect command button.
- Once the document has been inspected for the check-marked content, the findings will be returned.
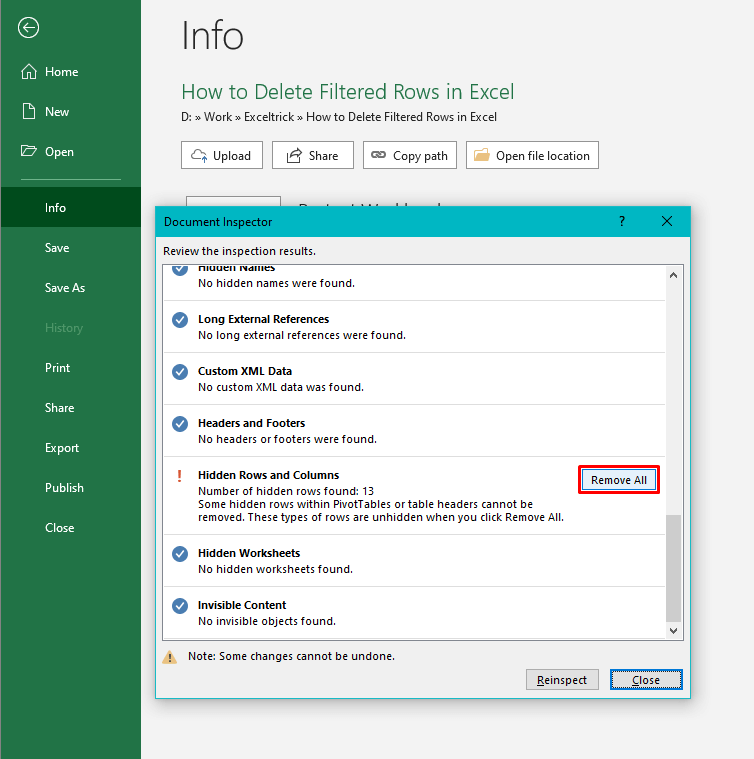
- The number of hidden rows will be shown. Select the Remove All command button to get rid of the hidden rows.
- Close the wizard and go back to the worksheet.
Only the visible rows will be kept and the hidden rows will be deleted by the Document Inspector:
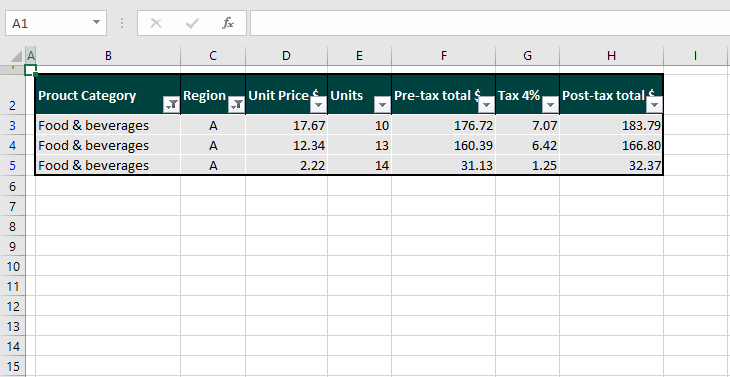
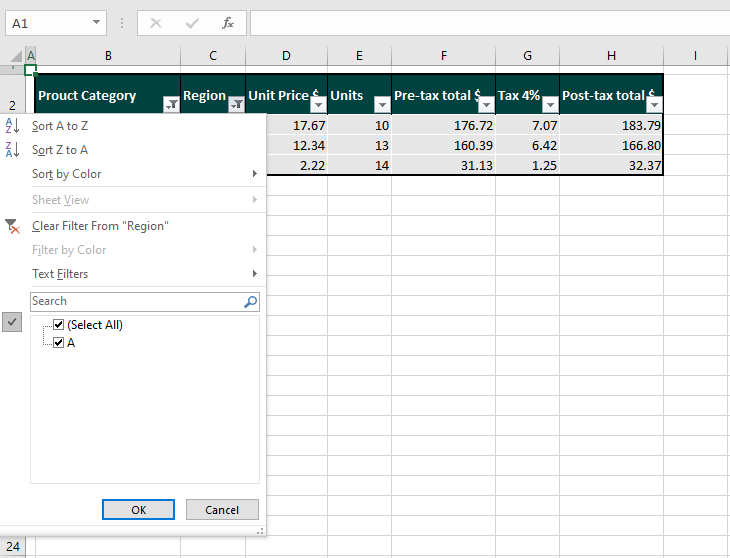
The proof is that the rest of the data won’t show in the filter controls and the row numbers have also automatically adjusted.
Recommended Reading: How to Delete Every Other Row in Excel
Deleting Hidden Filtered Rows Using VBA
Now let’s take the task of deleting hidden filtered rows and automate it. We’re using VBA again and like before, it works regardless of filtering as long as you select the dataset. The steps ahead will demonstrate how VBA can be used to delete hidden filtered rows:
- Select the database including the column headers.
- Open the VB editor by clicking on the Visual Basic button in the Developer tab’s Code
- Use the Module option in the insert tab to open a Module
- Copy and paste the code below in the Module window:
Sub Del_Hidden_Rows()
Dim myU As Range
Dim myR As Range
Dim R As Range
Set R = Selection
R.AutoFilter Field:=2, Criteria1:="A"
R.AutoFilter Field:=1, Criteria1:="Food & Beverages"

For Each myR In R.Rows
 If myR.Hidden Then
 If Not myU Is Nothing Then
 Set myU = Union(myU, myR)
 Else: Set myU = myR
 End If
 End If
Next

myU.Delete
ActiveSheet.AutoFilterMode = False
End Sub
In lines 6 and 7 of the code, you can set the field and criteria for the data you want to keep.
Field:=2, Criteria1:="A"
Here, Field 2 refers to the second column and the A for Criteria refers to the particular from column 2 we want to filter. Change the number 2 as per the column in your dataset and replace the A with the particular of the column that you want to keep on the worksheet.
Field:=1, Criteria1:="Food & Beverages"
Field 1 is the first column and Food & Beverages is the particular for filtering.
Delete this entire line from the code if you are only intending to apply one filter. Likewise, copy-paste this line in the code to add more columns to filter.
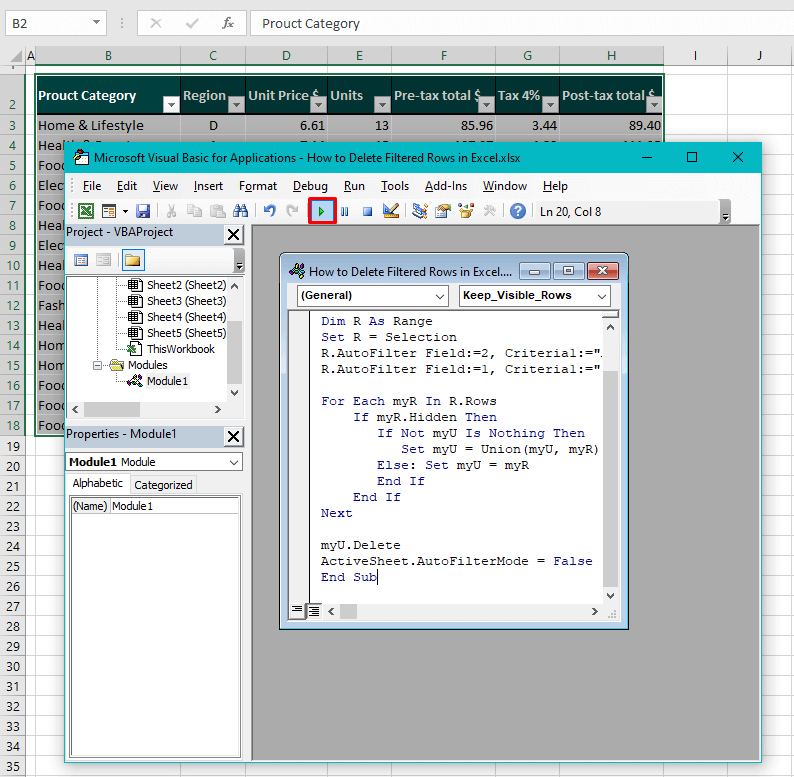
- When the code is ready, hit the Run
At this point, you can see on the worksheet that the filters mentioned in the code have been applied. Also, a pop-up window will appear confirming if you want to delete the hidden rows since only the filters have been applied as of now.
OK button: The filtered hidden rows will be deleted and the rows visible right now will be kept.
Cancel button: The filters will be cleared from the dataset and you can go back to editing the code in the Module window.
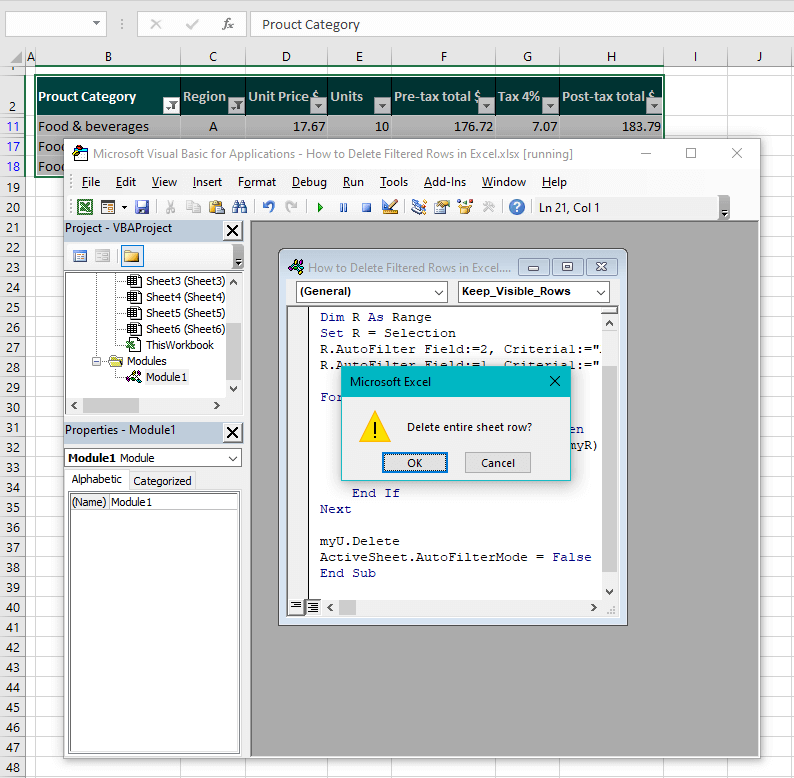
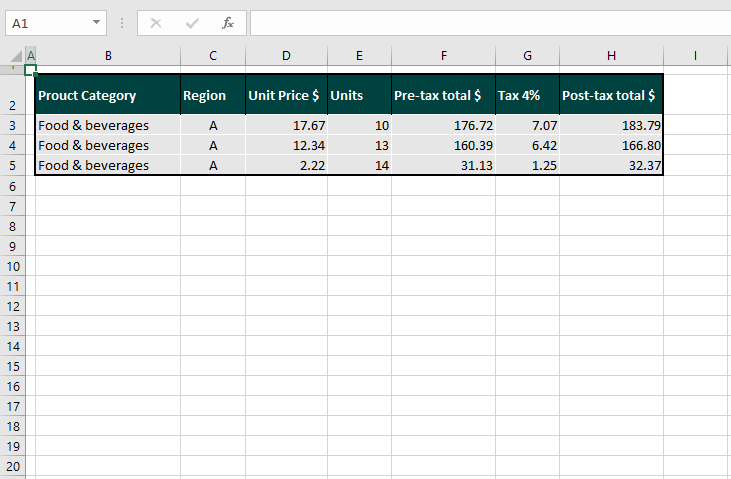
With the selection of the OK button, the visible rows remain and the hidden rows have been deleted:
Pro tip: Usually with VBA there’s no turning back; undo doesn’t work with VBA if the task has been completed. But as mentioned above, you have a small window for making amends when you run the code thanks to the confirmation window that pops up.
Pulling up and docking. That was our take on deleting filtered rows in Excel. We covered deleting visible and hidden filtered rows and hope you caught up with it.
If not, that's alright, you can take your time to familiarize yourself with the Excel tricks while we take that time to set sail with another Excel boat for you. Catch you at the next dock!


 This might leave you a little “blank”: