Your data looks great in Excel; you’ve used the perfect font styles, the right borders, and all that is Excel nifty. But the printer didn’t even think twice before severing your carefully drafted spreadsheet in the weirdest ways and now none of the pages make sense. Well, your printer is going to do what it’s set out to do so run a good check on what the final prints are going to look like.
For a decent-sized dataset, it’s not too much to ask for it to all be on the same page especially since details like headers are most likely to come out right on the first page, not to mention the waste of paper.
This tutorial will give you all the pointers on fitting an Excel sheet on one page. Portrait or landscape, scaling, adjusting rows and columns, reducing margins and font size, deleting/hiding rows or columns; these are the keywords of what we’ll be looking into today.
But before you try to print or find other ways to squeeze the sheet in, check the Print Preview of the worksheet to see how many pages the data is splayed on. You might find that the sheet is taking up a single page in the first place or that it cannot be crammed into one page.
Check Number of Pages in Print Preview
The number of pages a worksheet takes up can be seen in Print Preview, Page Break Preview, and Page Layout View. You can choose whichever preview you are comfortable with, and for now, we will talk about the first one.
Print Preview is easily accessed by pressing the Ctrl + P keys or by selecting the File tab and then selecting Print from the left pane in the window.
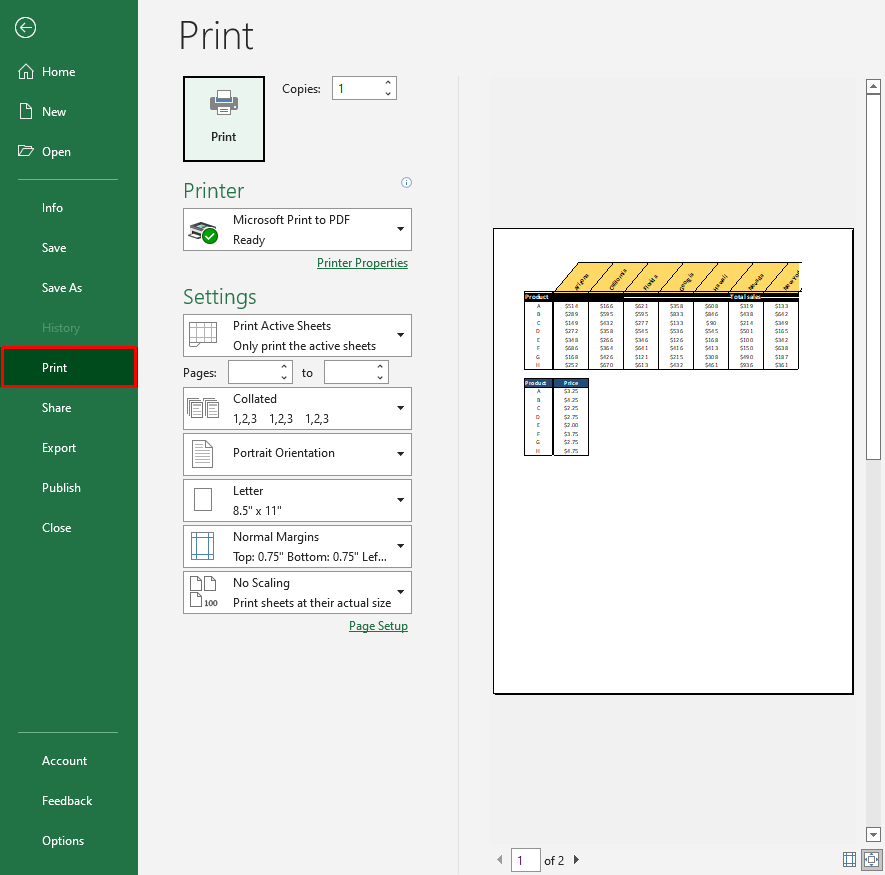
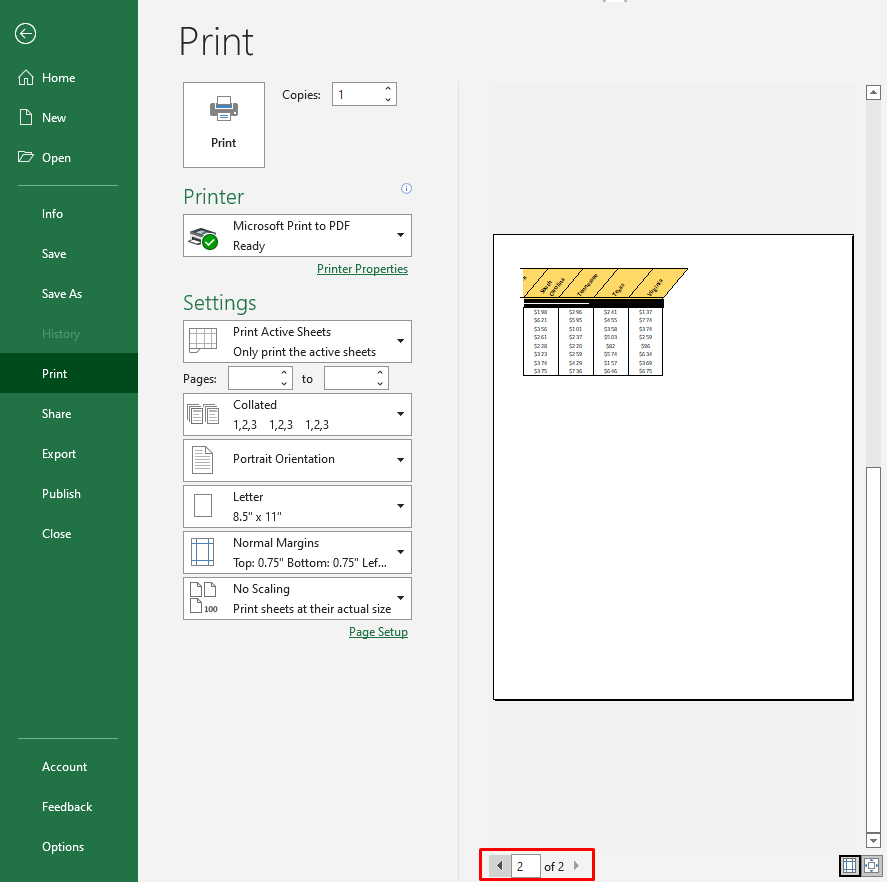
You can view what will be printed on each page. At the bottom of the window, you can see the page number total for each worksheet and can navigate to the pages by clicking on the left and right arrows.
Ways to Fit and Print a Worksheet on One Page
Now that we've viewed what the sheet will look like in prints, we can move to fit the data into one page. There are several ways of doing this and you may need a combination. The detailed steps for each method are explained below:
Let’s get fitting!
Change the Page Orientation
The default page orientation for printing will be Portrait Orientation. For our data which has more width than length, it’s a far better utilization of a page to change the page orientation to Landscape. You might not have to make any other adjustments to the data or the settings if the data fits in Landscape mode.
There are a couple of ways of changing the page orientation and we have them enlisted below with their steps:
Change Page Orientation in Print Preview
The page orientation can be changed in Print Preview while immediately previewing the effect of the change in orientation. Here’s what to do:
- Press the Ctrl + P keys to enter Print Preview.
In the Settings, you can see that the page is in Portrait Orientation.
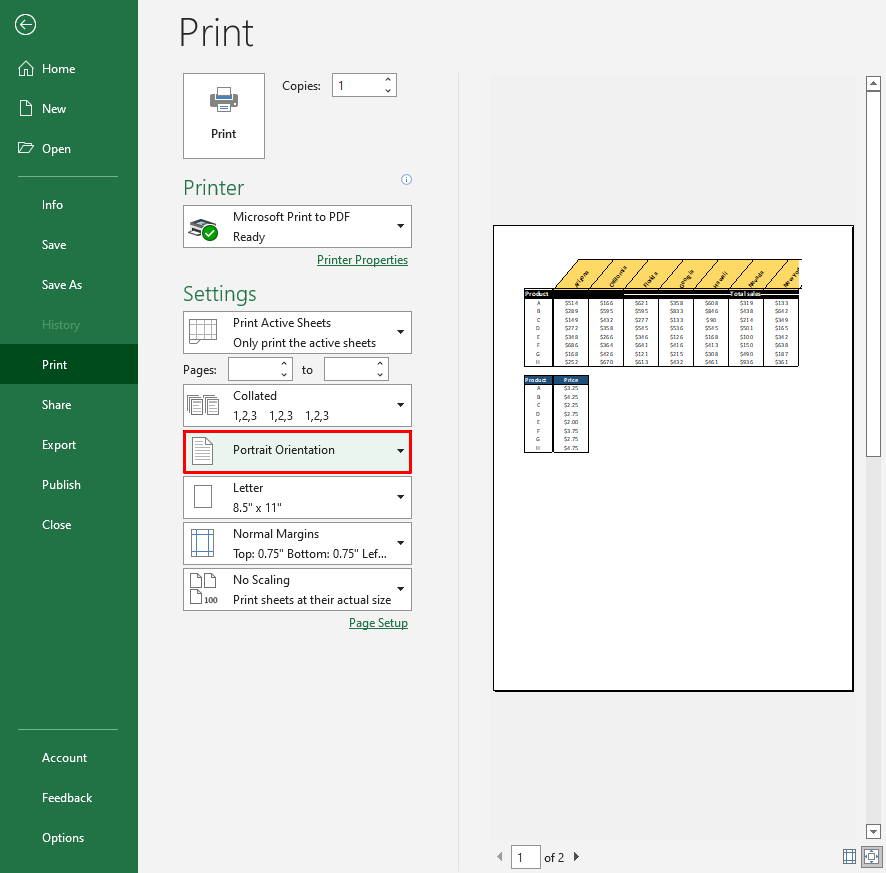
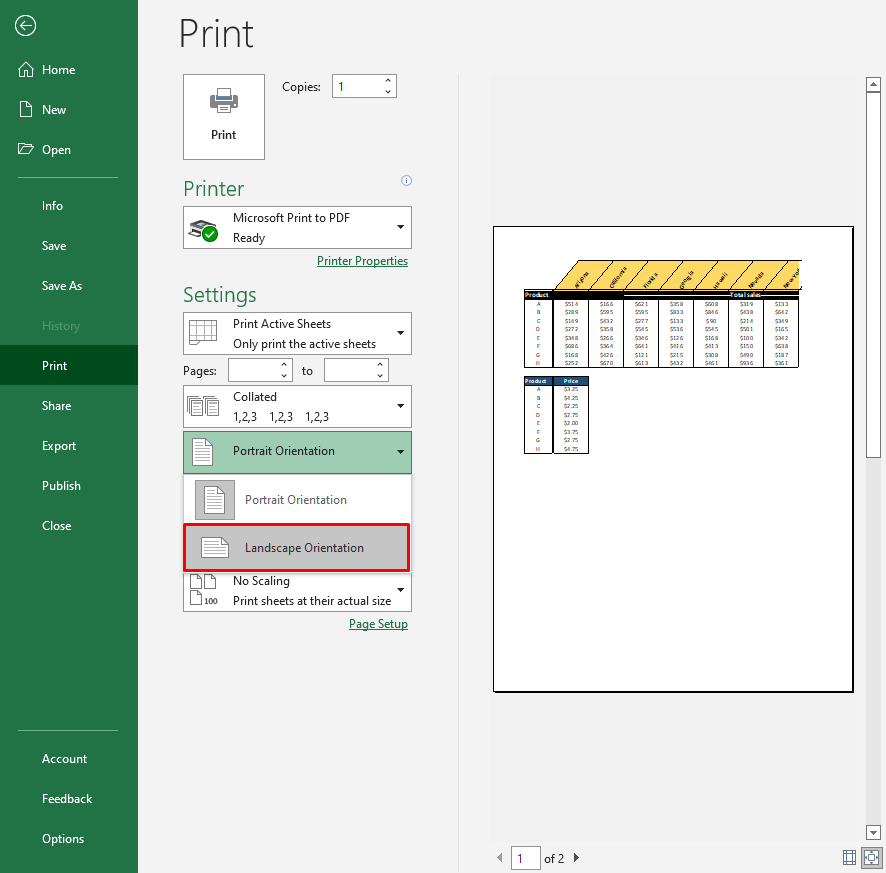
- Click on Portrait Orientation in Settings and select Landscape Orientation.
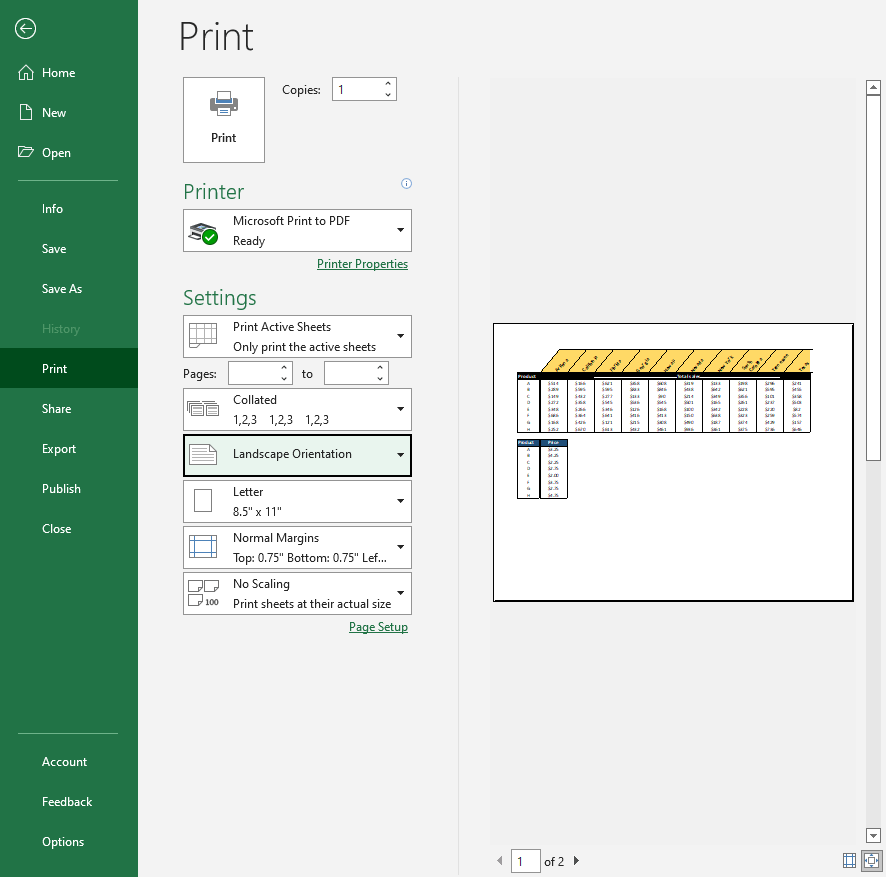
As with our data, Landscape Orientation has fit more columns on the first page but we still have a second page and will have to resort to other methods of fitting the data on one page.
Change Page Orientation in Page Setup
The page orientation can also be changed from Page Setup with the following steps:
- Go to the Page Layout tab and click on the dialog launcher of the Page Setup. This opens the Page Setup settings.
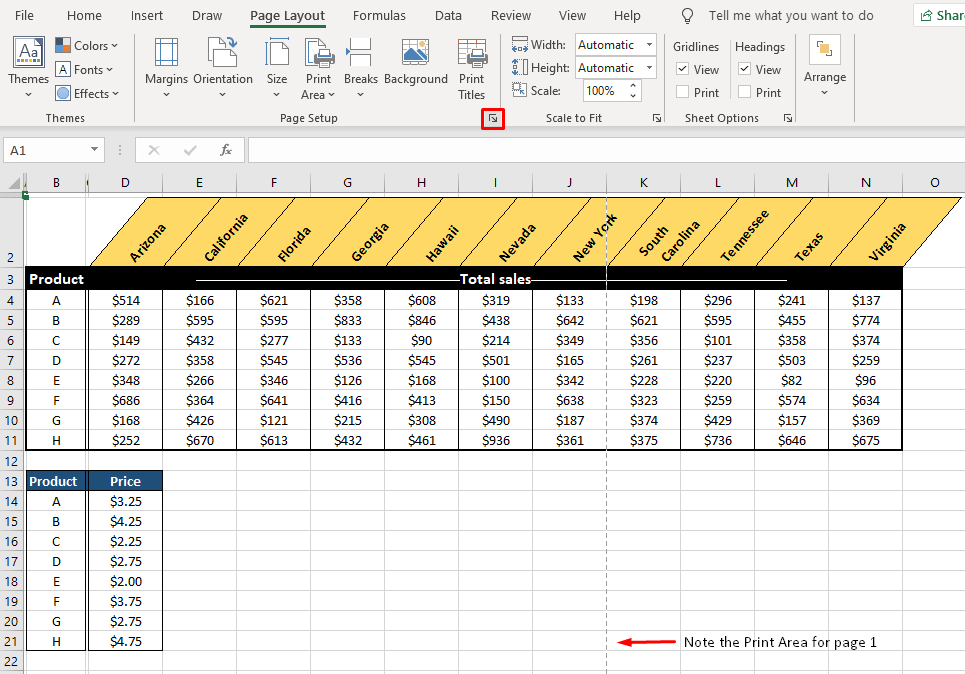
- In Portrait Orientation, we have 4 columns in excess of the first page.
- In the Page Setup dialog box’s Page tab, select Landscape from the Orientation
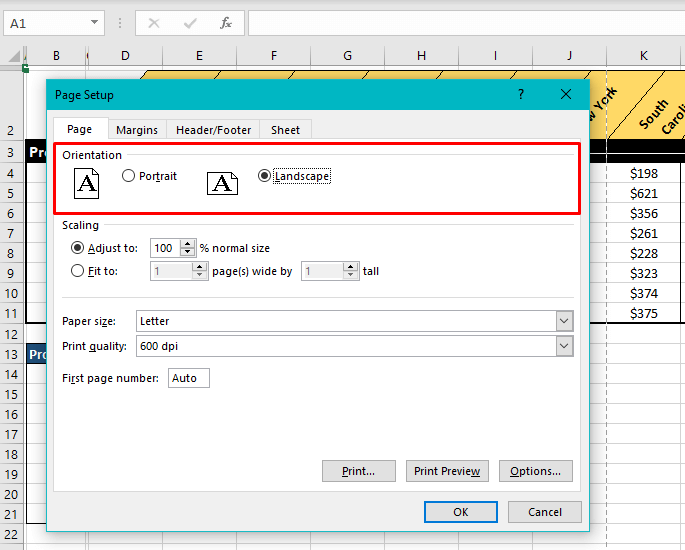
- Click on the OK
As seen from the Print Area line, the Landscape Orientation has included 3 more columns on the first page.
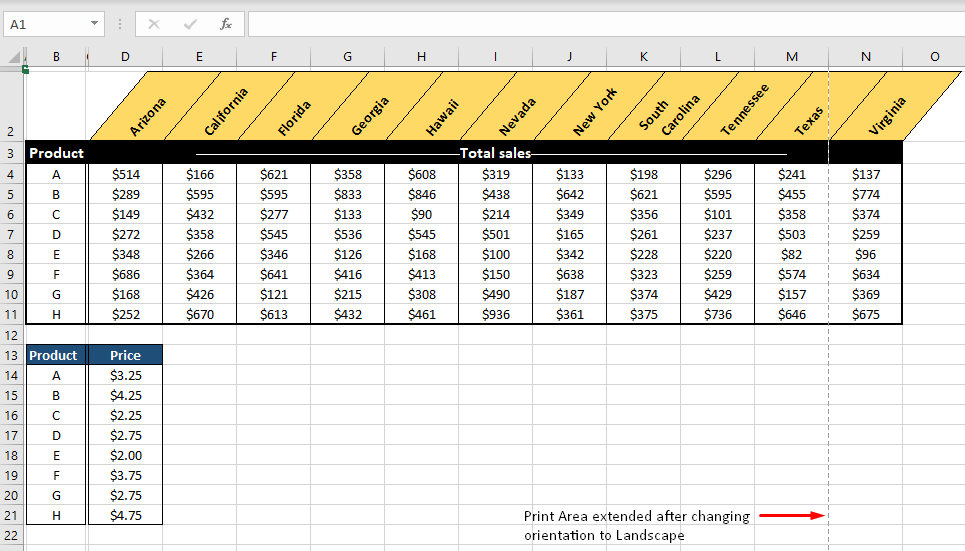
Note: The Print Area line will only show up on the sheet after entering Print Preview, Page Layout View, or Page Break View.
Fit Data on One Page in Page Break Preview
This solution may, many a time be the answer for you as you simply adjust the Page Breaks to include all the data on the same page. Now let’s see how to fit data on one page in Page Break Preview.
Carrying forward the example from above, here’s what to do next after switching to Landscape Orientation:
- From the status bar at the bottom of the file, click on the third icon to enter Page Break Preview.
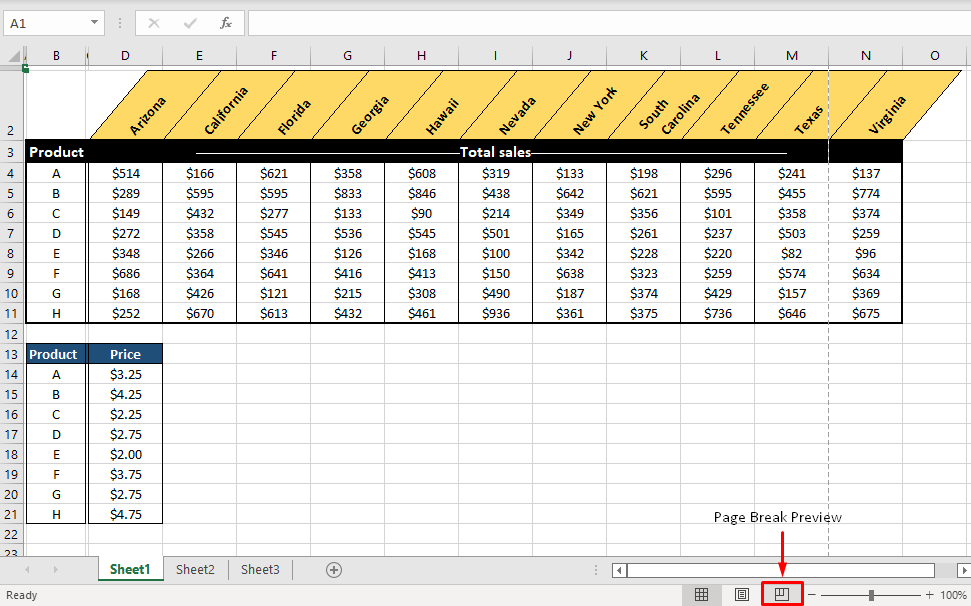
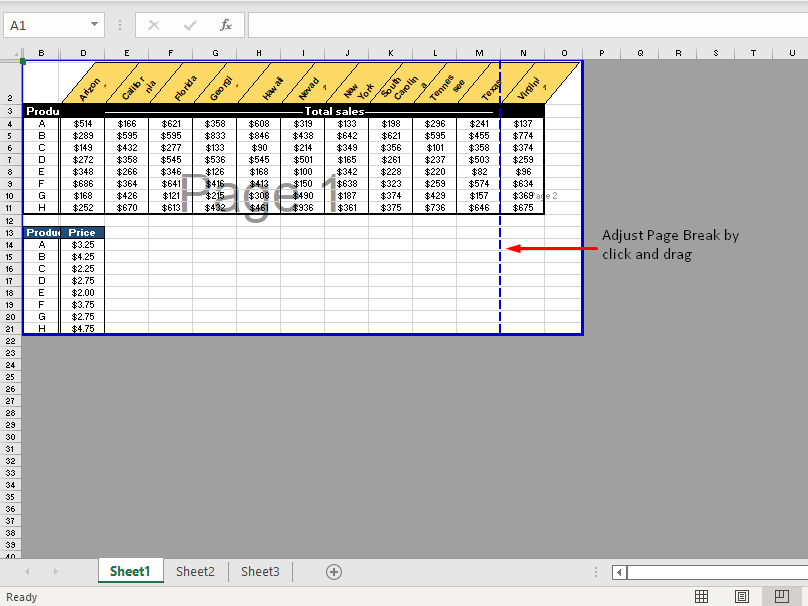
- The following window is what you’ll see in Page Break Preview. The blue lines are Page Breaks and can be clicked and dragged for adjustment.
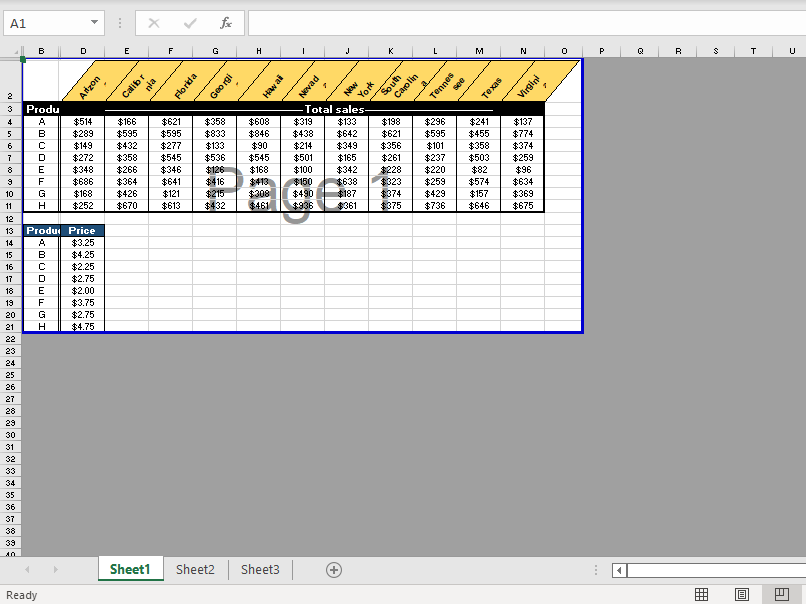
- Adjust the Page Breaks by clicking and dragging to fit the data on a single page.
Now all the data will fit on one page:
You may be tempted to directly jump into Page Break Preview and make everything settle on one page but sometimes you may find that you'll have to adjust the scaling for the data to sit right.
Change the Scaling (Fit All Rows/Columns in One Page)
Alternatively, the data can be scaled to fit the page. All the rows or columns containing the data can be scaled to fit on one page. This takes no manual adjusting like that of Page Breaks and the settings are easily accessible through Print settings. Let's see the steps to change the scaling to fit all rows/columns on one page:
Our example data is more column-dense than row-dense so we have first switched to Landscape Orientation to fit the data more suitably on the page.
- To go to the Print settings, press the Ctrl + P
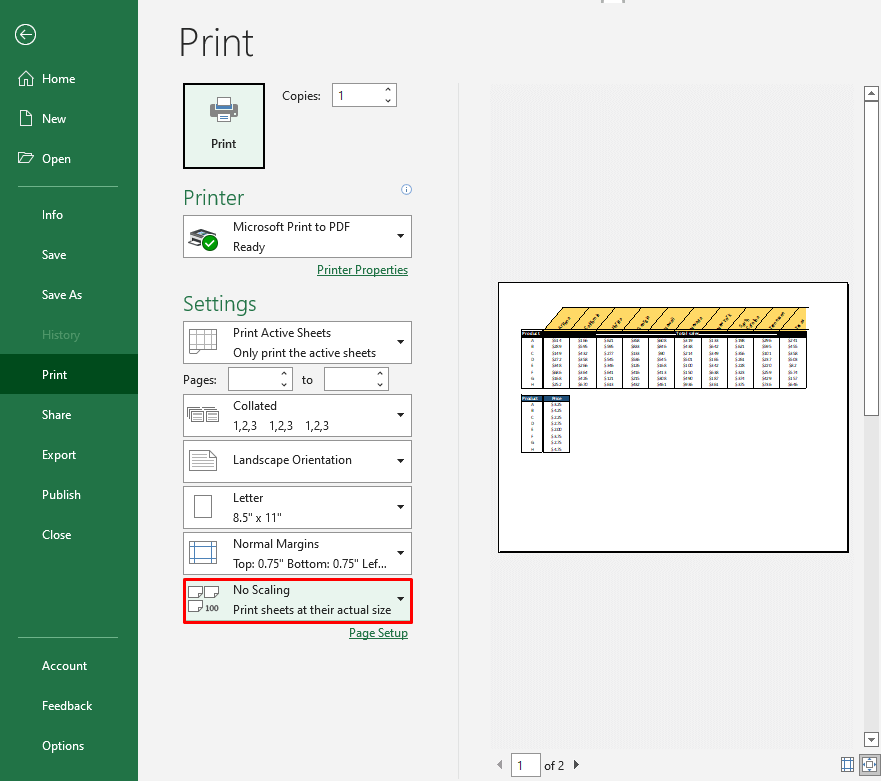
- The last option in the Settings shows that there is no scaling applied.
- Click on the last button in the Settings which says No Scaling and select one of the options.
We have selected Fit Sheet on One Page.
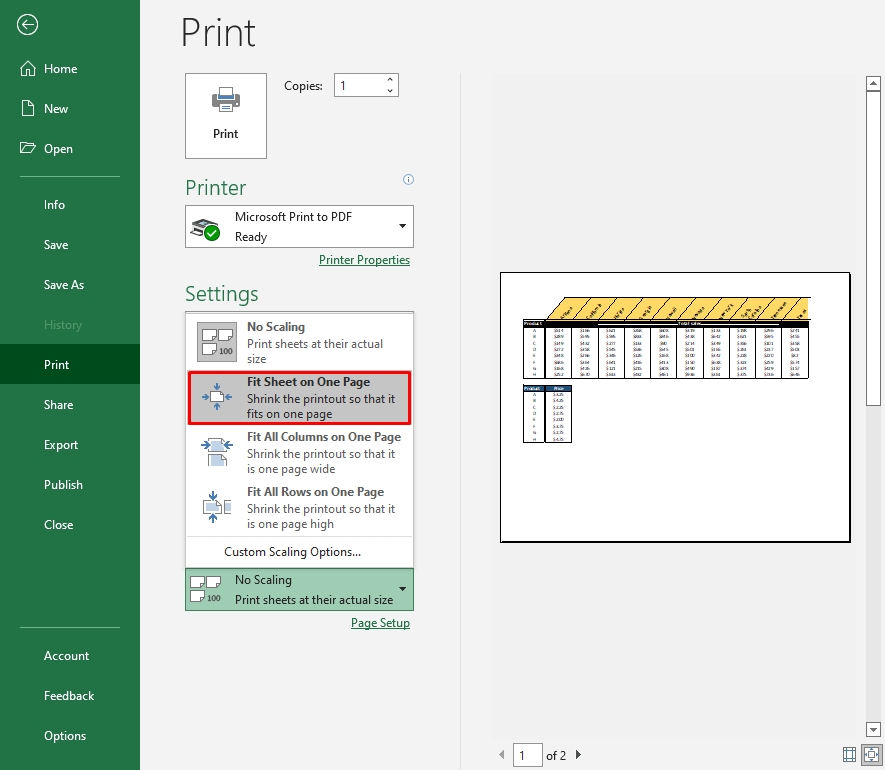
The selected scaling shows up in the Print Preview and has fitted the sheet on one page.
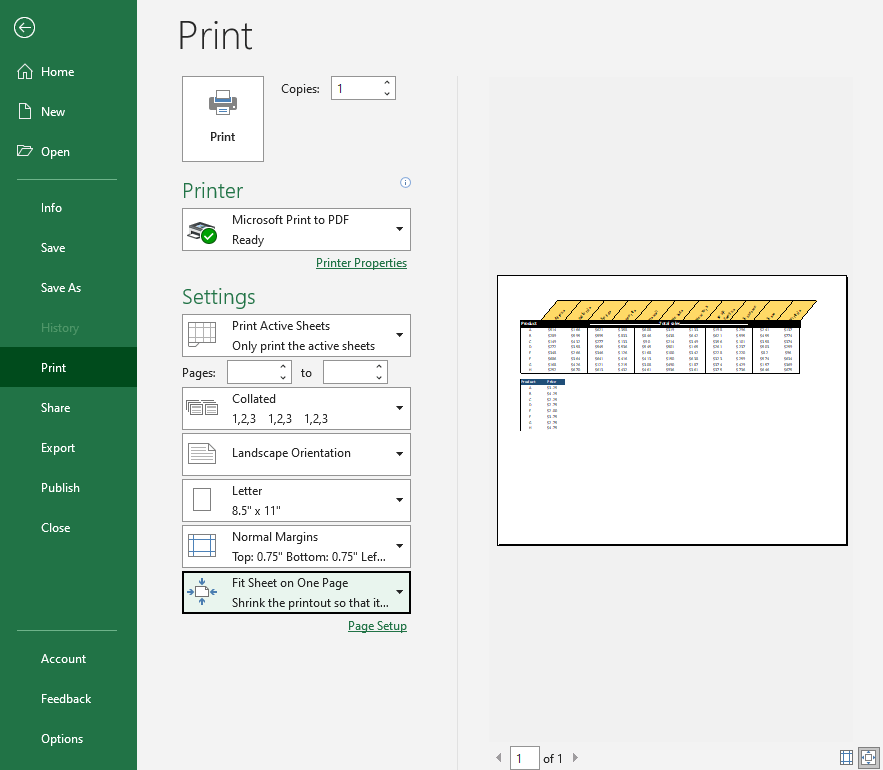
Similarly, you can scale the data to fit 1 page in width and 1 page in height from Page Layout tab > Scale to Fit group:
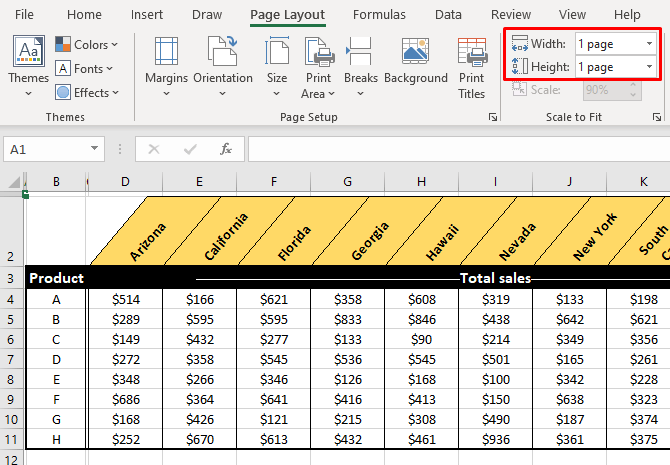
And from Page Layout tab > Page Setup dialog launcher > Scaling settings:
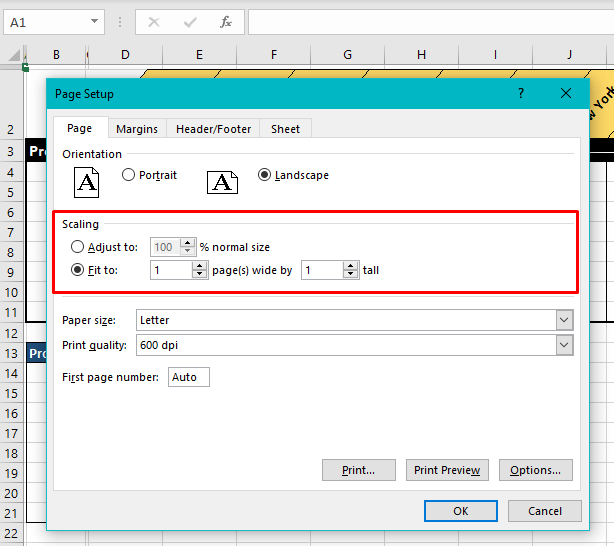
Both the above options are scaling options and have the same result of scaling down the sheet to fit a single page. Print Preview has the advantage of showing the changes in preview.
Reduce the Page Margins
The last option before we meddle with the actual sheet and the data is to reduce the Page Margins. By default, the margins are 0.75 inches at the top and bottom and 0.7 inches left and right from the edges in Excel. Narrowing or removing some margins will allow more data to fit on the same page. The steps to reduce Page Margins are:
- To go to Print Preview, press Ctrl + P. As shown in the Settings, the margins currently are Normal Margins.
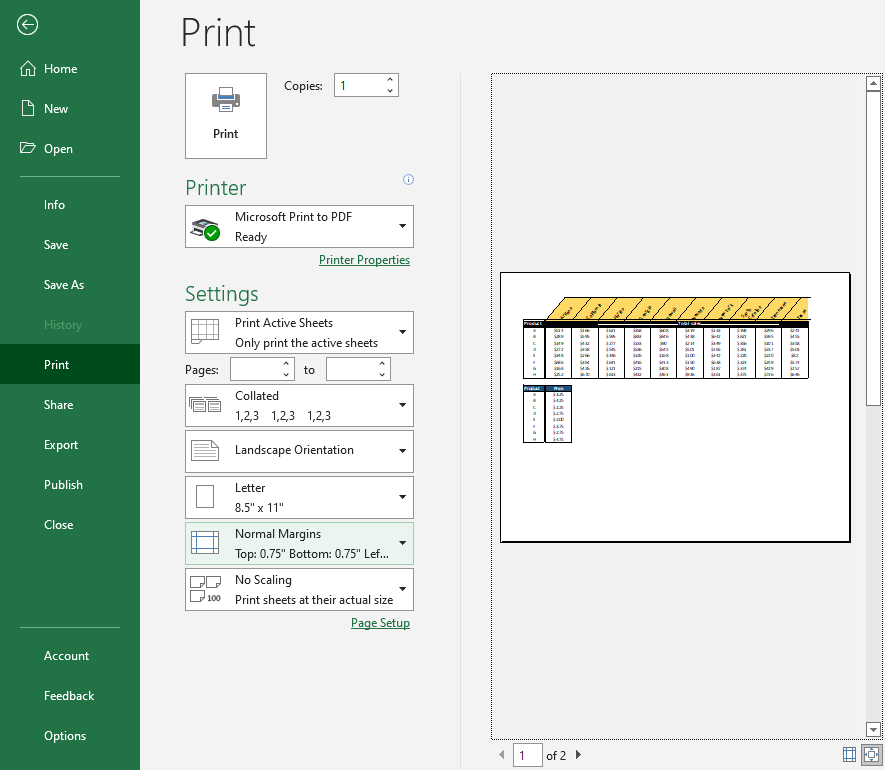
- Click on the Margins button reading Normal Margins and select Narrow to narrow down the margins or select Custom Margins… to further reduce or eliminate margins.
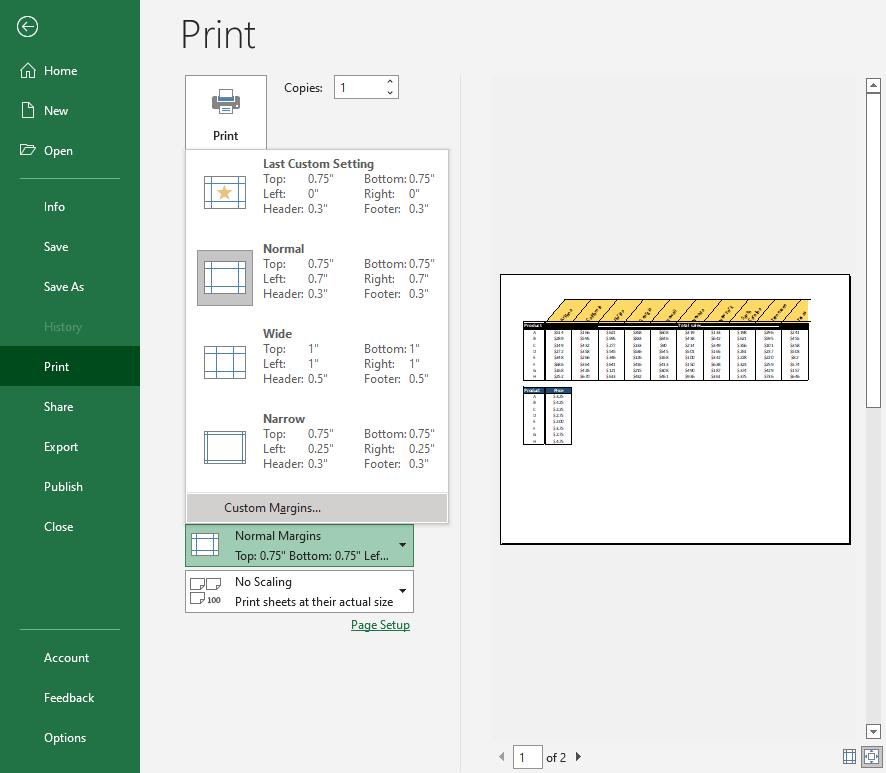
- Clicking on Custom Margins… leads to the Margin tab in the Page Setup dialog window.
- Reduce the relevant margins. We have eliminated the left and right margins to fit the columns in Landscape Orientation.
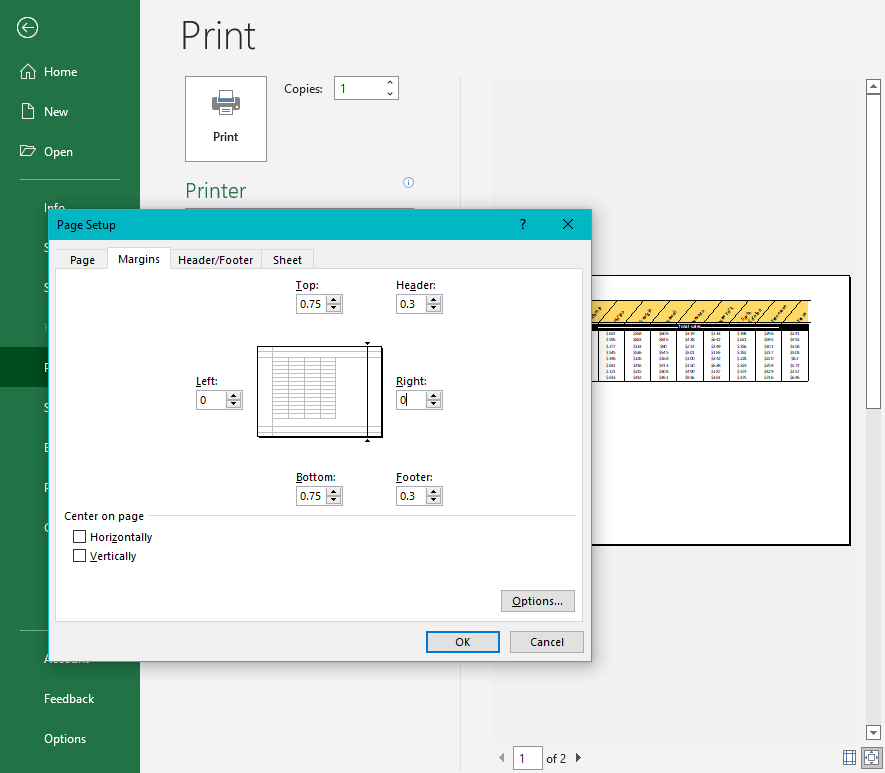
- Click on the OK button when done.
Check the effects in the preview. For our example, the reduced margins have fit the sheet on one page:
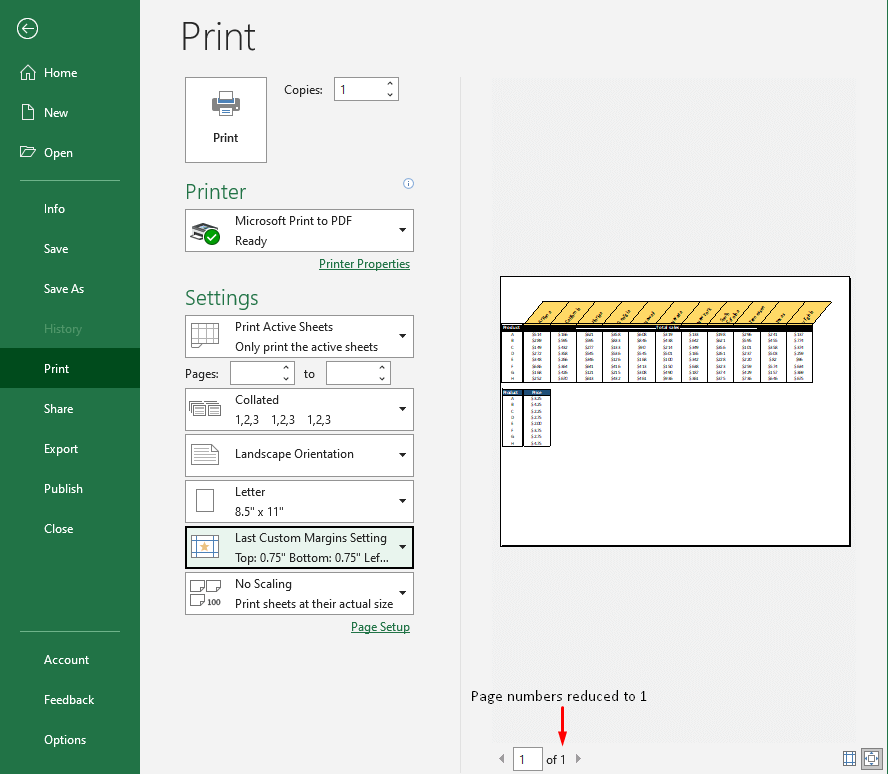
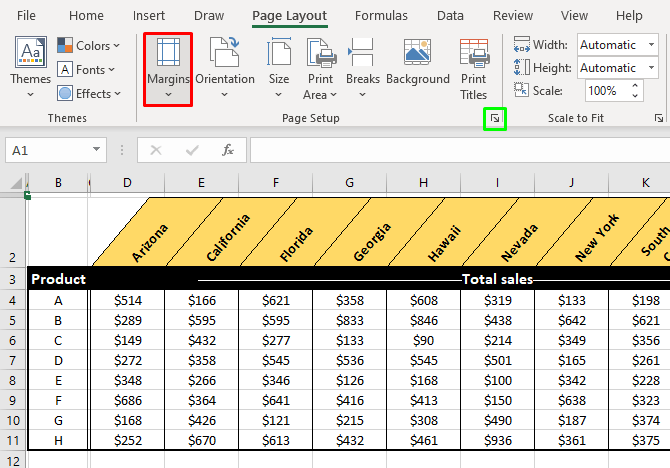
It’s easier to adjust the margins in the Print settings and view the changes in the Print Preview. Other ways to access the Margin settings are from the Page Layout tab’s Page Setup group.
You can use the Margin button (highlighted below in red) or the Page Setup dialog launcher’s (highlighted below in green) Margin tab:
Adjust Column Width or Row Height
Now we get to the more invasive methods where we tweak the sheet and its contents. You might have squeezed everything in on one page but would that always be a good idea? If the data comes out being congested and hard-to-read you probably gave the page too much to deal with. Row height is rarely a problem but columns, especially the ones carrying numeric data, are needlessly wide and we can work on those to make the data more compact.
Now we will try adjusting column width (or you can adjust row height, whichever is necessary) for fitting the sheet on one page and this is how we do it:
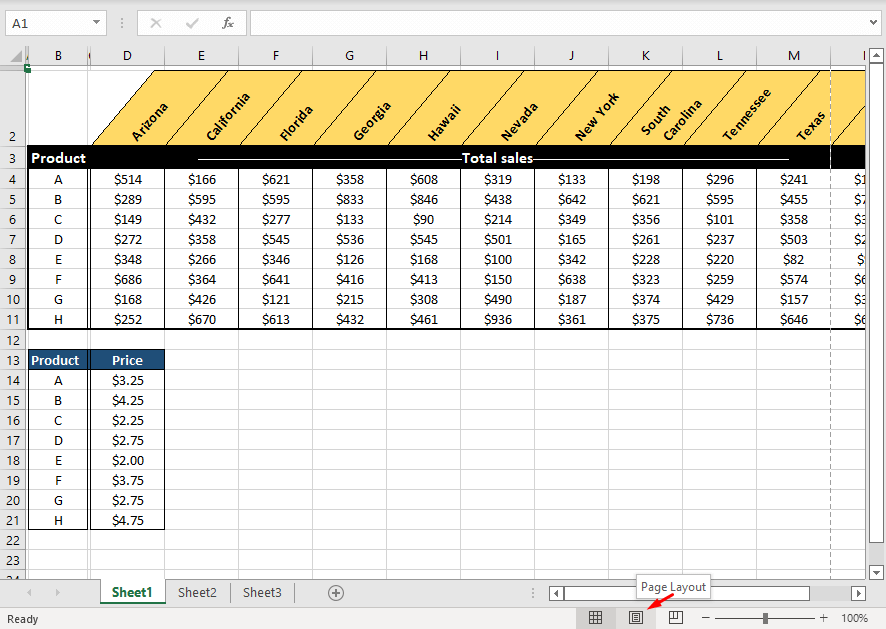
- To go to Page Layout View, click on the Page Layout icon in the status bar.
- This is the Page Layout View:
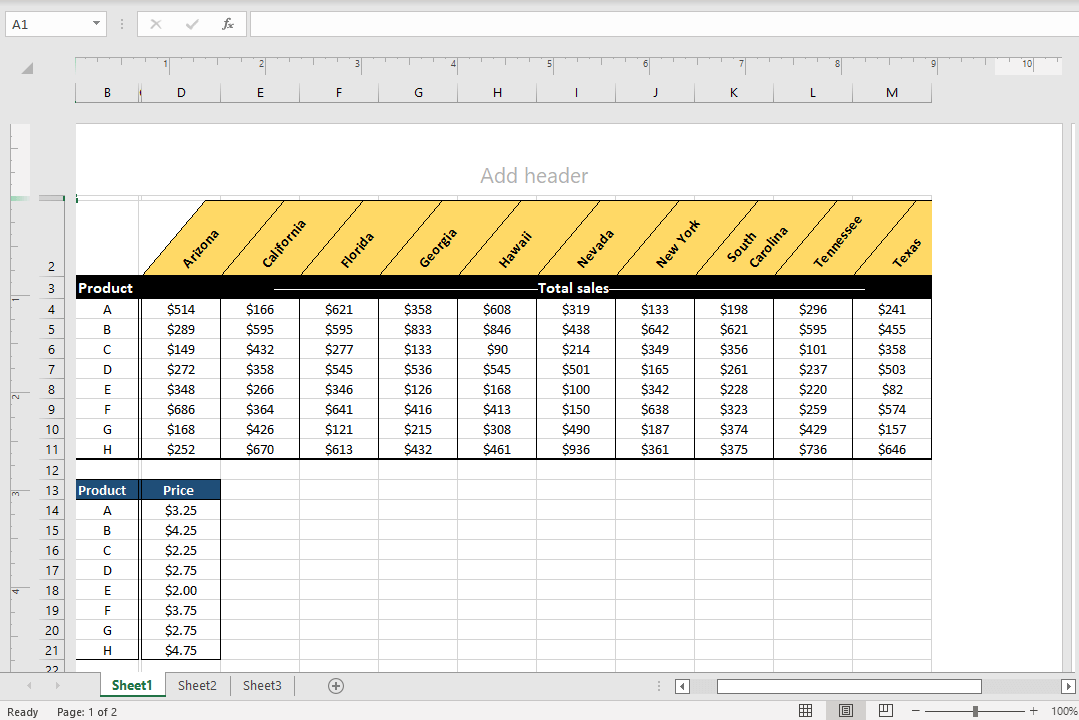
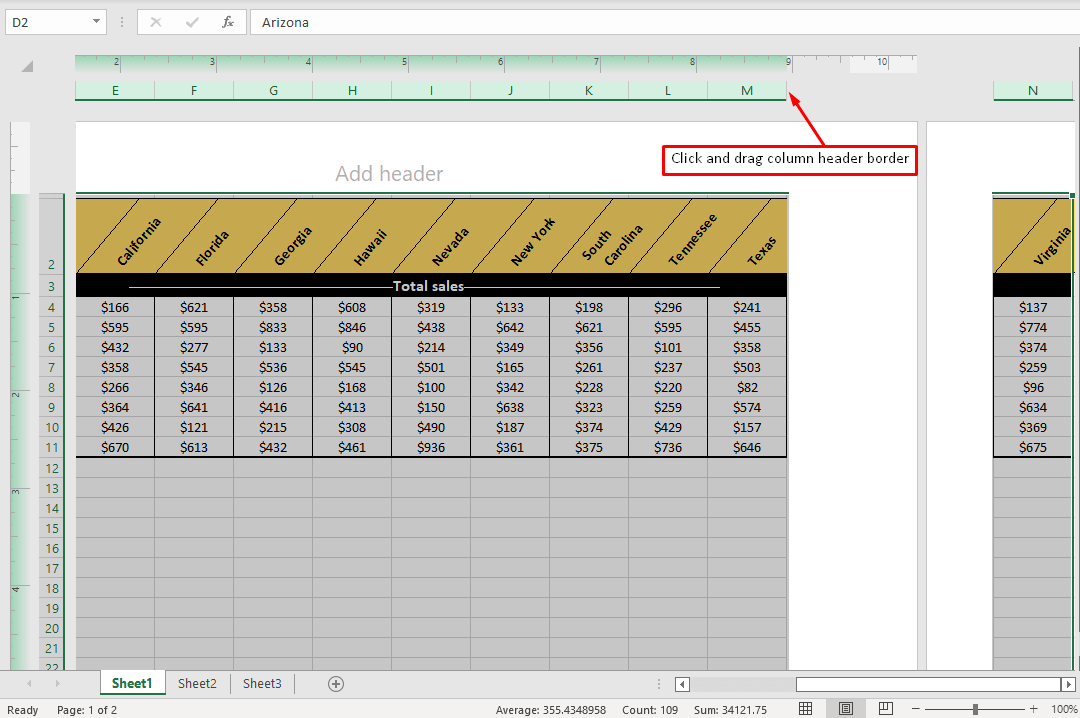
- Select the columns and reduce the widths by clicking and dragging a column header border until the columns all fit on one page.
- Now the worksheet fits on one page:
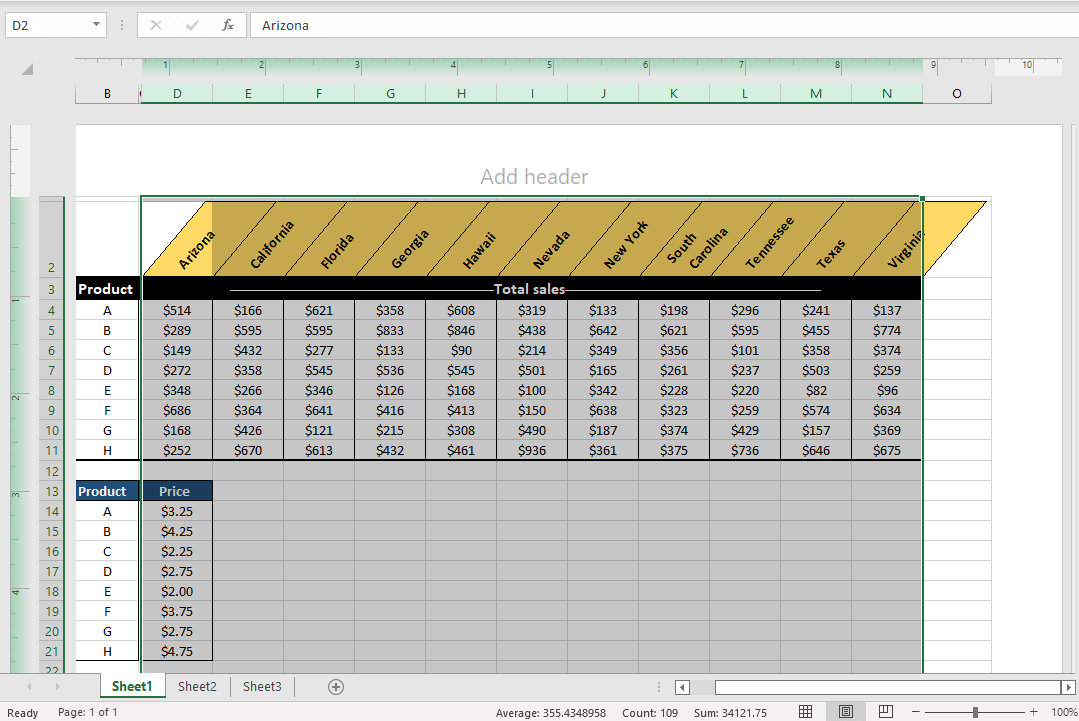
Note: The columns can be selected and their widths can be reduced in Normal View but with Page Layout View it is easier to determine how much column width you need to reduce to make all the data fit.
You can however also check if the data will fit on the page in Normal View if you have the Print Area set so that the dotted line will display on the worksheet. You can see the dotted line by entering and exiting Print Preview, Page Layout View, or Page Break View, or by setting the Print Area.
Hide or Delete Rows/Columns
If all else has failed and compacting the data on a sheet makes it indecipherable, you may have some columns or rows that are not important enough to not be deleted. Or if they are a bit more important than that, maybe they can be hidden at least for a print. Hidden columns/rows can be unhidden at any time.
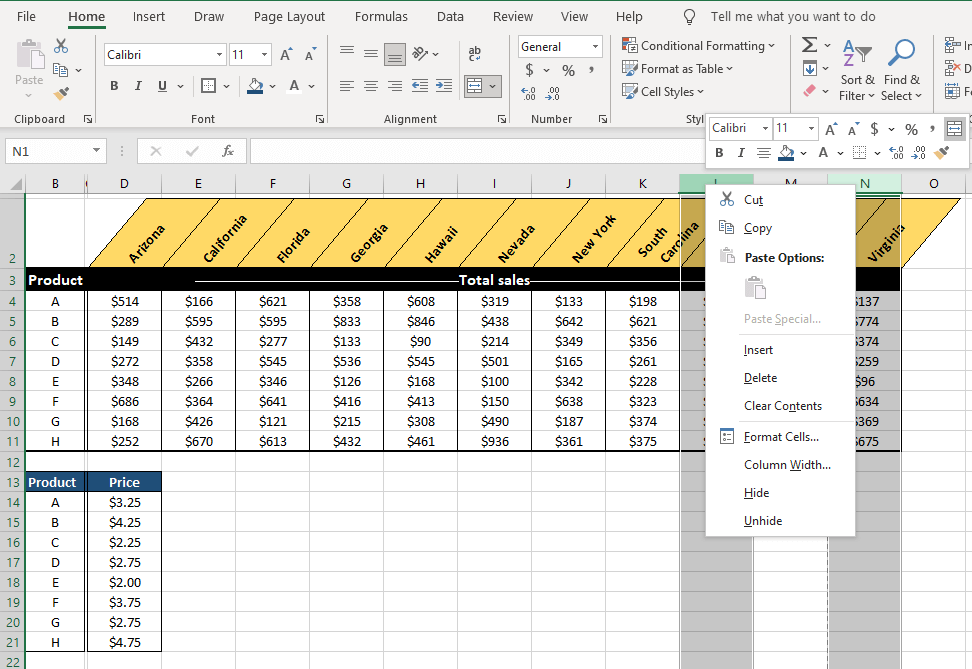
This one’s easy and with our example, we’re dealing with columns. All you need to do is select the columns, right-click any column in selection and choose Hide or Delete from the context menu:
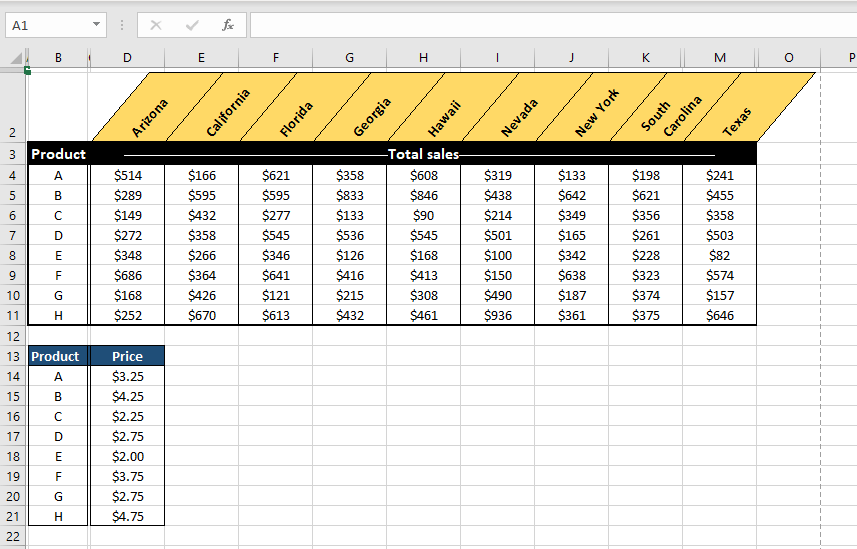
The data now fits the Print Area of the first page:
Reduce the Font Size
If you are trying to fit larger data on one page, the font will reduce anyway so might as well give this a try. Reducing the font size will then leave more space in columns and rows, which can then be reduced further to compress the data. You can reduce the font size of lesser important parts in the data.
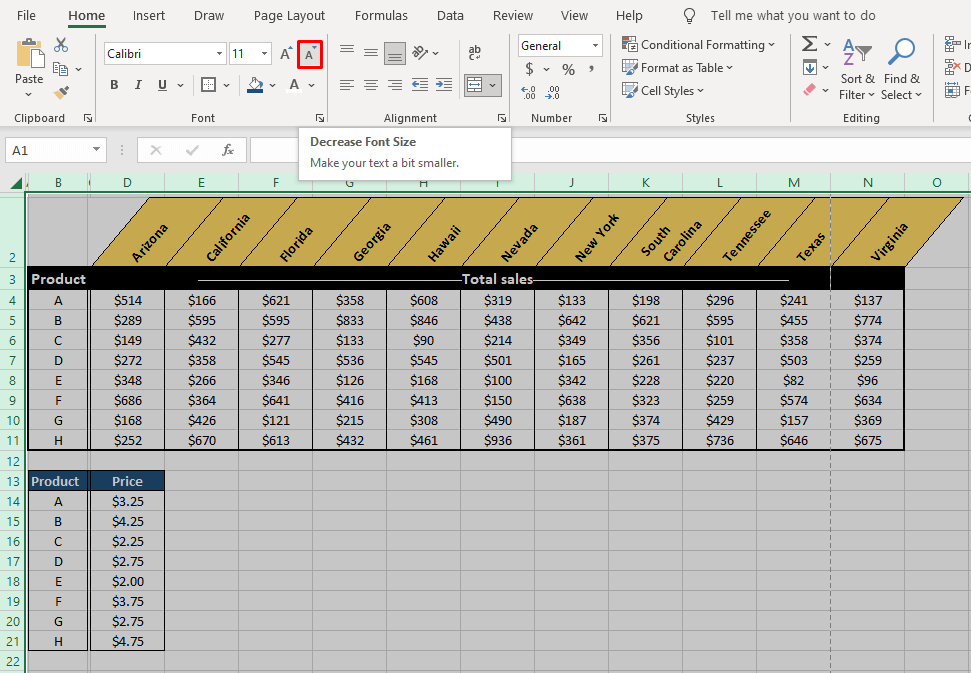
If you are reducing the font size of the whole sheet, your data may contain different font sizes. To reduce all the font sizes by one unit, select all the cells by pressing Ctrl + A, then select the Decrease Font Size button in the Font group of the Home tab:
Tip: Using Page Breaks to Divide Worksheet Print Areas
There’s only so much you can fit on one page before it doesn’t look right. If your data still can’t be stuffed on one page while maintaining readability, you can consider reverting the data and sheet to its original form and splitting the columns/rows between two pages using Page Breaks. This is also applicable for large datasets where inevitably multiple pages will be required for printing and by setting the Print Area with Page Breaks, you can control the amount of data on each page.
Tip: After adding Page Breaks, see if you need to add headers or extra information to the other pages to make the data look cohesive.
Follow these steps to add Page Breaks to your sheet:
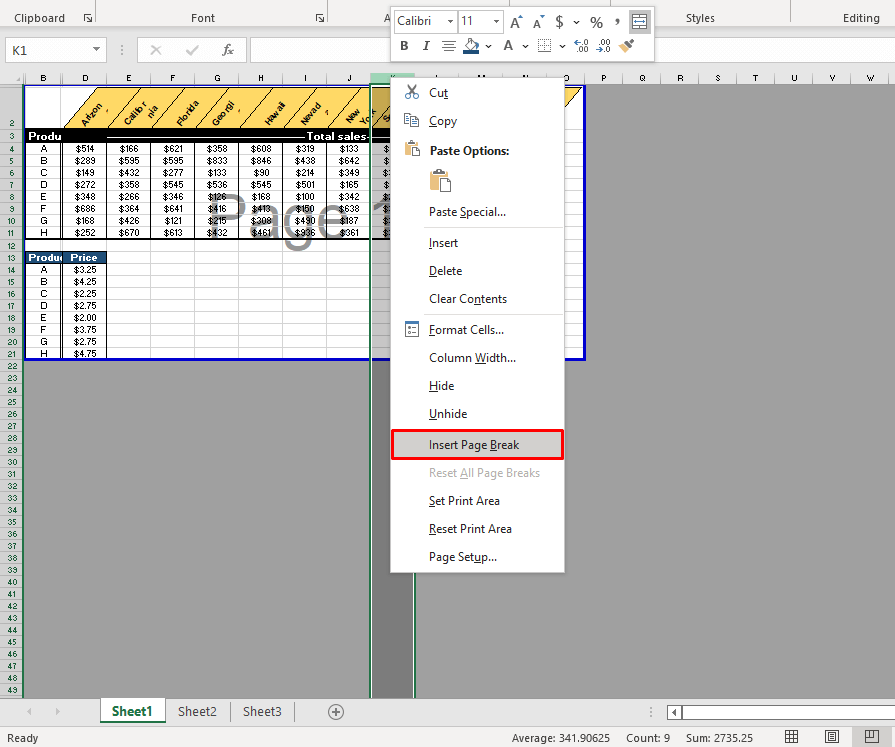
- Select the Page Break Preview icon in the status bar.
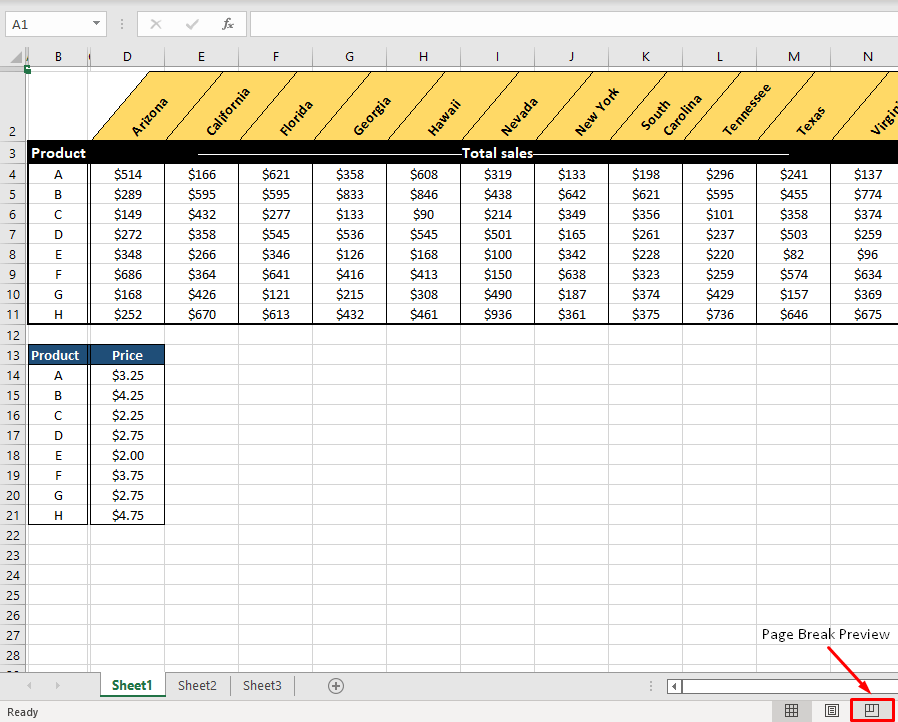
- Select the column where you want to add a Page Break. The Page Break will be added to the left of the selection.
- Right-click anywhere on the selection and select Insert Page Break from the list.
- For horizontal Page Breaks, the Page Break will be added on top of the selected row.
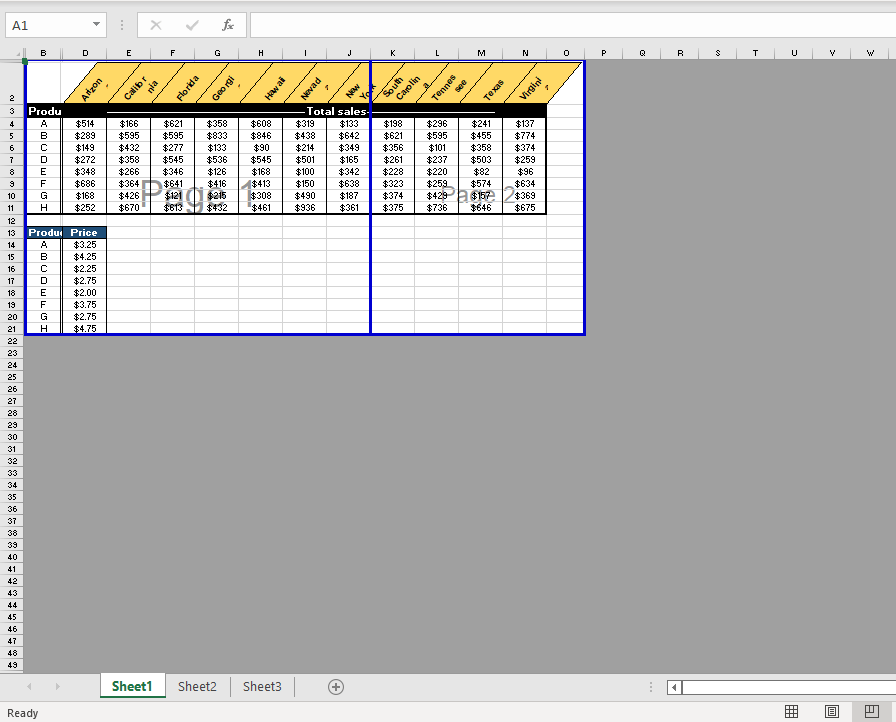
The Page Break will set the Print Areas for the pages.
Those were all our tips and tricks on how to print an Excel sheet on one page. Don’t forget to be mindful of the readability of the data on the page as all the fitting and resizing skills are of no use if one can’t make head or tail of the final print. We hope you'll be able to fit your worksheet contents on one page with our hacks. Be ready with more problems because we’ll be ready with more solutions!


