Say you’ve got this worksheet from a couple of months ago ready to work with. You pull it up on your computer and start working. You’re updating the worksheet and suddenly, you notice that a few of the old formulas are showing a #REF! error. The fix? Just reference the correct element.
#REF! error is pretty simple to solve. In this tutorial, you’ll find out what causes the #REF! error and how to fix it. If this sounds a little vague, let’s talk about the #REF! error right from what it is, to how to fix it.
What is #REF! Error in Excel?
A #REF! error is an Excel error that tells you that one or more of the references used in your formula is invalid. For instance, if you’ve summed up cells C1 to C5 [=C1+C2+C3+C4+C5] in cell C6, and then any one of the cells from C1 to C5 gets deleted, the formula in C6 will return a #REF! error. To understand this more clearly, refer to example 1.
Why Does it Appear?
#REF! error occurs when you’ve referenced an element on your worksheet or workbook that no longer exists. Most commonly, you’ll see a #REF! error because you had referenced a cell, column, row, or a sheet, and subsequently removed it from your workbook. You may also see a #REF! error because you’ve copied a formula with relative references to another worksheet where those references are rendered invalid.
Examples
Following are some examples of when you’d see a #REF! error. While there are a lot of other instances where you’d see a #REF! error, the solutions we discuss here should help you get rid of all #REF! errors that you see on your worksheet.
1. The reference has been removed
When you remove a cell, column, row, or worksheet that you’ve referenced in a formula somewhere in the workbook, you’ll see a #REF! error. The reason is simple. The element that you’re referring to in the formula no longer exists, and Excel has no way to use that data in the formula any longer.
For instance, say you’ve got some sales figures in column B. You want to sum those up, so you use the following formula:
=B2+B3+B4+B5+B6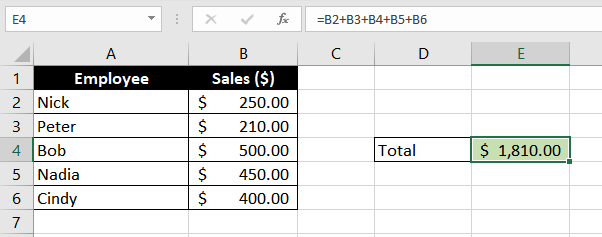
You get your output and everything is working just fine. Now, you select and right-click on row 6, and delete all the numbers. You’ll notice the output immediately changes to #REF! error.
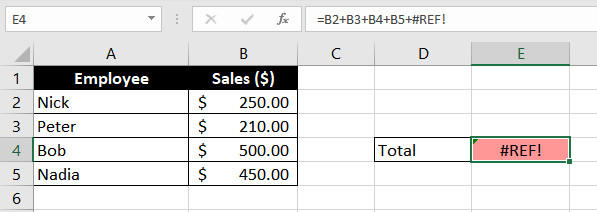
The solution? There are two. You can either change the formula and add valid references to a data set that does exist on the worksheet. Or you could add data into the cells that have been referenced in the formula.
2. Copying a formula with relative cell references
When you copy a formula into some other cell, and you see a #REF! error, it’s almost always a case of relative references. Not sure what this means? Try this out on your sheet. Enter some numbers in a column, and sum them in a cell using the SUM function.
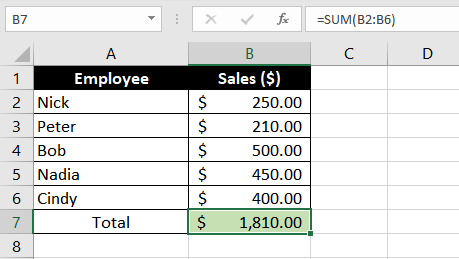
Then, copy the SUM function and paste it into another cell in a column far away.
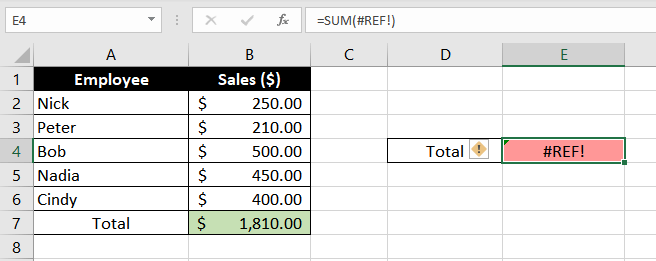
Getting a #REF! error? That's because Excel assumes that when you paste a formula in a different column, you'll also refer to corresponding data in that column. The fix is easier than the kindergarten volcano experiment though.
All you need to do is make your references absolute. First, undo the paste action by pressing Ctrl + Z. This should remove the #REF! error from your sheet. Now, put dollar signs in your cell references. This is what your formula should look like:
=SUM($B$2:$B$6)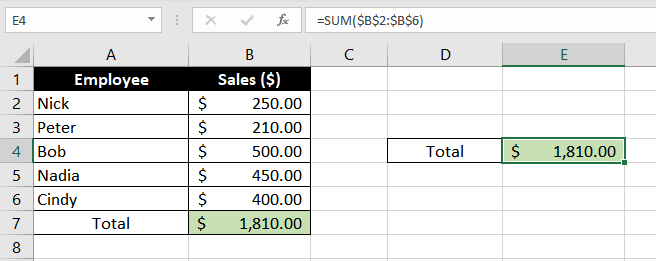
Neat, huh?
3. #REF! Error with the VLOOKUP Function
Now we all know that #REF! errors are referencing errors. However, there’s just a slight variation in how a #REF! error occurs when you’re using a VLOOKUP function. Let’s use the data from the previous example and instead of summing it up, we’ll apply the VLOOKUP function to the data.
Here’s the formula we’ll use:
=VLOOKUP(D4,A2:B6,3,0)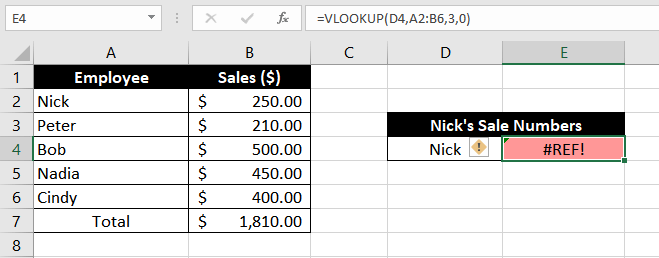
Getting a #REF! error?
Perfect. Think about the reason for a moment.
Okay, so the reason is that you’ve referenced the third column in the col_index_num argument, which isn’t included in the array that you’ve entered in the second argument. As far as the VLOOKUP function is concerned, the third column doesn’t exist. Therefore, it gives you a #REF! error.
The fix, again, is pretty straightforward.
Just change the third argument to 2, and you should be set.
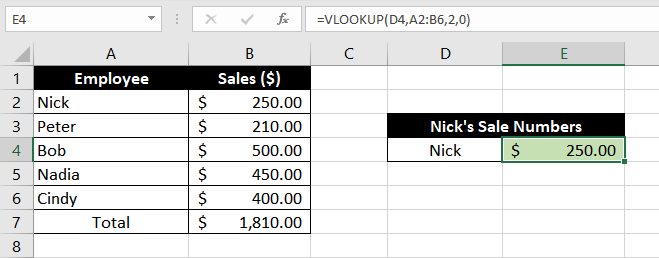
Could it be any easier?
Other solutions for #REF! Error
In most cases, you should be able to resolve the #REF! error using the methods that we’ve already discussed. However, some situations are trickier.
For instance, what if you deleted a worksheet from your workbook and have several #REF! errors across the worksheet where those cells were referenced? Well, there’s no getting around it. You’ll have to resolve those errors by referencing them properly.
1. Clear the #REF! Error from the Worksheet
If you’d like to just clear them out of your worksheet instead of fixing them, you can just use the Find and Replace option to clear out the #REF! errors from your worksheet.
To do this, press Ctrl + H and enter #REF! in the Find what field. Leave the Replace with field blank and click Replace All.
2. Trap the #REF! Error
#REF! error typically doesn’t warrant the use of the IFERROR function to trap the error. However, in some cases, you may want to use it. For instance, if you’re getting a #REF! error as a result of adding dynamic references using the INDIRECT function, IFERROR function can help you. To learn how you can trap an error, read through our comprehensive IFERROR function tutorial.
That’s all the ways that you can solve a #REF! error on your worksheet. Again, solving the #REF! error is a child’s play in most cases. On the off chance that you have a more complex issue like with the INDIRECT function, you’ll need to deploy some more Excel chops.
As long as you’ve got us, there’s nothing you can’t do on your worksheet. While you finish getting rid of all the #REF! errors on your worksheet, we’ll pull out another tutorial for you.

