The EXPAND function in Excel 365 is used to dynamically expand or extend the size of a given array, depending on the provided number of rows and columns. By adding rows and columns, the EXPAND function can be used to create bigger arrays and expand them as per our requirements.
The EXPAND function also allows us to pad the extended array with the specified value.

Syntax
The syntax of the EXPAND function is as follows.
=EXPAND(array, rows, [columns], [pad_with])Arguments:
The EXPAND function accepts 4 arguments, each of which plays a specific role in expanding the size of an array.
'array' – It is a mandatory argument that includes the original array or cell range that needs to be expanded. It can be a cell reference to the array or an Excel function that returns an array.
'rows' – This is an optional argument that specifies the total number of rows that the expanded array must have. The value of the rows argument must be a positive integer. If the argument is empty, the EXPAND function will return the same number of rows as the input array.
'columns' – This is also an optional argument and indicates the total number of columns that the resulting array should have. The input value of the columns argument must be a positive integer. When it is left empty, the number of columns remains the same as the input array.
'pad_with' – This is the last optional argument that defines the value that must be used to fill in any new cells that are created as a result of the expansion. If no value is defined, the new cells will be filled with the #N/A value. The input value must be enclosed in double quotes if it is a text.
Important Characteristics of the EXPAND Function
Some of the noteworthy characteristics of the EXPAND function are as follows.
- The EXPAND function returns a new array that spills into the adjacent cells depending on its size.
- If the resulting array is too large for the worksheet, the EXPAND array returns a #NUM error.
- If the value of the rows and columns argument is negative or less than the number of rows and columns in the input array, the EXPAND function throws #VALUE! error.
Examples of EXPAND Function
As the EXPAND function accepts four different arguments, we will use various input values for each to gain a better understanding of its functionality.
Here, we have a sample dataset that consists of two rows and columns.
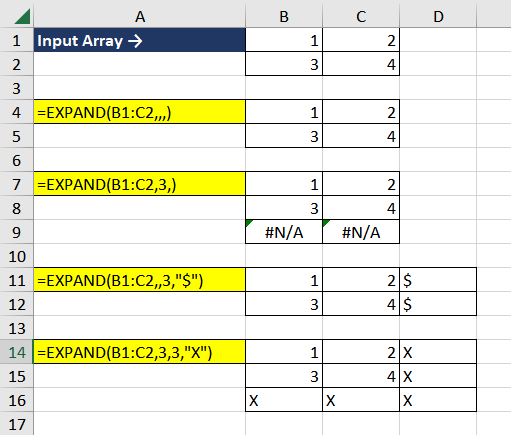
In the first case, we are only using the input value for the array argument and leaving all the remaining arguments empty. In such cases, the EXPAND function returns the original array as it is.
In the second instance, the input value of the rows argument is set to 3 while the columns argument is left empty. The EXPAND function extended the original array to three rows while keeping the number of columns the same as the original array. Since the pad_with argument is also left empty, the expanded array contains the default value, which is '#N/A'.
The next example expanded the original array horizontally since the formula contains an input value for the columns argument while the rows argument is left empty. Additionally, in this example, the input value of pad_with is also set to the dollar sign ($). As we can see, the resulting array contains 3 columns, and all the additional cells contain the dollar sign.
The last example showcases the functionality of all the arguments. In this case, the function expanded the original 2×2 array in cells B1:C2 to a 3×3 array, with the new cells filled with the value "X".
Now that we have a clear understanding of the basic functionality of the EXPAND function, let's explore some practical applications of this function.
Example 1 – Simple Use of EXPAND Function
Suppose we have a store's monthly sales data for the years 2020 and 2021. For the last few months in 2021, the store had to be temporarily closed due to renovation. The store will be operational from January 2024. However, for tax reasons, the sales data must be updated.
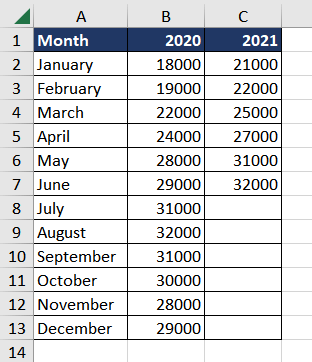
One way to update the sales data is by manually adding zero sales to all the months up to December 2023. An efficient way is to use the EXPAND function to extend the original array range A2:C13 to a 12 x 5 array (one row for each month and one column for each year) and pad the expanded cells with "0", indicating no sales.
The formula used will be as follows.
=EXPAND(A2:C13,12,5,0)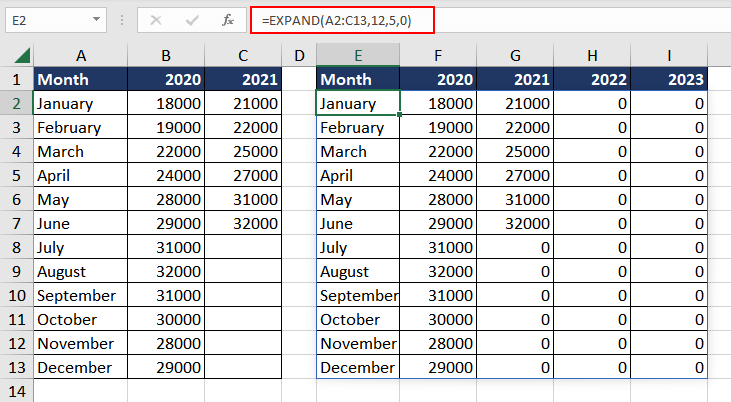
Now, we can use the updated sales data for tax purposes.
Example 2 – Split Strings into Expanded Array
Suppose we have a dataset containing the project names and team members assigned to each project for the upcoming week. In the existing dataset, the team members' names are separated by commas in the "Project Team" column.
The goal is to expand this table to create separate columns for each day of the project plan for the upcoming week to get a better look at days where no one is assigned.
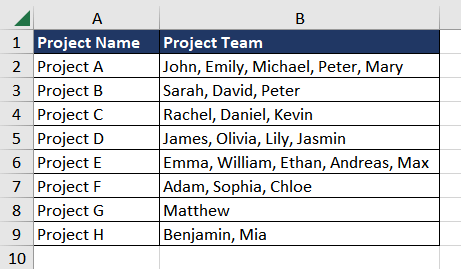
The first step is to split the names of people working on each project into separate cells using the delimiter, which is a comma and a space in this case. The formula used will be as follows.
=TEXTSPLIT(B2,", ")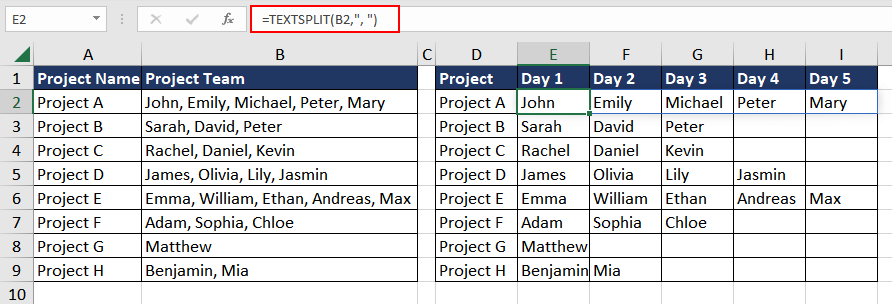
Now that we have the data in separate columns with the help of the TEXTSPLIT function, we can expand the array horizontally to create a separate column for each day using the EXPAND function and fill in the empty cells with a dash indicating that no one is assigned.
The number of columns can vary depending on the number of days the project will run. In this case, we can create it for 5 days. The formula used will be as follows.
=EXPAND(TEXTSPLIT(B2,", "),,5,"-")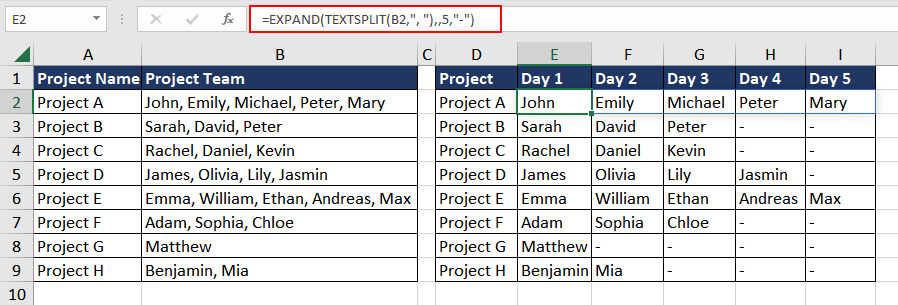
This will give us a better picture of who is working on each project on each day, which can be helpful in project management and planning.
Example 3 – Creating Planner Using EXPAND Function
In this example, we will demonstrate how to create a dynamic daily planner that adjusts based on the length of the project. The user can enter the project name, start date, and end date in separate cells. Using the EXPAND function, we will then create a day-wise planner based on the number of days in the project.

Users can enter the details in cells A3, B3, and C3. Using the DAYS function, we will first calculate the number of days between the start and end dates. The formula used will be as follows.
=DAYS(C3,B3)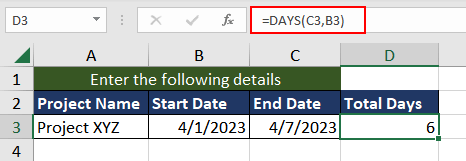
Now, we will use EXPAND function to extend the existing array into a planner by adding columns equivalent to the project length. To include the user-entered details, we will add 3 to the column number. Finally, we will include a header that prompts the user to enter daily tasks in each column. The formula will be as follows.
=EXPAND(A3:C3,,DAYS(C3,B3)+3,"Enter Daily Task")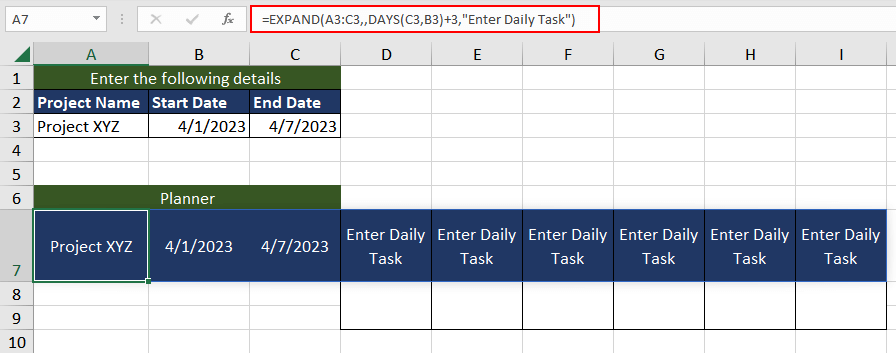
Now we have a dynamic planner to plan the project better at a user level.
EXPAND function is a versatile function in Excel and having it in your toolkit can significantly enhance your productivity. Practice and discover new ways to use it, while we bring to you another informational Excel function.


